


Creating a Resource Type, Part 3: Presentation
A Basic Presentation Pipeline
Now the Lenya web application can create new person documents, but it won't be able to render them as HTML pages (or anything else) yet. In our resource type declaration we specified the format xhtml. According to this specification, we'll setup a basic presentation pipeline which converts our FoaF XML document to XHTML.
First we'll add the sitemap ($MODULE_HOME/sitemap.xmap). Note that some lines have been wrapped (marked with backslashes):
<?xml version="1.0" encoding="UTF-8"?>
<map:sitemap xmlns:map="http://apache.org/cocoon/sitemap/1.0">
  <map:pipelines>
    <map:pipeline>

      <!-- {format}.xml -->
      <map:match pattern="*.xml">
        <map:generate src="cocoon:/{1}.xml/{page-envelope:publication-id}/ \
          {page-envelope:area}/{page-envelope:document-uuid}/ \
          {page-envelope:document-language}"/>
        <map:serialize type="xml"/>
      </map:match>

      <!-- {format}.xml/{pubId}/{area}/{uuid}/{language} -->
      <map:match pattern="*.xml/*/*/*/*">
        <map:generate src="lenya-document:{4},lang={5}{link:rev}"/>
        <map:transform src="fallback://lenya/modules/person/xslt/foaf2xhtml.xsl"/>
        <map:serialize type="xml"/>
      </map:match>

      <!-- The icon for person nodes in the sitetree. -->
      <map:match pattern="icon/*/*/*/*">
        <map:read src="fallback://lenya/modules/person/resources/icons/person.gif"/>
      </map:match>

    </map:pipeline>
  </map:pipelines>
</map:sitemap>
The sitemap uses an XSLT stylesheet $MODULE_HOME/xslt/foaf2xhtml.xsl to render the XHTML view of the FoaF file:
<?xml version="1.0" encoding="UTF-8"?>
<xsl:stylesheet version="1.0"
  xmlns:xsl="http://www.w3.org/1999/XSL/Transform"
  xmlns:rdf="http://www.w3.org/1999/02/22-rdf-syntax-ns#"
  xmlns:foaf="http://xmlns.com/foaf/0.1/"
  xmlns="http://www.w3.org/1999/xhtml">

  <xsl:template match="rdf:RDF">
    <html>
      <body>
        <div id="body">
          <xsl:apply-templates select="foaf:Person"/>
        </div>
      </body>
    </html>
  </xsl:template>

  <xsl:template match="foaf:Person">
    <h2>Person Details</h2>
    <table class="person">
      <tr>
        <th>Title:</th>
        <td><xsl:value-of select="foaf:title"/></td>
      </tr>
      <tr>
        <th>Given name:</th>
        <td><xsl:value-of select="foaf:givenname"/></td>
      </tr>
      <tr>
        <th>Family name:</th>
        <td><xsl:value-of select="foaf:family_name"/></td>
      </tr>
      <tr>
        <th>E-Mail:</th>
        <td>
          <xsl:variable name="mbox" select="foaf:mbox/@rdf:resource"/>
          <a href="{$mbox}">
            <xsl:value-of select="substring-after($mbox, 'mailto:')"/>
          </a>
        </td>
      </tr>
      <tr>
        <th>Phone:</th>
        <td>
          <xsl:variable name="phone" select="foaf:phone/@rdf:resource"/>
          <xsl:value-of select="substring-after($phone, 'tel:')"/>
        </td>
      </tr>
      <tr>
        <th>Homepage:</th>
        <td>
          <xsl:variable name="homepage" select="foaf:workplaceHomepage/@rdf:resource"/>
          <a href="{$homepage}"><xsl:value-of select="$homepage"/></a>
        </td>
      </tr>
    </table>
  </xsl:template>

</xsl:stylesheet>
Adding the CSS
The default publication allows to add custom CSS files for each resource type. We want to style our table headers a bit, so we add the file pubs/default/resources/shared/css/person.css with the following content:
table.person { font-size: small; }
table.person th {
  font-weight: normal;
  color: #999999;
  text-align: left;
  padding-right: 1em;
}
Creating our First Person Document
Now it's time to check out if everything works as expected. First, we build the Lenya web application to deploy our new resource type. If Lenya is running, shut it down. Go to $LENYA_HOME and execute
./build.sh
When the build has finished, start the Jetty server:
./lenya.sh
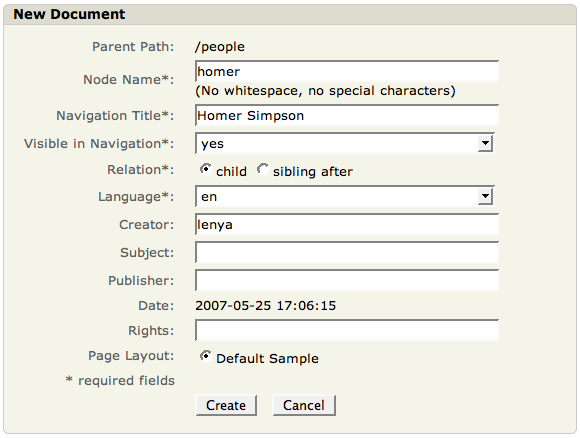
Now go to http://localhost:8888/default/authoring/index.html and log in as user "lenya". The File menu should now contain an item New Person Document. But before creating person documents, we'll add a new top level XHTML document People:
- File -> New XHTML Document
- Node Name: people
- Navigation Title: People
You end up on the People page. Now you can create a new person document as a child of this document by selecting the New Person Document menu item:
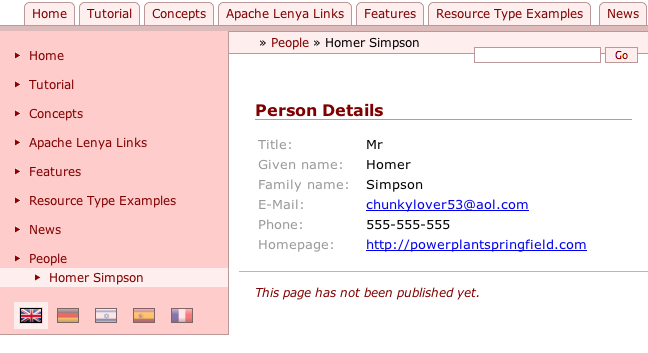
After hitting OK, you're redirected to the newly created person document:
In the next section we'll make our person documents editable.