|
Main
User's Guide
Administrator's Guide
Programmer's Corner
|
| Introduction |
There are some things this HOWTO will not cover. First, this HOWTO will not explain how to use the Eclipse IDE. A book that I highly recommend is
The Java Developer's Guide to Eclipse
Second, this HOWTO will not cover Tomcat, Ant, CVS, or any related tools required to build Slide from source code. Finally, this HOWTO will not explain how to build using a previous version of
the Java Developer's Kit.
Here are the necessary steps:
- Set up a CVS respository link to the Jakarta Slide source code
- Checkout the Slide source code
- Download the required third-party libraries:
- JDOM
- Java Transaction API
- Servlet 2.3
- Jakarta Commons HTTP Client
- Java Management Extension (JMX)
- Catalina components (Jakarta Tomcat version 4.1)
- Log4J
- Modify build.xml to use the new libraries
- Build Jakarta Slide
- Create a new Tomcat project
- Copy the built Slide libraries into the WEB-INF/lib folder in your new Tomcat project
- Copy the Domain.xml and web.xml files from the Slide source folder
- Associate the Slide libraries and source folder in your new Tomcat project
- Modify the web.xml file
- Update application context in server.xml
- Set breakpoints and start Tomcat
|
| Checkout the Slide source code |
After you have the CVS repository link set up, you'll need to checkout a particular version of the source tree. In this example we will use the 1.0.16 tagged version of Slide.
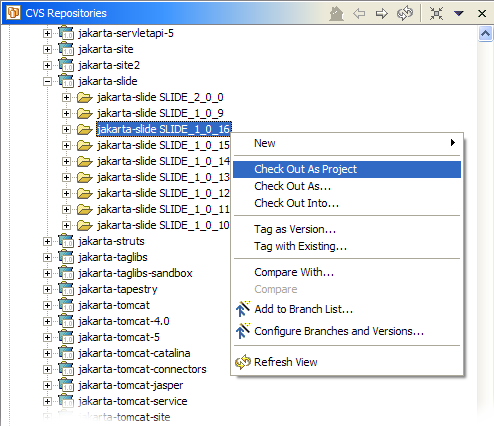
First, open the Jakarta CVS repository and select the Versions subtree:

Locate the project labeled jakarta-slide, right-click on the label, and select Configure Branches and Versions from the context menu. The following window should appear:

In the Browse files for tags section, choose the .cvsignore file, then press the Add Selected Files button. You should see a list of tags appear in the
New tags found in the selected files section. Pressing the Ok button will return you to the Versions subtree of the CVS perspective:

Select the SLIDE_1_0_16 (version 1.0.16) child of the version list, right-click, and choose Check out as Project from the context menu. The source code will then be downloaded
to your computer.
|
| Download and install the required third-party libraries |
You must install the following third-party libraries before building Slide:
Download each of the packages from the above links, and place the following JAR files in your jakarta-slide/lib folder:
- JDOM -
jdom.jar
- Java Transaction API -
jta.jar
- Servlet 2.3 -
servlet.jar
- Jakarta Commons HTTP Client -
commons-httpclient.jar
- Java Management Extension (JMX) -
jmxri.jar
- Catalina components -
naming-common.jar, naming-resources.jar, catalina.jar
- Log4J -
log4j.jar (you will need to rename the log4j-1.2.8.jar file)
|
| Modify build.xml to use the new libraries |
The Ant build.xml file must be modified to point at the third-party libraries. Change the following property entries:
| Property Name |
Old Value |
New Value |
| servlet.jar |
${servletapi.home}/lib/servlet.jar |
./lib/servlet.jar |
| jmx.jar |
${jmx.home}/lib/jmxri.jar |
./lib/jmxri.jar |
| naming.jar |
${catalina.dist}/common/lib/naming-common.jar |
./lib/naming-common.jar |
| resources.jar |
${catalina.dist}/common/lib/naming-resources.jar |
./lib/naming-resources.jar |
| catalina.jar |
${catalina.dist}/server/lib/catalina.jar |
./lib/catalina.jar |
You will also need to remove some of the commands from the build.xml file so the build does not fail.
Remove the following lines:
<copy todir="${slide.dist}/slide/lib" file="${jaxp.jar}" />
<copy todir="${slide.dist}/slide/lib" file="${xmlapi.jar}" />
<copy todir="${slide.dist}/slide/lib" file="${xmlparser.jar}" />
<copy todir="${webdavclient.dist}/lib" file="${jaxp.jar}" />
<copy todir="${webdavclient.dist}/lib" file="${xmlapi.jar}" />
|
| Build Jakarta Slide |
Now you are ready to build the Slide libraries. From the terminal, type ant dist, and the build should run successfully.
The files you'll need are in the jakarta-slide/dist/slide/lib folder:
- slide-kernel.jar
- slide-roles.jar
- slide-stores.jar
- slide-webdavservlet.jar
|
| Create a new Tomcat project |
Start by creating a new Tomcat project in Eclipse:

After you finish the project create sequence, your Eclipse workspace you should have a new project folder. In that folder is a directory called WEB-INF that contains the directory structure for your web application.
|
| Associate the Slide libraries and source folder in your new Tomcat project |
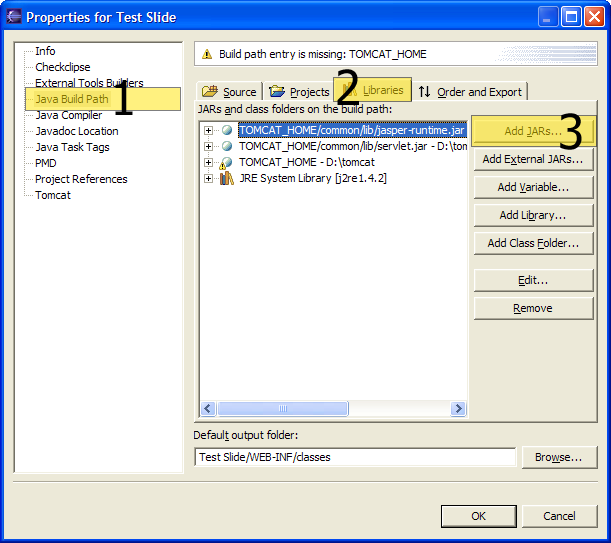
In Eclipse, open the project preferences by right-clicking the project folder and selecting properties. Select Java Build Path, Libraries, and Add Jars:

Open your project from the list and twiddle down to WEB-INF/lib and select the four libraries you copied in the previous task. Press Ok to return to the project preferences, then
press Ok to return back to the Eclipse IDE.
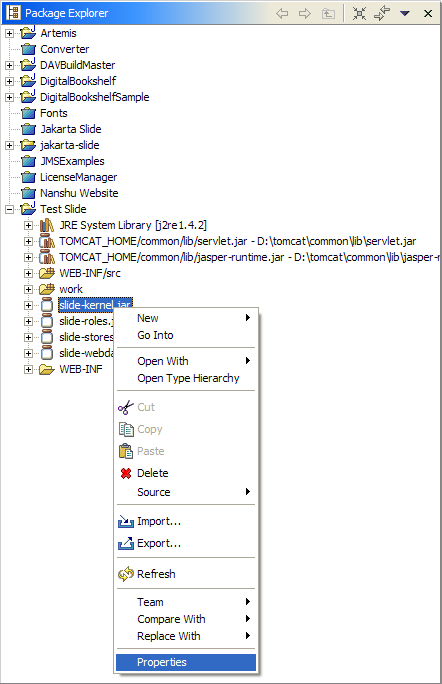
Next you'll want to associate the source folders of Slide with the libraries you just installed. From the project pane, right-click on slide-kernel.jar and choose properties from the
context menu:

From the Properties for slide-kernel.jar, choose Java Source Attachment and Workspace. A new window should appear labeled Source Location Selection.
Choose the src folder beneath the jakarta-slide project folder:

Press Ok to return to the Properties for slide-kernel.jar, then press Ok again to return back to the Eclipse IDE. Now the icon for the slide-kernel.jar
should look different:

Repeat the same steps for the remaining three jar files.
|
| Modify the web.xml file |
Open the web.xml file in Eclipse and look for the Servlet init-param domain. The current value should read: /Domain.xml. Change that value to /WEB-INF/Domain.xml
and save the file.
|
| Set breakpoints and start Tomcat |
Now set whatever breakpoints you want in the WebDAV servlet (org.apache.slide.webdav.WebdavServlet), then start the Tomcat container by selecting Tomcat --->Start Tomcat.
You are now running the server portion of Slide within Eclipse and the Eclipse Java debugger.
|
|


