- 18.0 Introduction
- 18.1 Samplers
- FTP Request
- HTTP Request
- JDBC Request
- Java Request
- SOAP/XML-RPC Request
- WebService(SOAP) Request (DEPRECATED)
- LDAP Request
- LDAP Extended Request
- Access Log Sampler
- BeanShell Sampler
- BSF Sampler
- JSR223 Sampler
- TCP Sampler
- JMS Publisher
- JMS Subscriber
- JMS Point-to-Point
- JUnit Request
- Mail Reader Sampler
- Test Action
- SMTP Sampler
- OS Process Sampler
- MongoDB Script
- 18.2 Logic Controllers
- Simple Controller
- Loop Controller
- Once Only Controller
- Interleave Controller
- Random Controller
- Random Order Controller
- Throughput Controller
- Runtime Controller
- If Controller
- While Controller
- Switch Controller
- ForEach Controller
- Module Controller
- Include Controller
- Transaction Controller
- Recording Controller
- Critical Section Controller
- 18.3 Listeners
- Sample Result Save Configuration
- Graph Results
- Spline Visualizer
- Assertion Results
- View Results Tree
- Aggregate Report
- View Results in Table
- Simple Data Writer
- Monitor Results
- Distribution Graph (alpha)
- Aggregate Graph
- Response Time Graph
- Mailer Visualizer
- BeanShell Listener
- Summary Report
- Save Responses to a file
- BSF Listener
- JSR223 Listener
- Generate Summary Results
- Comparison Assertion Visualizer
- Backend Listener
- 18.4 Configuration Elements
- CSV Data Set Config
- FTP Request Defaults
- DNS Cache Manager
- HTTP Authorization Manager
- HTTP Cache Manager
- HTTP Cookie Manager
- HTTP Request Defaults
- HTTP Header Manager
- Java Request Defaults
- JDBC Connection Configuration
- Keystore Configuration
- Login Config Element
- LDAP Request Defaults
- LDAP Extended Request Defaults
- TCP Sampler Config
- User Defined Variables
- Random Variable
- Counter
- Simple Config Element
- MongoDB Source Config
- 18.5 Assertions
- 18.6 Timers
- 18.7 Pre Processors
- 18.8 Post-Processors
- 18.9 Miscellaneous Features
18.0 Introduction
18.1 Samplers
Samplers perform the actual work of JMeter. Each sampler (except Test Action) generates one or more sample results. The sample results have various attributes (success/fail, elapsed time, data size etc) and can be viewed in the various listeners.
FTP Request
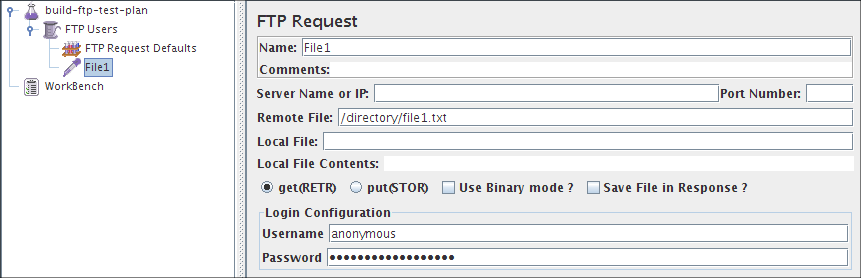
Latency is set to the time it takes to login (versions of JMeter after 2.3.1).
Parameters 
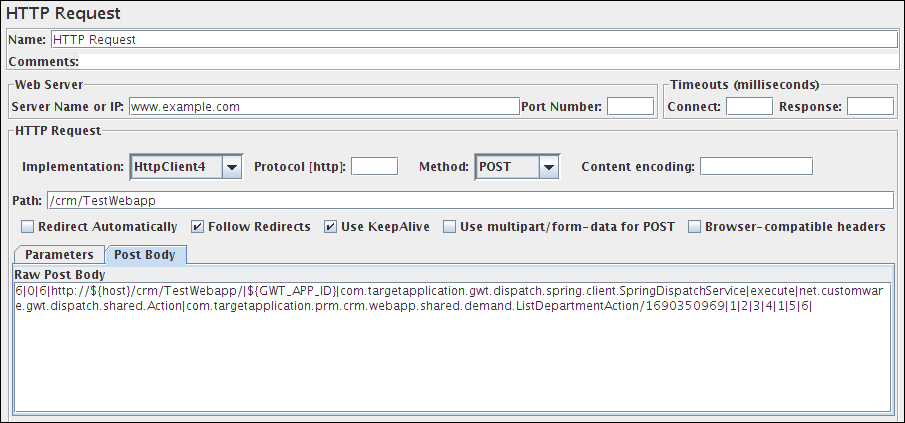
HTTP Request
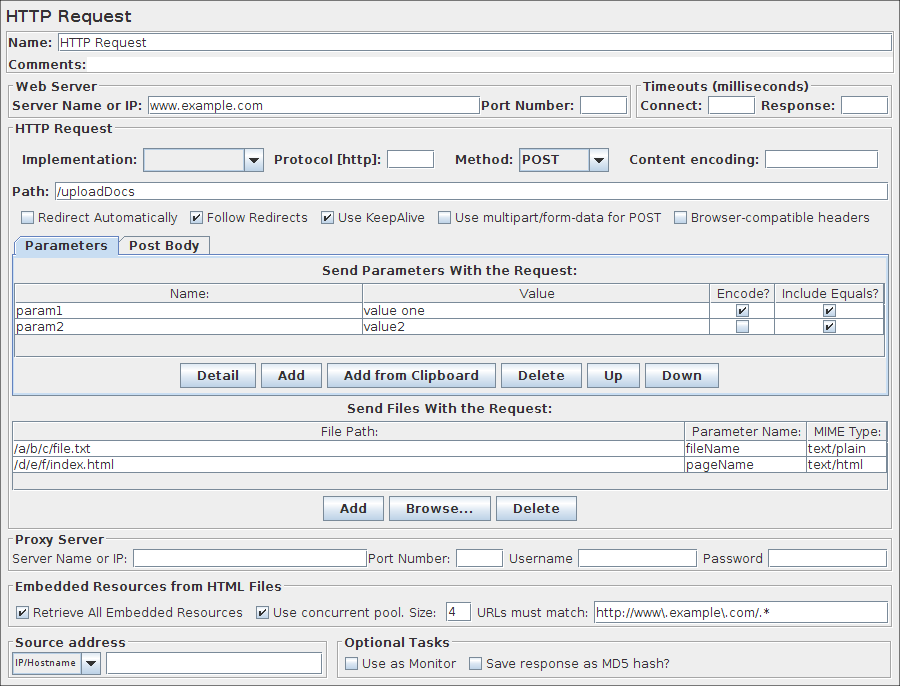
This sampler lets you send an HTTP/HTTPS request to a web server. It also lets you control whether or not JMeter parses HTML files for images and other embedded resources and sends HTTP requests to retrieve them. The following types of embedded resource are retrieved:
- images
- applets
- stylesheets
- external scripts
- frames, iframes
- background images (body, table, TD, TR)
- background sound
The default parser is htmlparser. This can be changed by using the property "htmlparser.classname" - see jmeter.properties for details.
If you are going to send multiple requests to the same web server, consider using an HTTP Request Defaults Configuration Element so you do not have to enter the same information for each HTTP Request.
Or, instead of manually adding HTTP Requests, you may want to use JMeter's HTTP(S) Test Script Recorder to create them. This can save you time if you have a lot of HTTP requests or requests with many parameters.
There are two different test elements used to define the samplers:
- AJP/1.3 Sampler - uses the Tomcat mod_jk protocol (allows testing of Tomcat in AJP mode without needing Apache httpd) The AJP Sampler does not support multiple file upload; only the first file will be used.
- HTTP Request - this has an implementation drop-down box, which selects the HTTP protocol implementation to be used:
- Java - uses the HTTP implementation provided by the JVM. This has some limitations in comparison with the HttpClient implementations - see below.
- HTTPClient3.1 - uses Apache Commons HttpClient 3.1. This is no longer being developed, and support for this may be dropped in a future JMeter release.
- HTTPClient4 - uses Apache HttpComponents HttpClient 4.x.
- Blank Value - does not set implementation on HTTP Samplers, so relies on HTTP Request Defaults if present or on jmeter.httpsampler property defined in jmeter.properties
The Java HTTP implementation has some limitations:
- There is no control over how connections are re-used. When a connection is released by JMeter, it may or may not be re-used by the same thread.
- The API is best suited to single-threaded usage - various settings are defined via system properties, and therefore apply to all connections.
- There is a bug in the handling of HTTPS via a Proxy (the CONNECT is not handled correctly). See Java bugs 6226610 and 6208335.
- It does not support virtual hosts.
- It does not support the following methods: COPY, LOCK, MKCOL, MOVE, PATCH, PROPFIND, PROPPATCH, UNLOCK, REPORT, MKCALENDAR.
- It does not support client based certificate testing with Keystore Config.
Note: the FILE protocol is intended for testing purposes only. It is handled by the same code regardless of which HTTP Sampler is used.
If the request requires server or proxy login authorization (i.e. where a browser would create a pop-up dialog box), you will also have to add an HTTP Authorization Manager Configuration Element. For normal logins (i.e. where the user enters login information in a form), you will need to work out what the form submit button does, and create an HTTP request with the appropriate method (usually POST) and the appropriate parameters from the form definition. If the page uses HTTP, you can use the JMeter Proxy to capture the login sequence.
In versions of JMeter up to 2.2, only a single SSL context was used for all threads and samplers. This did not generate the proper load for multiple users. A separate SSL context is now used for each thread. To revert to the original behaviour, set the JMeter property:
https.sessioncontext.shared=trueBy default, the SSL context is retained for the duration of the test. In versions of JMeter from 2.5.1, the SSL session can be optionally reset for each test iteration. To enable this, set the JMeter property:
https.use.cached.ssl.context=falseNote: this does not apply to the Java HTTP implementation.
JMeter defaults to the SSL protocol level TLS. If the server needs a different level, e.g. SSLv3, change the JMeter property, for example:
https.default.protocol=SSLv3
JMeter also allows one to enable additional protocols, by changing the property https.socket.protocols.
If the request uses cookies, then you will also need an HTTP Cookie Manager. You can add either of these elements to the Thread Group or the HTTP Request. If you have more than one HTTP Request that needs authorizations or cookies, then add the elements to the Thread Group. That way, all HTTP Request controllers will share the same Authorization Manager and Cookie Manager elements.
If the request uses a technique called "URL Rewriting" to maintain sessions, then see section 6.1 Handling User Sessions With URL Rewriting for additional configuration steps.
Parameters 
"Redirect requested but followRedirects is disabled"
This can be ignored.
In versions after 2.3.4, JMeter will collapse paths of the form '/../segment' in both absolute and relative redirect URLs. For example http://host/one/../two => http://host/two. If necessary, this behaviour can be suppressed by setting the JMeter property httpsampler.redirect.removeslashdotdot=false
Additionally, you can specify whether each parameter should be URL encoded. If you are not sure what this means, it is probably best to select it. If your values contain characters such as the following then encoding is usually required.:
- ASCII Control Chars
- Non-ASCII characters
- Reserved characters:URLs use some characters for special use in defining their syntax. When these characters are not used in their special role inside a URL, they need to be encoded, example : '$', '&', '+', ',' , '/', ':', ';', '=', '?', '@'
- Unsafe characters: Some characters present the possibility of being misunderstood within URLs for various reasons. These characters should also always be encoded, example : ' ', '<', '>', '#', '%', ...
If it is a POST or PUT or PATCH request and there is a single file whose 'Parameter name' attribute (below) is omitted, then the file is sent as the entire body of the request, i.e. no wrappers are added. This allows arbitrary bodies to be sent. This functionality is present for POST requests after version 2.2, and also for PUT requests after version 2.3. See below for some further information on parameter handling.
To distinguish the source address value, select the type of these:
- Select IP/Hostname to use a specific IP address or a (local) hostname
- Select Device to pick the first available address for that interface which this may be either IPv4 or IPv6
- Select Device IPv4To select the IPv4 address of the device name (like eth0, lo, em0, etc.)
- Select Device IPv6To select the IPv6 address of the device name (like eth0, lo, em0, etc.)
This property is used to enable IP Spoofing. It override the default local IP address for this sample. The JMeter host must have multiple IP addresses (i.e. IP aliases, network interfaces, devices). The value can be a host name, IP address, or a network interface device such as "eth0" or "lo" or "wlan0".
If the property httpclient.localaddress is defined, that is used for all HttpClient requests.
N.B. when using Automatic Redirection, cookies are only sent for the initial URL. This can cause unexpected behaviour for web-sites that redirect to a local server. E.g. if www.example.com redirects to www.example.co.uk. In this case the server will probably return cookies for both URLs, but JMeter will only see the cookies for the last host, i.e. www.example.co.uk. If the next request in the test plan uses www.example.com, rather than www.example.co.uk, it will not get the correct cookies. Likewise, Headers are sent for the initial request, and won't be sent for the redirect. This is generally only a problem for manually created test plans, as a test plan created using a recorder would continue from the redirected URL.
Parameter Handling:
For the POST and PUT method, if there is no file to send, and the name(s) of the parameter(s) are omitted,
then the body is created by concatenating all the value(s) of the parameters.
Note that the values are concatenated without adding any end-of-line characters.
These can be added by using the __char() function in the value fields.
This allows arbitrary bodies to be sent.
The values are encoded if the encoding flag is set (versions of JMeter after 2.3).
See also the MIME Type above how you can control the content-type request header that is sent.
For other methods, if the name of the parameter is missing,
then the parameter is ignored. This allows the use of optional parameters defined by variables.
(versions of JMeter after 2.3)
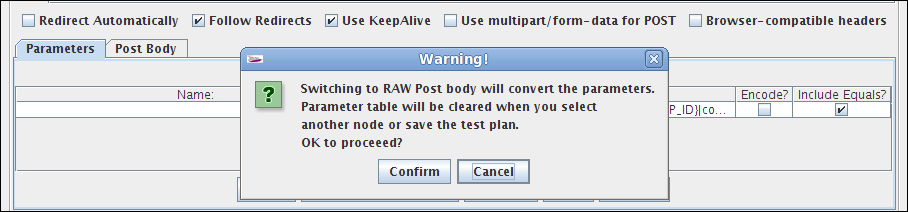
Since JMeter 2.6, you have the option to switch to Post Body when a request has only unnamed parameters (or no parameters at all). This option is useful in the following cases (amongst others):
- GWT RPC HTTP Request
- JSON REST HTTP Request
- XML REST HTTP Request
- SOAP HTTP Request
In Post Body mode, each line will be sent with CRLF appended, apart from the last line. To send a CRLF after the last line of data, just ensure that there is an empty line following it. (This cannot be seen, except by noting whether the cursor can be placed on the subsequent line.)
Method Handling:
The POST, PUT and PATCH request methods work similarly, except that the PUT and PATCH methods do not support multipart requests
or file upload.
The PUT and PATCH method body must be provided as one of the following:
- define the body as a file with empty Parameter name field; in which case the MIME Type is used as the Content-Type
- define the body as parameter value(s) with no name
- use the Post Body tab
Upto and including JMeter 2.1.1, only responses with the content-type "text/html" were scanned for embedded resources. Other content-types were assumed to be something other than HTML. JMeter 2.1.2 introduces the a new property HTTPResponse.parsers, which is a list of parser ids, e.g. htmlParser and wmlParser. For each id found, JMeter checks two further properties:
- id.types - a list of content types
- id.className - the parser to be used to extract the embedded resources
See jmeter.properties file for the details of the settings. If the HTTPResponse.parser property is not set, JMeter reverts to the previous behaviour, i.e. only text/html responses will be scanned
Emulating slow connections:HttpClient31, HttpClient4 and Java Sampler support emulation of slow connections; see the following entries in jmeter.properties:
# Define characters per second > 0 to emulate slow connections
#httpclient.socket.http.cps=0
#httpclient.socket.https.cps=0
Response size calculation
Optional properties to allow change the method to get response size:
- Gets the real network size in bytes for the body response
sampleresult.getbytes.body_real_size=true
- Add HTTP headers to full response size
sampleresult.getbytes.headers_size=true
The HttpClient4 implementation does include the overhead in the response body size, so the value may be greater than the number of bytes in the response content.
To return to settings before version 2.5, set the two properties to false.
Retry handling
In version 2.5 of JMeter, the HttpClient4 and Commons HttpClient 3.1 samplers used the default retry count, which was 3.
In later versions, the retry count has been set to 1, which is what the Java implementation appears to do.
The retry count can be overridden by setting the relevant JMeter property, for example:
httpclient4.retrycount=3
httpclient3.retrycount=3
Note: Certificates does not conform to algorithm constraints
You may encounter the following error: java.security.cert.CertificateException: Certificates does not conform to algorithm constraints
if you run a HTTPS request on a web site with a SSL certificate (itself or one of SSL certificates in its chain of trust) with a signature
algorithm using MD2 (like md2WithRSAEncryption) or with a SSL certificate with a size lower than 1024 bits.
This error is related to increased security in Java 7 version u16 (MD2) and version u40 (Certificate size lower than 1024 bits), and Java 8 too.
To allow you to perform your HTTPS request, you can downgrade the security of your Java installation by editing the Java jdk.certpath.disabledAlgorithms property. Remove the MD2 value or the constraint on size, depending on your case.
This property is in this file:
JAVA_HOME/jre/lib/security/java.securitySee Bug 56357 for details.
JDBC Request
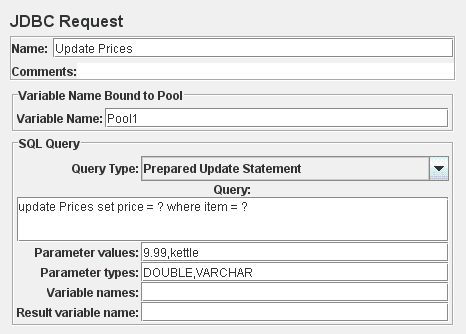
This sampler lets you send an JDBC Request (an SQL query) to a database.
Before using this you need to set up a JDBC Connection Configuration Configuration element
If the Variable Names list is provided, then for each row returned by a Select statement, the variables are set up with the value of the corresponding column (if a variable name is provided), and the count of rows is also set up. For example, if the Select statement returns 2 rows of 3 columns, and the variable list is A,,C, then the following variables will be set up:
A_#=2 (number of rows)
A_1=column 1, row 1
A_2=column 1, row 2
C_#=2 (number of rows)
C_1=column 3, row 1
C_2=column 3, row 2
If the Select statement returns zero rows, then the A_# and C_# variables would be set to 0, and no other variables would be set.
Old variables are cleared if necessary - e.g. if the first select retrieves 6 rows and a second select returns only 3 rows, the additional variables for rows 4, 5 and 6 will be removed.
Note: The latency time is set from the time it took to acquire a connection.
Parameters 
- Select Statement
- Update Statement - use this for Inserts and Deletes as well
- Callable Statement
- Prepared Select Statement
- Prepared Update Statement - use this for Inserts and Deletes as well
- Commit
- Rollback
- Autocommit(false)
- Autocommit(true)
- Edit - this should be a variable reference that evaluates to one of the above
- select * from t_customers where id=23
- CALL SYSCS_UTIL.SYSCS_EXPORT_TABLE (null,?, ?, null, null, null)
- Parameter values: tablename,filename
- Parameter types: VARCHAR,VARCHAR
The second example assumes you are using Apache Derby.
The list must be enclosed in double-quotes if any of the values contain a comma or double-quote, and any embedded double-quotes must be doubled-up, for example:
"Dbl-Quote: "" and Comma: ,"
These are defined as fields in the class java.sql.Types, see for example:
Javadoc for java.sql.Types.
[Note: JMeter will use whatever types are defined by the runtime JVM, so if you are running on a different JVM, be sure to check the appropriate document]
If the callable statement has INOUT or OUT parameters, then these must be indicated by prefixing the appropriate parameter types, e.g. instead of "INTEGER", use "INOUT INTEGER".
If not specified, "IN" is assumed, i.e. "DATE" is the same as "IN DATE".
If the type is not one of the fields found in java.sql.Types, versions of JMeter after 2.3.2 also accept the corresponding integer number, e.g. since OracleTypes.CURSOR == -10, you can use "INOUT -10".
There must be as many types as there are placeholders in the statement.
columnValue = vars.getObject("resultObject").get(0).get("Column Name");
- Store As String (default) - All variables on Variable Names list are stored as strings, will not iterate through a ResultSets when present on the list.
- Store As Object - Variables of ResultSet type on Variables Names list will be stored as Object and can be accessed in subsequent tests/scripts and iterated, will not iterate through the ResultSet
- Count Records - Variables of ResultSet types will be iterated through showing the count of records as result. Variables will be stored as Strings.
Java Request
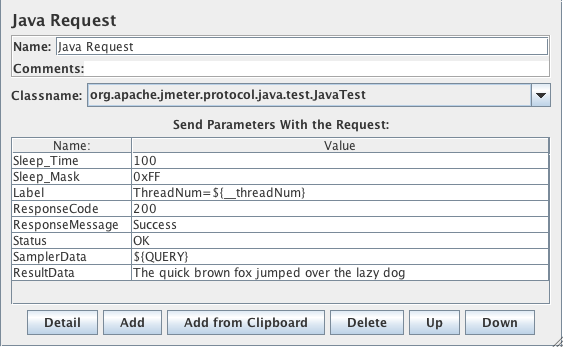
This sampler lets you control a java class that implements the org.apache.jmeter.protocol.java.sampler.JavaSamplerClient interface. By writing your own implementation of this interface, you can use JMeter to harness multiple threads, input parameter control, and data collection.
The pull-down menu provides the list of all such implementations found by JMeter in its classpath. The parameters can then be specified in the table below - as defined by your implementation. Two simple examples (JavaTest and SleepTest) are provided.
The JavaTest example sampler can be useful for checking test plans, because it allows one to set values in almost all the fields. These can then be used by Assertions, etc. The fields allow variables to be used, so the values of these can readily be seen.
Parameters 
The following parameters apply to the SleepTest and JavaTest implementations:
Parameters 
The sleep time is calculated as follows:
totalSleepTime = SleepTime + (System.currentTimeMillis() % SleepMask)
The following parameters apply additionaly to the JavaTest implementation:
Parameters 
SOAP/XML-RPC Request
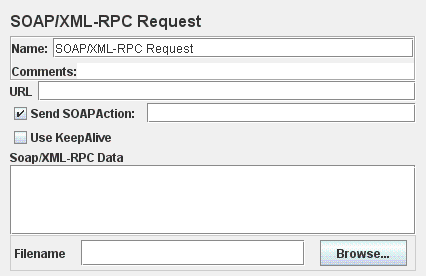
This sampler lets you send a SOAP request to a webservice. It can also be used to send XML-RPC over HTTP. It creates an HTTP POST request, with the specified XML as the POST content. To change the "Content-type" from the default of "text/xml", use a HeaderManager. Note that the sampler will use all the headers from the HeaderManager. If a SOAP action is specified, that will override any SOAPaction in the HeaderManager. The primary difference between the soap sampler and webservice sampler, is the soap sampler uses raw post and does not require conformance to SOAP 1.1.
For screen input, it now always uses the size of the data.
File input uses the file length as determined by Java.
On some OSes this may not work for all files, in which case add a child Header Manager with Content-Length set to the actual length of the file.
Or set Content-Length to -1 to force chunked encoding.
Parameters 
WebService(SOAP) Request (DEPRECATED)
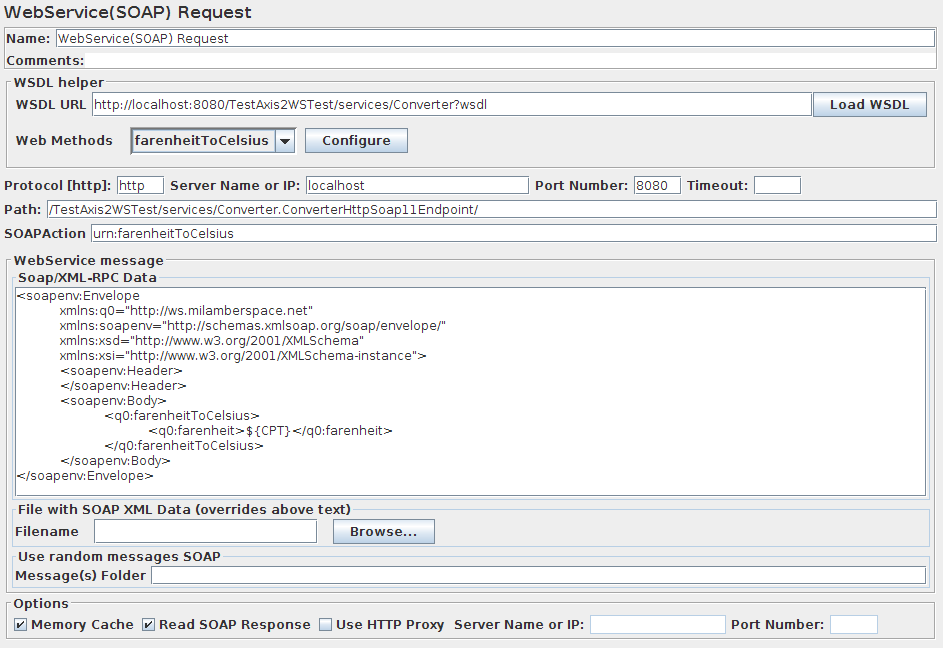
This sampler has been tested with IIS Webservice running .NET 1.0 and .NET 1.1. It has been tested with SUN JWSDP, IBM webservices, Axis and gSoap toolkit for C/C++. The sampler uses Apache SOAP driver to serialize the message and set the header with the correct SOAPAction. Right now the sampler doesn't support automatic WSDL handling, since Apache SOAP currently does not provide support for it. Both IBM and SUN provide WSDL drivers. There are 3 options for the post data: text area, external file, or directory. If you want the sampler to randomly select a message, use the directory. Otherwise, use the text area or a file. The if either the file or path are set, it will not use the message in the text area. If you need to test a soap service that uses different encoding, use the file or path. If you paste the message in to text area, it will not retain the encoding and will result in errors. Save your message to a file with the proper encoding, and the sampler will read it as java.io.FileInputStream.
An important note on the sampler is it will automatically use the proxy host and port passed to JMeter from command line, if those fields in the sampler are left blank. If a sampler has values in the proxy host and port text field, it will use the ones provided by the user. This behavior may not be what users expect.
By default, the webservice sampler sets SOAPHTTPConnection.setMaintainSession (true). If you need to maintain the session, add a blank Header Manager. The sampler uses the Header Manager to store the SOAPHTTPConnection object, since the version of apache soap does not provide a easy way to get and set the cookies.
Note: If you are using CSVDataSet, do not check "Memory Cache". If memory cache is checked, it will not iterate to the next value. That means all the requests will use the first value.
Make sure you use <soap:Envelope rather than <Envelope. For example:
<?xml version="1.0" encoding="utf-8"?>
<soap:Envelope
xmlns:xsi="http://www.w3.org/2001/XMLSchema-instance"
xmlns:xsd="http://www.w3.org/2001/XMLSchema"
xmlns:soap="http://schemas.xmlsoap.org/soap/envelope/">
<soap:Body>
<foo xmlns="http://clients-xlmns"/>
</soap:Body>
</soap:Envelope>
Parameters 
LDAP Request
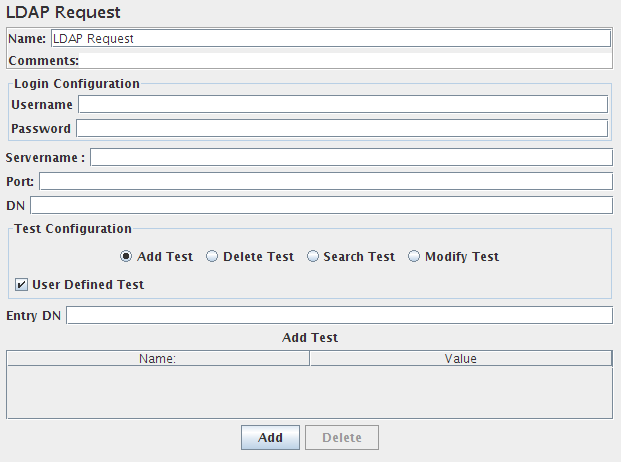
If you are going to send multiple requests to the same LDAP server, consider using an LDAP Request Defaults Configuration Element so you do not have to enter the same information for each LDAP Request.
The same way the Login Config Element also using for Login and password.There are two ways to create test cases for testing an LDAP Server.
- Inbuilt Test cases.
- User defined Test cases.
There are four test scenarios of testing LDAP. The tests are given below:
- Add Test
- Inbuilt test :
This will add a pre-defined entry in the LDAP Server and calculate the execution time. After execution of the test, the created entry will be deleted from the LDAP Server.
- User defined test :
This will add the entry in the LDAP Server. User has to enter all the attributes in the table.The entries are collected from the table to add. The execution time is calculated. The created entry will not be deleted after the test.
- Modify Test
- Inbuilt test :
This will create a pre-defined entry first, then will modify the created entry in the LDAP Server.And calculate the execution time. After execution of the test, the created entry will be deleted from the LDAP Server.
- User defined test
This will modify the entry in the LDAP Server. User has to enter all the attributes in the table. The entries are collected from the table to modify. The execution time is calculated. The entry will not be deleted from the LDAP Server.
- Search Test
- Inbuilt test :
This will create the entry first, then will search if the attributes are available. It calculates the execution time of the search query. At the end of the execution,created entry will be deleted from the LDAP Server.
- User defined test
This will search the user defined entry(Search filter) in the Search base (again, defined by the user). The entries should be available in the LDAP Server. The execution time is calculated.
- Delete Test
- Inbuilt test :
This will create a pre-defined entry first, then it will be deleted from the LDAP Server. The execution time is calculated.
- User defined test
This will delete the user-defined entry in the LDAP Server. The entries should be available in the LDAP Server. The execution time is calculated.
Parameters 
LDAP Extended Request
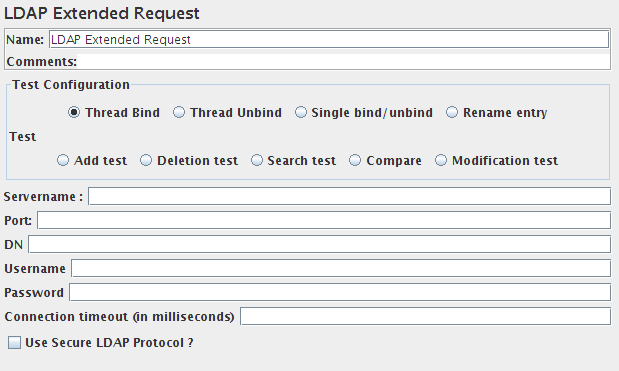
If you are going to send multiple requests to the same LDAP server, consider using an LDAP Extended Request Defaults Configuration Element so you do not have to enter the same information for each LDAP Request.
There are nine test operations defined. These operations are given below:
- Thread bind
- Thread unbind
- Single bind/unbind
- Rename entry
- Add test
- Delete test
- Search test
- Modification test
- Compare
Any LDAP request is part of an LDAP session, so the first thing that should be done is starting a session to the LDAP server. For starting this session a thread bind is used, which is equal to the LDAP "bind" operation. The user is requested to give a username (Distinguished name) and password, which will be used to initiate a session. When no password, or the wrong password is specified, an anonymous session is started. Take care, omitting the password will not fail this test, a wrong password will. (N.B. this is stored unencrypted in the test plan)
Parameters
This is simply the operation to end a session. It is equal to the LDAP "unbind" operation.
Parameters
This is a combination of the LDAP "bind" and "unbind" operations. It can be used for an authentication request/password check for any user. It will open an new session, just to check the validity of the user/password combination, and end the session again.
Parameters
This is the LDAP "moddn" operation. It can be used to rename an entry, but also for moving an entry or a complete subtree to a different place in the LDAP tree.
Parameters
This is the ldap "add" operation. It can be used to add any kind of object to the LDAP server.
Parameters
This is the LDAP "delete" operation, it can be used to delete an object from the LDAP tree
Parameters
This is the LDAP "search" operation, and will be used for defining searches.
Parameters
This is the LDAP "modify" operation. It can be used to modify an object. It can be used to add, delete or replace values of an attribute.
Parameters
This is the LDAP "compare" operation. It can be used to compare the value of a given attribute with some already known value. In reality this is mostly used to check whether a given person is a member of some group. In such a case you can compare the DN of the user as a given value, with the values in the attribute "member" of an object of the type groupOfNames. If the compare operation fails, this test fails with errorcode 49.
Parameters
Access Log Sampler
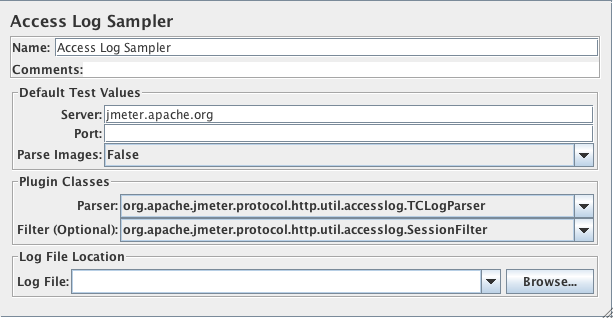
(Beta Code)
AccessLogSampler was designed to read access logs and generate http requests. For those not familiar with the access log, it is the log the webserver maintains of every request it accepted. This means every image, css file, javascript file, html file.... The current implementation is complete, but some features have not been enabled. There is a filter for the access log parser, but I haven't figured out how to link to the pre-processor. Once I do, changes to the sampler will be made to enable that functionality.
Tomcat uses the common format for access logs. This means any webserver that uses the common log format can use the AccessLogSampler. Server that use common log format include: Tomcat, Resin, Weblogic, and SunOne. Common log format looks like this:
127.0.0.1 - - [21/Oct/2003:05:37:21 -0500] "GET /index.jsp?%2Findex.jsp= HTTP/1.1" 200 8343
For the future, it might be nice to filter out entries that do not have a response code of 200. Extending the sampler should be fairly simple. There are two interfaces you have to implement:
- org.apache.jmeter.protocol.http.util.accesslog.LogParser
- org.apache.jmeter.protocol.http.util.accesslog.Generator
The current implementation of AccessLogSampler uses the generator to create a new HTTPSampler. The servername, port and get images are set by AccessLogSampler. Next, the parser is called with integer 1, telling it to parse one entry. After that, HTTPSampler.sample() is called to make the request.
samp = (HTTPSampler) GENERATOR.generateRequest();
samp.setDomain(this.getDomain());
samp.setPort(this.getPort());
samp.setImageParser(this.isImageParser());
PARSER.parse(1);
res = samp.sample();
res.setSampleLabel(samp.toString());
The required methods in LogParser are:
- setGenerator(Generator)
- parse(int)
Parameters 
The TCLogParser processes the access log independently for each thread. The SharedTCLogParser and OrderPreservingLogParser share access to the file, i.e. each thread gets the next entry in the log.
The SessionFilter is intended to handle Cookies across threads. It does not filter out any entries, but modifies the cookie manager so that the cookies for a given IP are processed by a single thread at a time. If two threads try to process samples from the same client IP address, then one will be forced to wait until the other has completed.
The LogFilter is intended to allow access log entries to be filtered by filename and regex, as well as allowing for the replacement of file extensions. However, it is not currently possible to configure this via the GUI, so it cannot really be used.
BeanShell Sampler
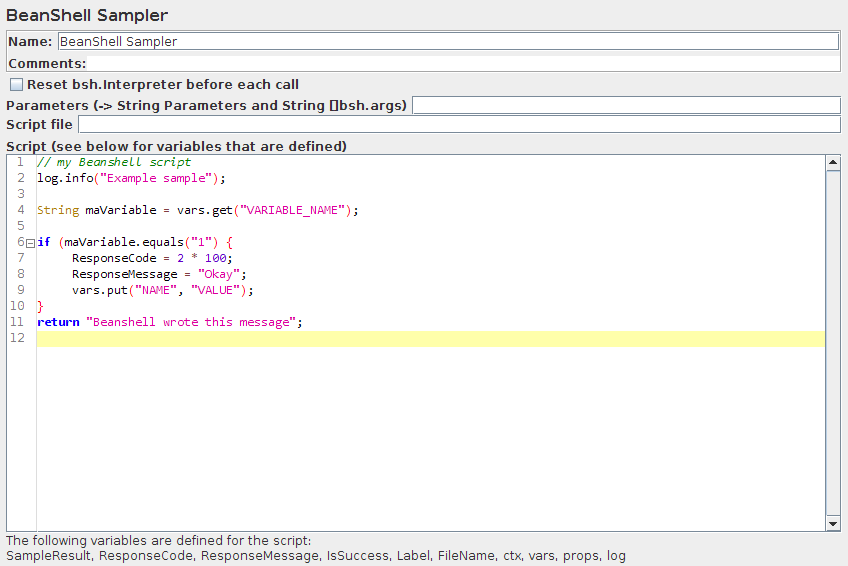
This sampler allows you to write a sampler using the BeanShell scripting language.
For full details on using BeanShell, please see the BeanShell website.
The test element supports the ThreadListener and TestListener interface methods. These must be defined in the initialisation file. See the file BeanShellListeners.bshrc for example definitions.
From JMeter version 2.5.1, the BeanShell sampler also supports the Interruptible interface. The interrupt() method can be defined in the script or the init file.
Parameters 
- Parameters - string containing the parameters as a single variable
- bsh.args - String array containing parameters, split on white-space
N.B. Each Sampler instance has its own BeanShell interpeter, and Samplers are only called from a single thread
If the property "beanshell.sampler.init" is defined, it is passed to the Interpreter as the name of a sourced file. This can be used to define common methods and variables. There is a sample init file in the bin directory: BeanShellSampler.bshrc.
If a script file is supplied, that will be used, otherwise the script will be used.
BeanShell does not currently support Java 5 syntax such as generics and the enhanced for loop.
Before invoking the script, some variables are set up in the BeanShell interpreter:
The contents of the Parameters field is put into the variable "Parameters". The string is also split into separate tokens using a single space as the separator, and the resulting list is stored in the String array bsh.args.
The full list of BeanShell variables that is set up is as follows:
- log - the Logger
- Label - the Sampler label
- FileName - the file name, if any
- Parameters - text from the Parameters field
- bsh.args - the parameters, split as described above
- SampleResult - pointer to the current SampleResult
- ResponseCode = 200
- ResponseMessage = "OK"
- IsSuccess = true
- ctx - JMeterContext
- vars - JMeterVariables - e.g. vars.get("VAR1"); vars.put("VAR2","value"); vars.remove("VAR3"); vars.putObject("OBJ1",new Object());
- props - JMeterProperties (class java.util.Properties)- e.g. props.get("START.HMS"); props.put("PROP1","1234");
When the script completes, control is returned to the Sampler, and it copies the contents of the following script variables into the corresponding variables in the SampleResult:
- ResponseCode - for example 200
- ResponseMessage - for example "OK"
- IsSuccess - true/false
The SampleResult ResponseData is set from the return value of the script. Since version 2.1.2, if the script returns null, it can set the response directly, by using the method SampleResult.setResponseData(data), where data is either a String or a byte array. The data type defaults to "text", but can be set to binary by using the method SampleResult.setDataType(SampleResult.BINARY).
The SampleResult variable gives the script full access to all the fields and methods in the SampleResult. For example, the script has access to the methods setStopThread(boolean) and setStopTest(boolean). Here is a simple (not very useful!) example script:
if (bsh.args[0].equalsIgnoreCase("StopThread")) {
    log.info("Stop Thread detected!");
    SampleResult.setStopThread(true);
}
return "Data from sample with Label "+Label;
//or, since version 2.1.2
SampleResult.setResponseData("My data");
return null;
Another example:
ensure that the property beanshell.sampler.init=BeanShellSampler.bshrc is defined in jmeter.properties.
The following script will show the values of all the variables in the ResponseData field:
return getVariables();
For details on the methods available for the various classes (JMeterVariables, SampleResult etc) please check the Javadoc or the source code. Beware however that misuse of any methods can cause subtle faults that may be difficult to find ...
BSF Sampler

This sampler allows you to write a sampler using a BSF scripting language.
See the Apache Bean Scripting Framework
website for details of the languages supported.
You may need to download the appropriate jars for the language; they should be put in the JMeter lib directory.
By default, JMeter supports the following languages:
- javascript
- jexl (JMeter version 2.3.2 and later)
- xslt
Parameters 
If a script file is supplied, that will be used, otherwise the script will be used.
Before invoking the script, some variables are set up. Note that these are BSF variables - i.e. they can be used directly in the script.
- log - the Logger
- Label - the Sampler label
- FileName - the file name, if any
- Parameters - text from the Parameters field
- args - the parameters, split as described above
- SampleResult - pointer to the current SampleResult
- sampler - pointer to current Sampler
- ctx - JMeterContext
- vars - JMeterVariables - e.g. vars.get("VAR1"); vars.put("VAR2","value"); vars.remove("VAR3"); vars.putObject("OBJ1",new Object());
- props - JMeterProperties (class java.util.Properties) - e.g. props.get("START.HMS"); props.put("PROP1","1234");
- OUT - System.out - e.g. OUT.println("message")
The SampleResult ResponseData is set from the return value of the script. If the script returns null, it can set the response directly, by using the method SampleResult.setResponseData(data), where data is either a String or a byte array. The data type defaults to "text", but can be set to binary by using the method SampleResult.setDataType(SampleResult.BINARY).
The SampleResult variable gives the script full access to all the fields and methods in the SampleResult. For example, the script has access to the methods setStopThread(boolean) and setStopTest(boolean).
Unlike the BeanShell Sampler, the BSF Sampler does not set the ResponseCode, ResponseMessage and sample status via script variables. Currently the only way to changes these is via the SampleResult methods:
- SampleResult.setSuccessful(true/false)
- SampleResult.setResponseCode("code")
- SampleResult.setResponseMessage("message")
JSR223 Sampler
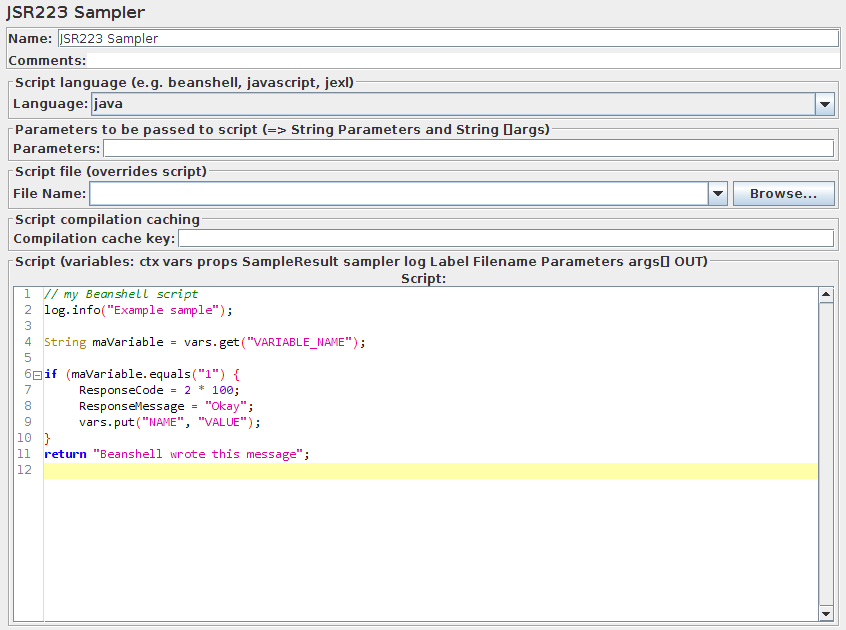
The JSR223 Sampler allows JSR223 script code to be used to perform a sample.
The JSR223 test elements have a feature (compilation) that can significantly increase performance. To benefit from this feature:
- Use Script files instead of inlining them. This will make JMeter compile them if this feature is available on ScriptEngine and cache them.
- Or Use Script Text and fill in script cache key property, ensure it is unique across Test Plan as JMeter will use it to cache result of compilation.
When using this feature, ensure you script code does not use JMeter variables directly in script code as caching would only cache first replacement. Instead use script parameters.To benefit fomr Caching and compilation, language engine used for scripting must implement JSR223 Compilable interface (Groovy is one of these, java, beanshell and javascript are not)
- jsr223.compiled_scripts_cache_size=100
TCP Sampler
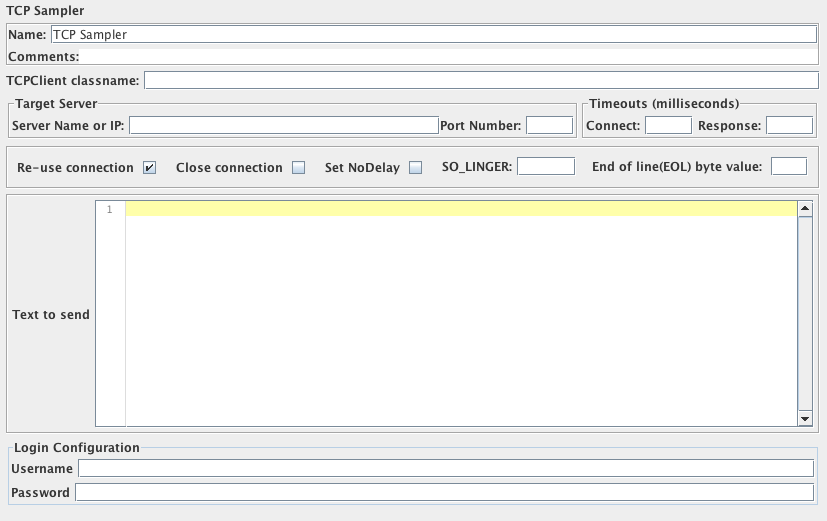
The TCP Sampler opens a TCP/IP connection to the specified server.
It then sends the text, and waits for a response.
If "Re-use connection" is selected, connections are shared between Samplers in the same thread,
provided that the exact same host name string and port are used.
Different hosts/port combinations will use different connections, as will different threads.
If both of "Re-use connection" and "Close connection" are selected, the socket will be closed after running the sampler.
On the next sampler, another socket will be created. You may want to close a socket at the end of each thread loop.
If an error is detected - or "Re-use connection" is not selected - the socket is closed.
Another socket will be reopened on the next sample.
The following properties can be used to control its operation:
- tcp.status.prefix - text that precedes a status number
- tcp.status.suffix - text that follows a status number
- tcp.status.properties - name of property file to convert status codes to messages
- tcp.handler - Name of TCP Handler class (default TCPClientImpl) - only used if not specified on the GUI
Users can provide their own implementation. The class must extend org.apache.jmeter.protocol.tcp.sampler.TCPClient.
The following implementations are currently provided.
- TCPClientImpl
- BinaryTCPClientImpl
- LengthPrefixedBinaryTCPClientImpl
TCPClientImpl
This implementation is fairly basic.
When reading the response, it reads until the end of line byte, if this is defined
by setting the property tcp.eolByte, otherwise until the end of the input stream.
You can control charset encoding by setting tcp.charset, which will default to Platform default encoding.
BinaryTCPClientImpl
This implementation converts the GUI input, which must be a hex-encoded string, into binary,
and performs the reverse when reading the response.
When reading the response, it reads until the end of message byte, if this is defined
by setting the property tcp.BinaryTCPClient.eomByte, otherwise until the end of the input stream.
LengthPrefixedBinaryTCPClientImpl
This implementation extends BinaryTCPClientImpl by prefixing the binary message data with a binary length byte.
The length prefix defaults to 2 bytes.
This can be changed by setting the property tcp.binarylength.prefix.length.
Timeout handling If the timeout is set, the read will be terminated when this expires. So if you are using an eolByte/eomByte, make sure the timeout is sufficiently long, otherwise the read will be terminated early.
Response handling
If tcp.status.prefix is defined, then the response message is searched for the text following
that up to the suffix. If any such text is found, it is used to set the response code.
The response message is then fetched from the properties file (if provided).
For example, if the prefix = "[" and the suffix = "]", then the following repsonse:
[J28] XI123,23,GBP,CR
would have the response code J28.
Response codes in the range "400"-"499" and "500"-"599" are currently regarded as failures;
all others are successful. [This needs to be made configurable!]
Sockets are disconnected at the end of a test run.
Parameters 
JMS Publisher
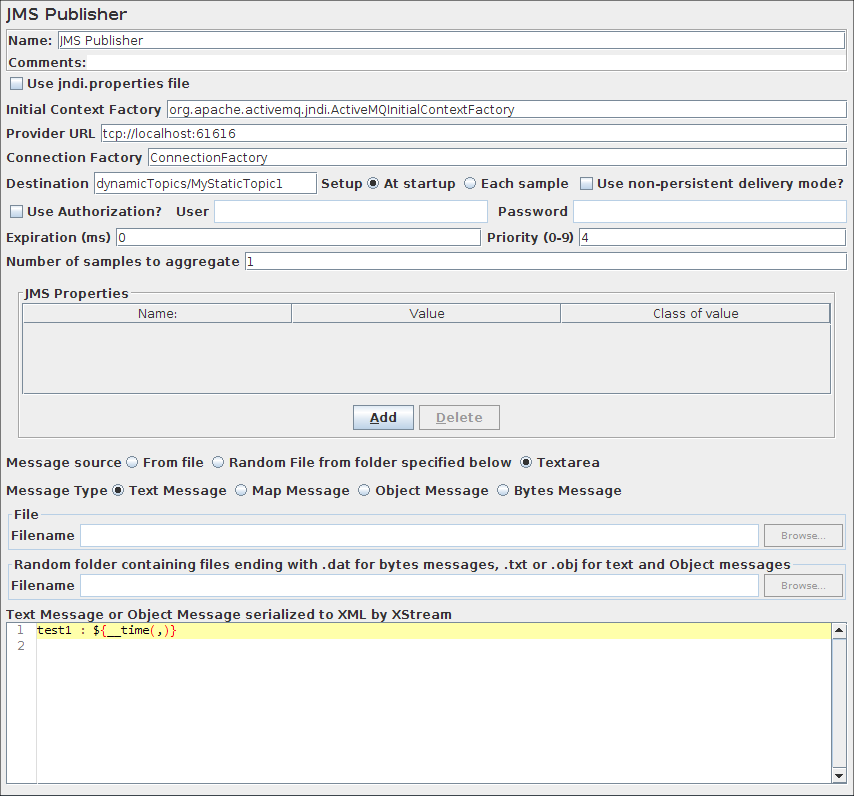
JMS Publisher will publish messages to a given destination (topic/queue). For those not familiar with JMS, it is the J2EE specification for messaging. There are numerous JMS servers on the market and several open source options.
Parameters 
- From File : means the referenced file will be read and reused by all samples
- Random File from folder specified below : means a random file will be selected from folder specified below, this folder must contain either files with extension .dat for Bytes Messages, or files with extension .txt or .obj for Object or Text messages
- Text area : The Message to use either for Text or Object message
For the MapMessage type, JMeter reads the source as lines of text. Each line must have 3 fields, delimited by commas. The fields are:
- Name of entry
- Object class name, e.g. "String" (assumes java.lang package if not specified)
- Object string value
name,String,Example
size,Integer,1234
This is a very simple implementation; it is not intended to support all possible object types.
- Put the JAR that contains your object and its dependencies in jmeter_home/lib/ folder
- Serialize your object as XML using XStream
- Either put result in a file suffixed with .txt or .obj or put XML content direclty in Text Area
The following table shows some values which may be useful when configuring JMS:
| Apache ActiveMQ | Value(s) | Comment |
|---|---|---|
| Context Factory | org.apache.activemq.jndi.ActiveMQInitialContextFactory | . |
| Provider URL | vm://localhost | |
| Provider URL | vm:(broker:(vm://localhost)?persistent=false) | Disable persistence |
| Queue Reference | dynamicQueues/QUEUENAME | Dynamically define the QUEUENAME to JNDI |
| Topic Reference | dynamicTopics/TOPICNAME | Dynamically define the TOPICNAME to JNDI |
JMS Subscriber
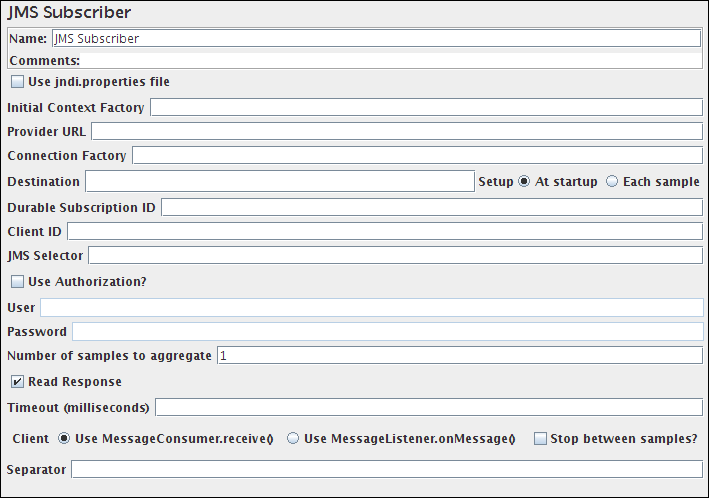
JMS Publisher will subscribe to messages in a given destination (topic or queue). For those not familiar with JMS, it is the J2EE specification for messaging. There are numerous JMS servers on the market and several open source options.
Parameters 
- MessageConsumer.receive() - calls receive() for every requested message. Retains the connection between samples, but does not fetch messages unless the sampler is active. This is best suited to Queue subscriptions.
- MessageListener.onMessage() - establishes a Listener that stores all incoming messages on a queue. The listener remains active after the sampler completes. This is best suited to Topic subscriptions.
NOTE: JMeter 2.3.4 and earlier used a different strategy for the MessageConsumer.receive() client. Previously this started a background thread which polled for messages. This thread continued when the sampler completed, so the net effect was similar to the MessageListener.onMessage() strategy.
JMS Point-to-Point
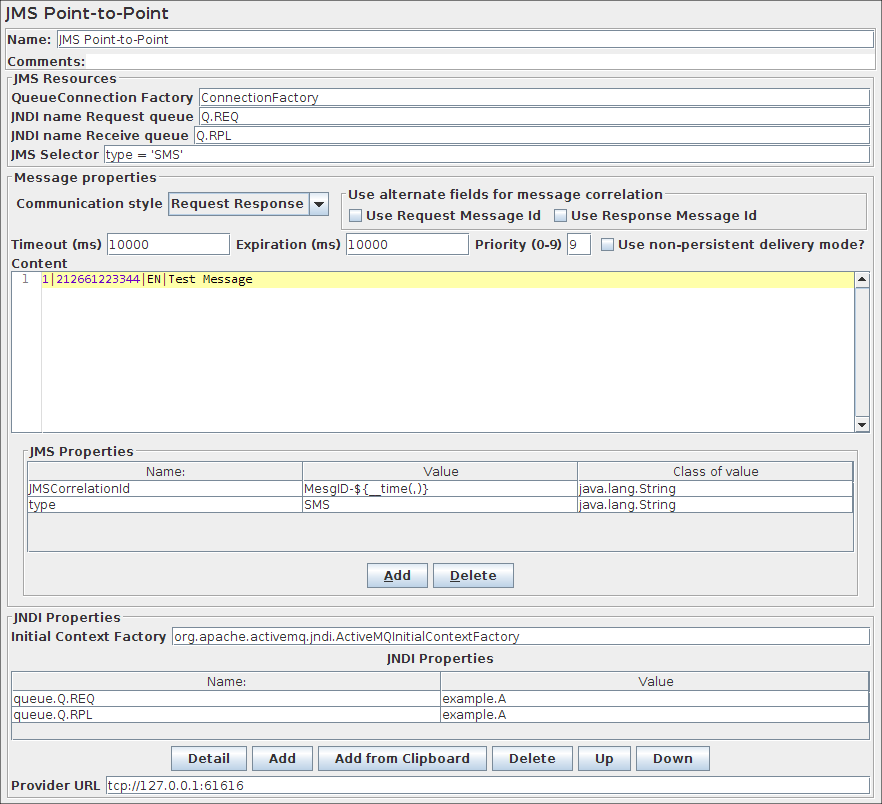
This sampler sends and optionally receives JMS Messages through point-to-point connections (queues). It is different from pub/sub messages and is generally used for handling transactions.
Request Only will typically used to put load on a JMS System.
Request Response will be used when you want to test response time of a JMS service that processes messages sent to the Request Queue as this mode will wait for the response on the Reply queue sent by this service.
Versions of JMeter after 2.3.2 use the properties java.naming.security.[principal|credentials] - if present - when creating the Queue Connection. If this behaviour is not desired, set the JMeter property JMSSampler.useSecurity.properties=false
Parameters 
- Request Only will only send messages and will not monitor replies. As such it can be used to put load on a system.
- Request Response will send messages and monitor the replies it receives. Behaviour depends on the value of the JNDI Name Reply Queue. If JNDI Name Reply Queue has a value, this queue is used to monitor the results. Matching of request and reply is done with the message id of the request and the correlation id of the reply. If the JNDI Name Reply Queue is empty, then temporary queues will be used for the communication between the requestor and the server. This is very different from the fixed reply queue. With temporary queues the sending thread will block until the reply message has been received. With Request Response mode, you need to have a Server that listens to messages sent to Request Queue and sends replies to queue referenced by message.getJMSReplyTo().
- Use Request Message Id - if selected, the request JMSMessageID will be used, otherwise the request JMSCorrelationID will be used. In the latter case the correlation id must be specified in the request.
- Use Response Message Id - if selected, the response JMSMessageID will be used, otherwise the response JMSCorrelationID will be used.
- JMS Correlation ID Pattern - i.e. match request and response on their correlation Ids => deselect both checkboxes, and provide a correlation id.
- JMS Message ID Pattern - i.e. match request message id with response correlation id => select "Use Request Message Id" only.
JUnit Request
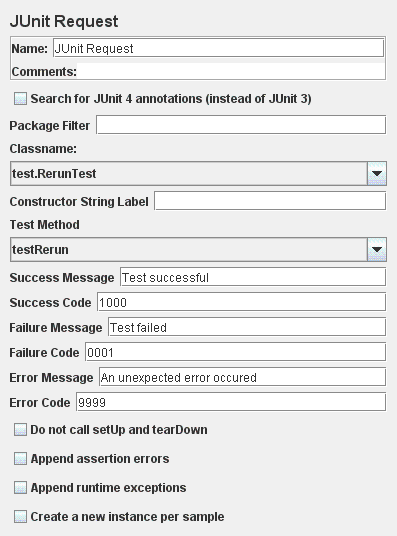
- rather than use Jmeter's test interface, it scans the jar files for classes extending junit's TestCase class. That includes any class or subclass.
- Junit test jar files should be placed in jmeter/lib/junit instead of /lib directory. In versions of JMeter after 2.3.1, you can also use the "user.classpath" property to specify where to look for TestCase classes.
- Junit sampler does not use name/value pairs for configuration like the JavaSampler. The sampler assumes setUp and tearDown will configure the test correctly.
- The sampler measures the elapsed time only for the test method and does not include setUp and tearDown.
- Each time the test method is called, Jmeter will pass the result to the listeners.
- Support for oneTimeSetUp and oneTimeTearDown is done as a method. Since Jmeter is multi-threaded, we cannot call oneTimeSetUp/oneTimeTearDown the same way Maven does it.
- The sampler reports unexpected exceptions as errors. There are some important differences between standard JUnit test runners and JMeter's implementation. Rather than make a new instance of the class for each test, JMeter creates 1 instance per sampler and reuses it. This can be changed with checkbox "Create a new instance per sample".
public class myTestCase {
  public myTestCase() {}
}
String Constructor:
public class myTestCase {
  public myTestCase(String text) {
    super(text);
  }
}
General Guidelines
If you use setUp and tearDown, make sure the methods are declared public. If you do not, the test may not run properly.Here are some general guidelines for writing Junit tests so they work well with Jmeter. Since Jmeter runs multi-threaded, it is important to keep certain things in mind.
- Write the setUp and tearDown methods so they are thread safe. This generally means avoid using static memebers.
- Make the test methods discrete units of work and not long sequences of actions. By keeping the test method to a descrete operation, it makes it easier to combine test methods to create new test plans.
- Avoid making test methods depend on each other. Since Jmeter allows arbitrary sequencing of test methods, the runtime behavior is different than the default Junit behavior.
- If a test method is configurable, be careful about where the properties are stored. Reading the properties from the Jar file is recommended.
- Each sampler creates an instance of the test class, so write your test so the setup happens in oneTimeSetUp and oneTimeTearDown.
Parameters 
The following JUnit4 annotations are recognised:
- @Test - used to find test methods and classes. The "expected" and "timeout" attributes are supported.
- @Before - treated the same as setUp() in JUnit3
- @After - treated the same as tearDown() in JUnit3
- @BeforeClass, @AfterClass - treated as test methods so they can be run independently as required
Note that JMeter currently runs the test methods directly, rather than leaving it to JUnit. This is to allow the setUp/tearDown methods to be excluded from the sample time.
Mail Reader Sampler
The Mail Reader Sampler can read (and optionally delete) mail messages using POP3(S) or IMAP(S) protocols.
Parameters 
Failing that, against the directory containing the test script (JMX file).
Messages are stored as subsamples of the main sampler. In versions of JMeter after 2.3.4, multipart message parts are stored as subsamples of the message.
Special handling for "file" protocol:
The file JavaMail provider can be used to read raw messages from files.
The server field is used to specify the path to the parent of the folder.
Individual message files should be stored with the name n.msg,
where n is the message number.
Alternatively, the server field can be the name of a file which contains a single message.
The current implementation is quite basic, and is mainly intended for debugging purposes.
Test Action
This sampler can also be useful in conjunction with the Transaction Controller, as it allows pauses to be included without needing to generate a sample. For variable delays, set the pause time to zero, and add a Timer as a child.
The "Stop" action stops the thread or test after completing any samples that are in progress. The "Stop Now" action stops the test without waiting for samples to complete; it will interrupt any active samples. If some threads fail to stop within the 5 second time-limit, a message will be displayed in GUI mode. You can try using the Stop command to see if this will stop the threads, but if not, you should exit JMeter. In non-GUI mode, JMeter will exit if some threads fail to stop within the 5 second time limit. [This can be changed using the JMeter property jmeterengine.threadstop.wait]
Parameters 
SMTP Sampler
The SMTP Sampler can send mail messages using SMTP/SMTPS protocol.
It is possible to set security propocols for the connection (SSL and TLS), as well as user authentication.
If a security protocol is used a verification on the server certificate will occur.
Two alternatives to handle this verification are available:
- Trust all certificates. This will ignore certificate chain verification
- Use a local truststore. With this option the certificate chain will be validated against the local truststore file.
Parameters 
Failing that, against the directory containing the test script (JMX file).
OS Process Sampler
The OS Process Sampler is a sampler that can be used to execute commands on the local machine.
It should allow execution of any command that can be run from the command line.
Validation of the return code can be enabled, and the expected return code can be specified.
Note that OS shells generally provide command-line parsing. This varies between OSes, but generally the shell will split parameters on white-space. Some shells expand wild-card file names; some don't. The quoting mechanism also varies between OSes. The sampler deliberately does not do any parsing or quote handling. The command and its parameters must be provided in the form expected by the executable. This means that the sampler settings will not be portable between OSes.
Many OSes have some built-in commands which are not provided as separate executables. For example the Windows DIR command is part of the command interpreter (CMD.EXE). These built-ins cannot be run as independent programs, but have to be provided as arguments to the appropriate command interpreter.
For example, the Windows command-line: DIR C:\TEMP needs to be specified as follows:
command:   CMD
Param 1:   /C
Param 2:   DIR
Param 3:   C:\TEMP
Parameters 
MongoDB Script
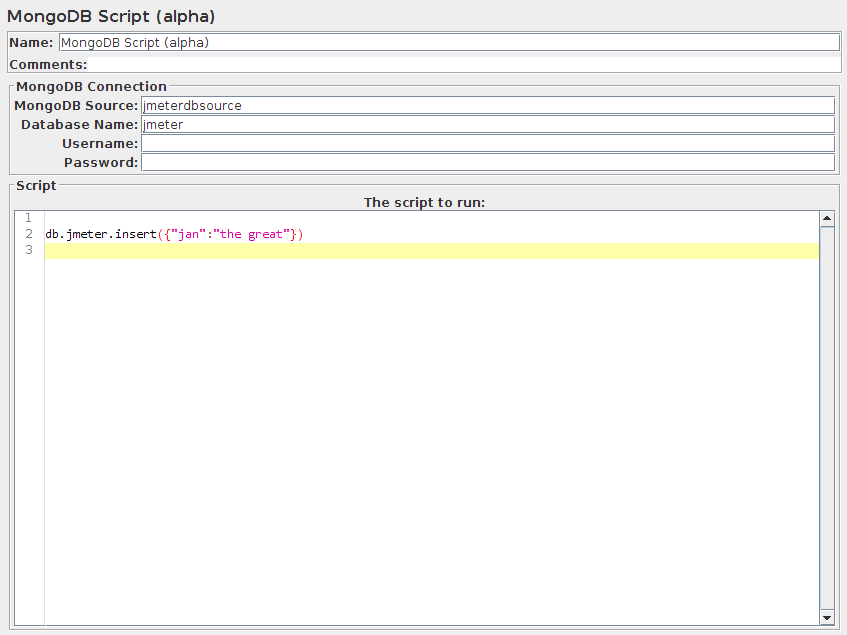
This sampler lets you send an Request to a MongoDB.
Before using this you need to set up a MongoDB Source Config Configuration element
Parameters 
18.2 Logic Controllers
Logic Controllers determine the order in which Samplers are processed.
Simple Controller
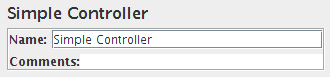
The Simple Logic Controller lets you organize your Samplers and other Logic Controllers. Unlike other Logic Controllers, this controller provides no functionality beyond that of a storage device.
Parameters 
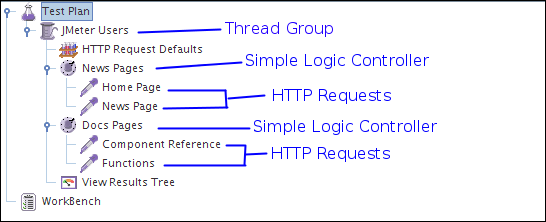
Download this example (see Figure 6). In this example, we created a Test Plan that sends two Ant HTTP requests and two Log4J HTTP requests. We grouped the Ant and Log4J requests by placing them inside Simple Logic Controllers. Remember, the Simple Logic Controller has no effect on how JMeter processes the controller(s) you add to it. So, in this example, JMeter sends the requests in the following order: Ant Home Page, Ant News Page, Log4J Home Page, Log4J History Page. Note, the File Reporter is configured to store the results in a file named "simple-test.dat" in the current directory.
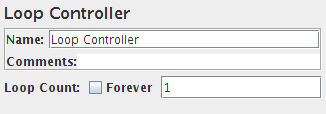
Loop Controller
If you add Generative or Logic Controllers to a Loop Controller, JMeter will loop through them a certain number of times, in addition to the loop value you specified for the Thread Group. For example, if you add one HTTP Request to a Loop Controller with a loop count of two, and configure the Thread Group loop count to three, JMeter will send a total of 2 * 3 = 6 HTTP Requests.
Parameters 
Special Case: The Loop Controller embedded in the Thread Group element behaves slightly differently. Unless set to forever, it stops the test after the given number of iterations have been done.
Download this example (see Figure 4). In this example, we created a Test Plan that sends a particular HTTP Request only once and sends another HTTP Request five times.
We configured the Thread Group for a single thread and a loop count value of one. Instead of letting the Thread Group control the looping, we used a Loop Controller. You can see that we added one HTTP Request to the Thread Group and another HTTP Request to a Loop Controller. We configured the Loop Controller with a loop count value of five.
JMeter will send the requests in the following order: Home Page, News Page, News Page, News Page, News Page, and News Page. Note, the File Reporter is configured to store the results in a file named "loop-test.dat" in the current directory.
Once Only Controller
The Once Only Logic Controller tells JMeter to process the controller(s) inside it only once per Thread, and pass over any requests under it during further iterations through the test plan.
The Once Only Controller will now execute always during the first iteration of any looping parent controller. Thus, if the Once Only Controller is placed under a Loop Controller specified to loop 5 times, then the Once Only Controller will execute only on the first iteration through the Loop Controller (ie, every 5 times). Note this means the Once Only Controller will still behave as previously expected if put under a Thread Group (runs only once per test per Thread), but now the user has more flexibility in the use of the Once Only Controller.
For testing that requires a login, consider placing the login request in this controller since each thread only needs to login once to establish a session.
Parameters 
Download this example (see Figure 5). In this example, we created a Test Plan that has two threads that send HTTP request. Each thread sends one request to the Home Page, followed by three requests to the Bug Page. Although we configured the Thread Group to iterate three times, each JMeter thread only sends one request to the Home Page because this request lives inside a Once Only Controller.
Each JMeter thread will send the requests in the following order: Home Page, Bug Page, Bug Page, Bug Page. Note, the File Reporter is configured to store the results in a file named "loop-test.dat" in the current directory.
Interleave Controller

If you add Generative or Logic Controllers to an Interleave Controller, JMeter will alternate among each of the other controllers for each loop iteration.
Parameters 
Download this example (see Figure 1). In this example, we configured the Thread Group to have two threads and a loop count of five, for a total of ten requests per thread. See the table below for the sequence JMeter sends the HTTP Requests.
| Loop Iteration | Each JMeter Thread Sends These HTTP Requests |
|---|---|
| 1 | News Page |
| 1 | Log Page |
| 2 | FAQ Page |
| 2 | Log Page |
| 3 | Gump Page |
| 3 | Log Page |
| 4 | Because there are no more requests in the controller, JMeter starts over and sends the first HTTP Request, which is the News Page. |
| 4 | Log Page |
| 5 | FAQ Page |
| 5 | Log Page |
Download another example (see Figure 2). In this example, we configured the Thread Group to have a single thread and a loop count of eight. Notice that the Test Plan has an outer Interleave Controller with two Interleave Controllers inside of it.
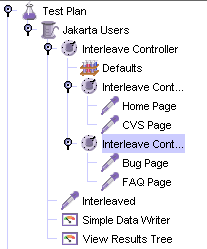
The outer Interleave Controller alternates between the two inner ones. Then, each inner Interleave Controller alternates between each of the HTTP Requests. Each JMeter thread will send the requests in the following order: Home Page, Interleaved, Bug Page, Interleaved, CVS Page, Interleaved, and FAQ Page, Interleaved. Note, the File Reporter is configured to store the results in a file named "interleave-test2.dat" in the current directory.

If the two interleave controllers under the main interleave controller were instead simple controllers, then the order would be: Home Page, CVS Page, Interleaved, Bug Page, FAQ Page, Interleaved. However, if "ignore sub-controller blocks" was checked on the main interleave controller, then the order would be: Home Page, Interleaved, Bug Page, Interleaved, CVS Page, Interleaved, and FAQ Page, Interleaved.
Random Controller
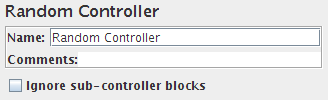
The Random Logic Controller acts similarly to the Interleave Controller, except that instead of going in order through its sub-controllers and samplers, it picks one at random at each pass.
Parameters 
Random Order Controller
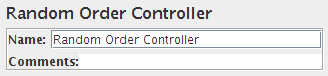
The Random Order Controller is much like a Simple Controller in that it will execute each child element at most once, but the order of execution of the nodes will be random.
Parameters 
Throughput Controller
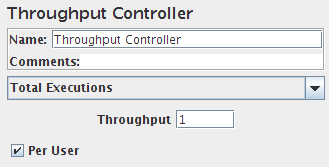
This controller is badly named, as it does not control throughput. Please refer to the Constant Throughput Timer for an element that can be used to adjust the throughput.
The Throughput Controller allows the user to control how often it is executed. There are two modes - percent execution and total executions. Percent executions causes the controller to execute a certain percentage of the iterations through the test plan. Total executions causes the controller to stop executing after a certain number of executions have occurred. Like the Once Only Controller, this setting is reset when a parent Loop Controller restarts.
Parameters 
Runtime Controller
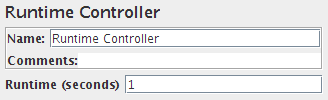
The Runtime Controller controls how long its children are allowed to run.
Parameters 
If Controller
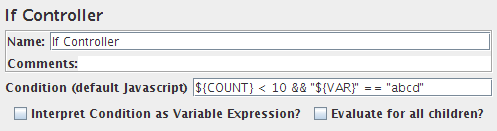
The If Controller allows the user to control whether the test elements below it (its children) are run or not.
Prior to JMeter 2.3RC3, the condition was evaluated for every runnable element contained in the controller. This sometimes caused unexpected behaviour, so 2.3RC3 was changed to evaluate the condition only once on initial entry. However, the original behaviour is also useful, so versions of JMeter after 2.3RC4 have an additional option to select the original behaviour.
Versions of JMeter after 2.3.2 allow the script to be processed as a variable expression, rather than requiring Javascript. It was always possible to use functions and variables in the Javascript condition, so long as they evaluated to "true" or "false"; now this can be done without the overhead of using Javascript as well. For example, previously one could use the condition: ${__jexl(${VAR} == 23)} and this would be evaluated as true/false, the result would then be passed to Javascript which would then return true/false. If the Variable Expression option is selected, then the expression is evaluated and compared with "true", without needing to use Javascript. Also, variable expressions can return any value, whereas the Javascript condition must return "true"/"false" or an error is logged.
"${myVar}" == "\${myVar}"
Or use:
"${myVar}" != "\${myVar}"
to test if a variable is defined and is not null.
Parameters 
Examples (Javascript):
- ${COUNT} < 10
- "${VAR}" == "abcd"
- ${JMeterThread.last_sample_ok} (check if last sample succeeded)
Examples (Variable Expression):
- ${__jexl(${COUNT} < 10)}
- ${RESULT}
While Controller
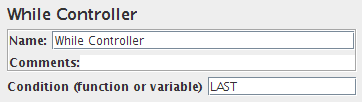
The While Controller runs its children until the condition is "false".
Possible condition values:
- blank - exit loop when last sample in loop fails
- LAST - exit loop when last sample in loop fails. If the last sample just before the loop failed, don't enter loop.
- Otherwise - exit (or don't enter) the loop when the condition is equal to the string "false"
For example:
- ${VAR} - where VAR is set to false by some other test element
- ${__javaScript(${C}==10)}
- ${__javaScript("${VAR2}"=="abcd")}
- ${_P(property)} - where property is set to "false" somewhere else
Parameters 
Switch Controller
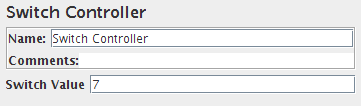
The Switch Controller acts like the Interleave Controller in that it runs one of the subordinate elements on each iteration, but rather than run them in sequence, the controller runs the element defined by the switch value.
Note: In versions of JMeter after 2.3.1, the switch value can also be a name.
If the switch value is out of range, it will run the zeroth element, which therefore acts as the default for the numeric case. It also runs the zeroth element if the value is the empty string.
If the value is non-numeric (and non-empty), then the Switch Controller looks for the element with the same name (case is significant). If none of the names match, then the element named "default" (case not significant) is selected. If there is no default, then no element is selected, and the controller will not run anything.
Parameters 
ForEach Controller
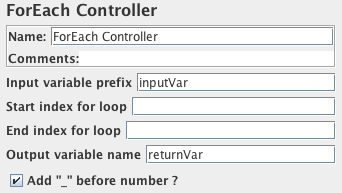
A ForEach controller loops through the values of a set of related variables. When you add samplers (or controllers) to a ForEach controller, every sample sample (or controller) is executed one or more times, where during every loop the variable has a new value. The input should consist of several variables, each extended with an underscore and a number. Each such variable must have a value. So for example when the input variable has the name inputVar, the following variables should have been defined:
- inputVar_1 = wendy
- inputVar_2 = charles
- inputVar_3 = peter
- inputVar_4 = john
Note: the "_" separator is now optional.
When the return variable is given as "returnVar", the collection of samplers and controllers under the ForEach controller will be executed 4 consecutive times, with the return variable having the respective above values, which can then be used in the samplers.It is especially suited for running with the regular expression post-processor. This can "create" the necessary input variables out of the result data of a previous request. By omitting the "_" separator, the ForEach Controller can be used to loop through the groups by using the input variable refName_g, and can also loop through all the groups in all the matches by using an input variable of the form refName_${C}_g, where C is a counter variable.
Parameters 
Download this example (see Figure 7). In this example, we created a Test Plan that sends a particular HTTP Request only once and sends another HTTP Request to every link that can be found on the page.
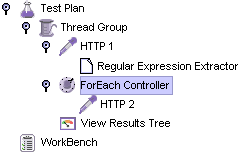
We configured the Thread Group for a single thread and a loop count value of one. You can see that we added one HTTP Request to the Thread Group and another HTTP Request to the ForEach Controller.
After the first HTTP request, a regular expression extractor is added, which extracts all the html links out of the return page and puts them in the inputVar variable
In the ForEach loop, a HTTP sampler is added which requests all the links that were extracted from the first returned HTML page.
Here is another example you can download. This has two Regular Expressions and ForEach Controllers. The first RE matches, but the second does not match, so no samples are run by the second ForEach Controller
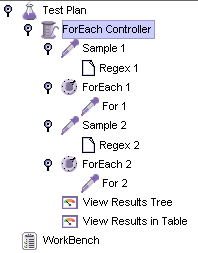
The Thread Group has a single thread and a loop count of two.
Sample 1 uses the JavaTest Sampler to return the string "a b c d".
The Regex Extractor uses the expression (\w)\s which matches a letter followed by a space, and returns the letter (not the space). Any matches are prefixed with the string "inputVar".
The ForEach Controller extracts all variables with the prefix "inputVar_", and executes its sample, passing the value in the variable "returnVar". In this case it will set the variable to the values "a" "b" and "c" in turn.
The For 1 Sampler is another Java Sampler which uses the return variable "returnVar" as part of the sample Label and as the sampler Data.
Sample 2, Regex 2 and For 2 are almost identical, except that the Regex has been changed to "(\w)\sx", which clearly won't match. Thus the For 2 Sampler will not be run.
Module Controller
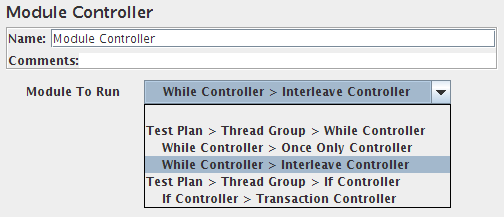
The Module Controller provides a mechanism for substituting test plan fragments into the current test plan at run-time.
A test plan fragment consists of a Controller and all the test elements (samplers etc) contained in it. The fragment can be located in any Thread Group, or on the WorkBench. If the fragment is located in a Thread Group, then its Controller can be disabled to prevent the fragment being run except by the Module Controller. Or you can store the fragments in a dummy Thread Group, and disable the entire Thread Group.
There can be multiple fragments, each with a different series of samplers under them. The module controller can then be used to easily switch between these multiple test cases simply by choosing the appropriate controller in its drop down box. This provides convenience for running many alternate test plans quickly and easily.
A fragment name is made up of the Controller name and all its parent names. For example:
Test Plan / Protocol: JDBC / Control / Interleave Controller (Module1)Any fragments used by the Module Controller must have a unique name, as the name is used to find the target controller when a test plan is reloaded. For this reason it is best to ensure that the Controller name is changed from the default - as shown in the example above - otherwise a duplicate may be accidentally created when new elements are added to the test plan.
Parameters 
Include Controller
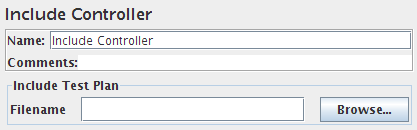
The include controller is designed to use an external jmx file. To use it, create a Test Fragment underneath the Test Plan and add any desired samplers, controllers etc. below it. Then save the Test Plan. The file is now ready to be included as part of other Test Plans.
For convenience, a Thread Group can also be added in the external JMX file for debugging purposes. A Module Controller can be used to reference the Test Fragment. The Thread Group will be ignored during the include process.
If the test uses a Cookie Manager or User Defined Variables, these should be placed in the top-level test plan, not the included file, otherwise they are not guaranteed to work.
However, if the property includecontroller.prefix is defined, the contents are used to prefix the pathname.
If the file cannot be found at the location given by prefix+filename, then the controller attempts to open the fileName relative to the JMX launch directory (versions of JMeter after 2.3.4).
Transaction Controller
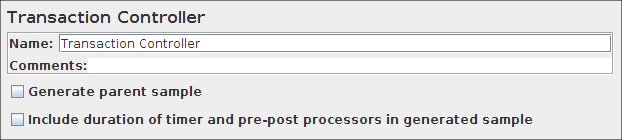
The Transaction Controller generates an additional sample which measures the overall time taken to perform the nested test elements.
For JMeter versions after 2.3, there are two modes of operation
- additional sample is added after the nested samples
- additional sample is added as a parent of the nested samples
The generated sample time includes all the times for the nested samplers, and any timers etc. Depending on the clock resolution, it may be slightly longer than the sum of the individual samplers plus timers. The clock might tick after the controller recorded the start time but before the first sample starts. Similarly at the end.
The generated sample is only regarded as successful if all its sub-samples are successful.
In parent mode, the individual samples can still be seen in the Tree View Listener, but no longer appear as separate entries in other Listeners. Also, the sub-samples do not appear in CSV log files, but they can be saved to XML files.
Parameters 
Recording Controller

The Recording Controller is a place holder indicating where the proxy server should record samples to. During test run, it has no effect, similar to the Simple Controller. But during recording using the HTTP(S) Test Script Recorder, all recorded samples will by default be saved under the Recording Controller.
Parameters 
Critical Section Controller
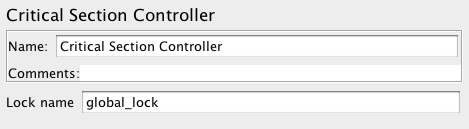
The Critical Section Controller ensures that its children elements (samplers/controllers, etc) will be executed by only one thread as a named lock will be taken before executing children of controller.
The figure below shows an example of using Critical Section Controller, in the figure below 2 Critical Section Controllers ensure that:
- DS2-${__threadNum} is executed only by one thread at a time
- DS4-${__threadNum} is executed only by one thread at a time
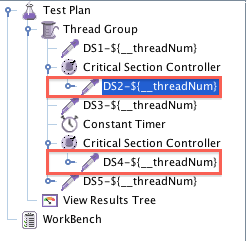
Parameters 
18.3 Listeners
Most of the listeners perform several roles in addition to "listening" to the test results. They also provide means to view, save, and read saved test results.
Note that Listeners are processed at the end of the scope in which they are found.
The saving and reading of test results is generic. The various listeners have a panel whereby one can specify the file to which the results will be written (or read from). By default, the results are stored as XML files, typically with a ".jtl" extension. Storing as CSV is the most efficient option, but is less detailed than XML (the other available option).
Listeners do not process sample data in non-GUI mode, but the raw data will be saved if an output file has been configured. In order to analyse the data generated by a non-GUI test run, you need to load the file into the appropriate Listener.
Versions of JMeter up to 2.3.2 used to clear any current data before loading the new file.
This is no longer done, thus allowing files to be merged.
If the previous behaviour is required,
use the menu item Run/Clear (Ctrl+Shift+E) or Run/Clear All (Ctrl+E) before loading the file.
Results can be read from XML or CSV format files. When reading from CSV results files, the header (if present) is used to determine which fields are present. In order to interpret a header-less CSV file correctly, the appropriate properties must be set in jmeter.properties.
Listeners can use a lot of memory if there are a lot of samples. Most of the listeners currently keep a copy of every sample in their scope, apart from:
- Simple Data Writer
- BeanShell/BSF Listener
- Mailer Visualizer
- Monitor Results
- Summary Report
The following Listeners no longer need to keep copies of every single sample. Instead, samples with the same elapsed time are aggregated. Less memory is now needed, especially if most samples only take a second or two at most.
- Aggregate Report
- Aggregate Graph
- Distribution Graph
To minimise the amount of memory needed, use the Simple Data Writer, and use the CSV format.
The figure below shows an example of the result file configuration panel

Parameters
Sample Result Save Configuration
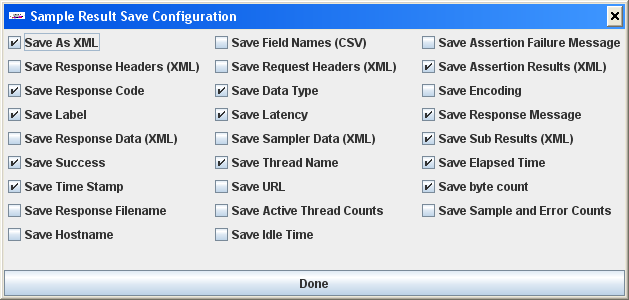
Listeners can be configured to save different items to the result log files (JTL) by using the Config popup as shown below. The defaults are defined as described in the Listener Default Configuration documentation. Items with (CSV) after the name only apply to the CSV format; items with (XML) only apply to XML format. CSV format cannot currently be used to save any items that include line-breaks.
Note that cookies, method and the query string are saved as part of the "Sampler Data" option.
Graph Results
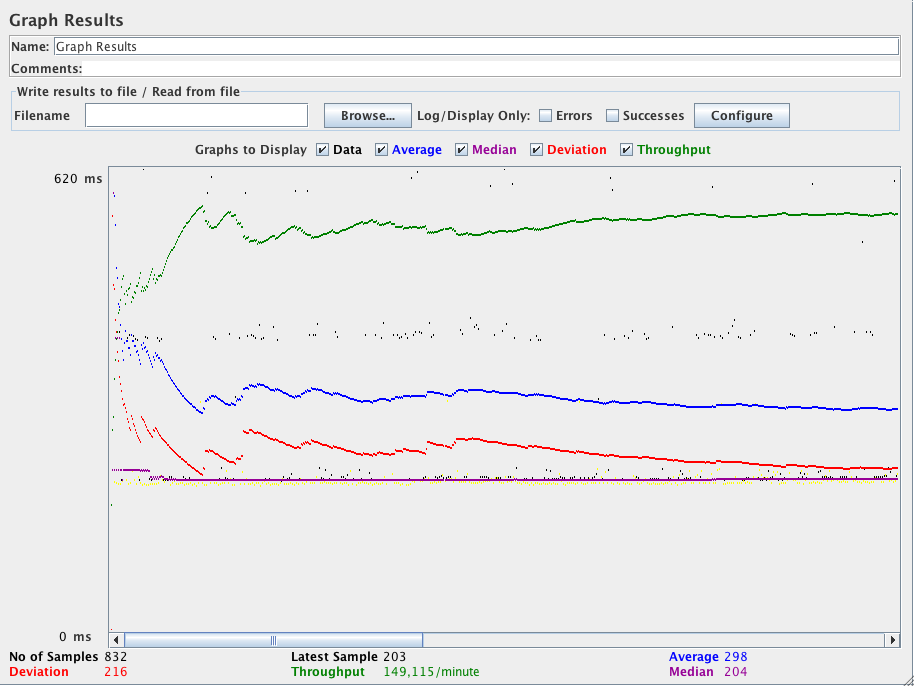
The Graph Results listener generates a simple graph that plots all sample times. Along the bottom of the graph, the current sample (black), the current average of all samples(blue), the current standard deviation (red), and the current throughput rate (green) are displayed in milliseconds.
The throughput number represents the actual number of requests/minute the server handled. This calculation includes any delays you added to your test and JMeter's own internal processing time. The advantage of doing the calculation like this is that this number represents something real - your server in fact handled that many requests per minute, and you can increase the number of threads and/or decrease the delays to discover your server's maximum throughput. Whereas if you made calculations that factored out delays and JMeter's processing, it would be unclear what you could conclude from that number.
The following table briefly describes the items on the graph. Further details on the precise meaning of the statistical terms can be found on the web - e.g. Wikipedia - or by consulting a book on statistics.
- Data - plot the actual data values
- Average - plot the Average
- Median - plot the Median (midway value)
- Deviation - plot the Standard Deviation (a measure of the variation)
- Throughput - plot the number of samples per unit of time
The individual figures at the bottom of the display are the current values. "Latest Sample" is the current elapsed sample time, shown on the graph as "Data".
The value displayed on the top left of graph is the max of 90th percentile of response time.
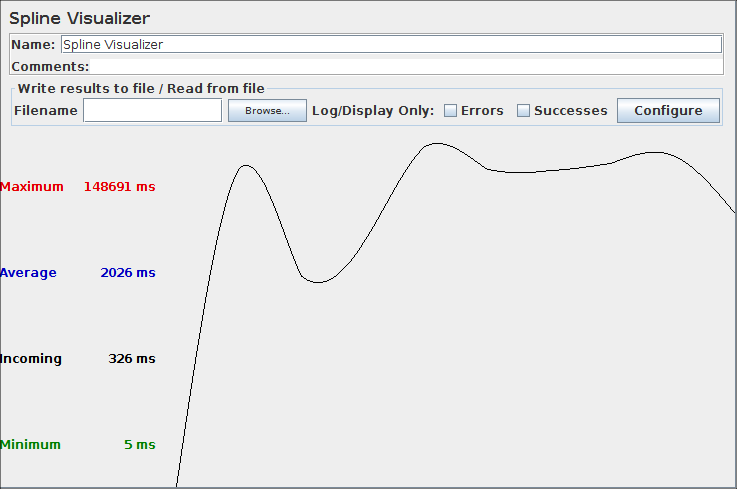
Spline Visualizer
The Spline Visualizer provides a view of all sample times from the start of the test till the end, regardless of how many samples have been taken. The spline has 10 points, each representing 10% of the samples, and connected using spline logic to show a single continuous line.
The graph is automatically scaled to fit within the window. This needs to be borne in mind when comparing graphs.
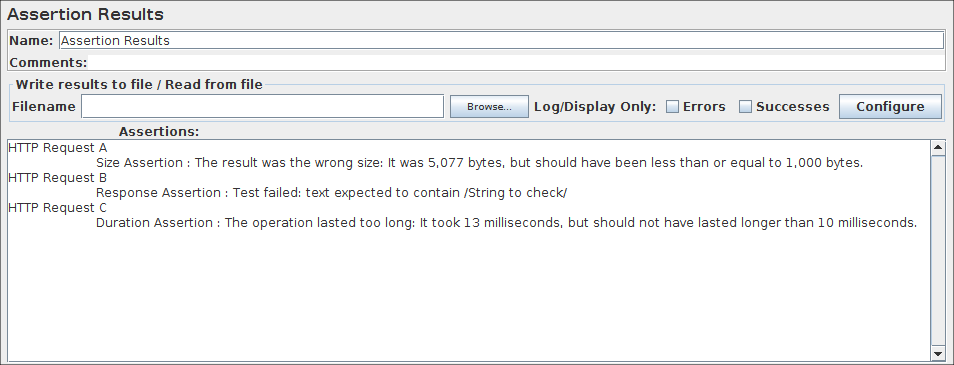
Assertion Results
The Assertion Results visualizer shows the Label of each sample taken. It also reports failures of any Assertions that are part of the test plan.
View Results Tree
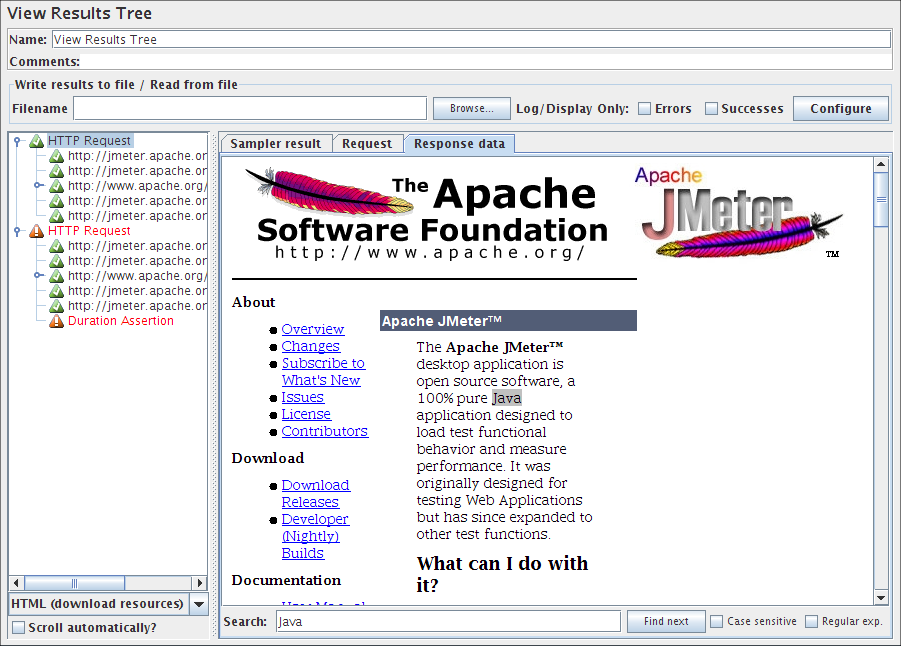
There are several ways to view the response, selectable by a drop-down box at the bottom of the left hand panel.
| Renderer | Description |
|---|---|
| CSS/JQuery Tester | The CSS/JQuery Tester only works for text responses. It shows the plain text in the upper panel.
The "Test" button allows the user to apply the CSS/JQuery to the upper panel and the results
will be displayed in the lower panel. The engine of CSS/JQuery expression can be JSoup or Jodd, syntax of these 2 implementation differs slightly. For example, the Selector a[class=sectionlink] with attribute href applied to the current JMeter functions page gives the following output: Match count: 74 Match[1]=#functions Match[2]=#what_can_do Match[3]=#where Match[4]=#how Match[5]=#function_helper Match[6]=#functions Match[7]=#__regexFunction Match[8]=#__regexFunction_parms Match[9]=#__counter ... and so on ... |
| Document | The Document view will show the extract text from various type of documents like Microsoft Office
(Word, Excel, PowerPoint 97-2003, 2007-2010 (openxml), Apache OpenOffice (writer, calc, impress), HTML,
gzip, jar/zip files (list of content), and some meta-data on "multimedia" files like mp3, mp4, flv, etc. The complete list of
support format is available on Apache Tika format page.
Note: A requirement to the Document view is to download the Apache Tika binary package (tika-app-x.x.jar) and put this in JMETER_HOME/lib directory. If the document is larger than 10 MB, then it won't be displayed. To change this limit, set the JMeter property document.max_size (unit is byte) or set to 0 to remove the limit. |
| HTML | The HTML view attempts to render the response as
HTML. The rendered HTML is likely to compare poorly to the view one
would get in any web browser; however, it does provide a quick
approximation that is helpful for initial result evaluation. Images, style-sheets, etc. aren't downloaded. |
| HTML (download resources) | If the HTML (download resources) view option is selected, the renderer
may download images, style-sheets, etc. referenced by the HTML code.
|
| JSON | The JSON view will show the response in tree style (also handles JSON embedded in JavaScript).
|
| Regexp Tester | The Regexp Tester view only works for text responses. It shows the plain text in the upper panel.
The "Test" button allows the user to apply the Regular Expression to the upper panel and the results
will be displayed in the lower panel. The engine of regular expression is the same that the Regular Expression Extractor. For example, the RE (JMeter\w*).* applied to the current JMeter home page gives the following output: Match count: 26 Match[1][0]=JMeter - Apache JMeter</title> Match[1][1]=JMeter Match[2][0]=JMeter" title="JMeter" border="0"/></a> Match[2][1]=JMeter Match[3][0]=JMeterCommitters">Contributors</a> Match[3][1]=JMeterCommitters ... and so on ... The first number in [] is the match number; the second number is the group. Group [0] is whatever matched the whole RE. Group [1] is whatever matched the 1st group, i.e. (JMeter\w*) in this case. See Figure 9b (below). |
| Text |
The default Text view shows all of the text contained in the response.
Note that this will only work if the response content-type is considered to be text.
If the content-type begins with any of the following, it is considered as binary,
otherwise it is considered to be text.
image/ audio/ video/ |
| XML | The XML view will show response in tree style.
Any DTD nodes or Prolog nodes will not show up in tree; however, response may contain those nodes.
|
| XPath Tester | The XPath Tester only works for text responses. It shows the plain text in the upper panel.
The "Test" button allows the user to apply the XPath query to the upper panel and the results
will be displayed in the lower panel. |
Scroll automatically? option permit to have last node display in tree selection
With Search option, most of the views also allow the displayed data to be searched; the result of the search will be high-lighted
in the display above. For example the Control panel screenshot below shows one result of searching for "Java".
Note that the search operates on the visible text, so you may get different results when searching
the Text and HTML views.
Note: The regular expression uses the Java engine (not ORO engine like the Regular Expression Extractor or Regexp Tester view).
If there is no content-type provided, then the content will not be displayed in the any of the Response Data panels. You can use Save Responses to a file to save the data in this case. Note that the response data will still be available in the sample result, so can still be accessed using Post-Processors.
If the response data is larger than 200K, then it won't be displayed. To change this limit, set the JMeter property view.results.tree.max_size. You can also use save the entire response to a file using Save Responses to a file.
Additional renderers can be created. The class must implement the interface org.apache.jmeter.visualizers.ResultRenderer and/or extend the abstract class org.apache.jmeter.visualizers.SamplerResultTab, and the compiled code must be available to JMeter (e.g. by adding it to the lib/ext directory).
The Control Panel (above) shows an example of an HTML display.
Figure 9 (below) shows an example of an XML display.
Figure 9a (below) shows an example of an Regexp tester display.
Figure 9b (below) shows an example of an Document display.
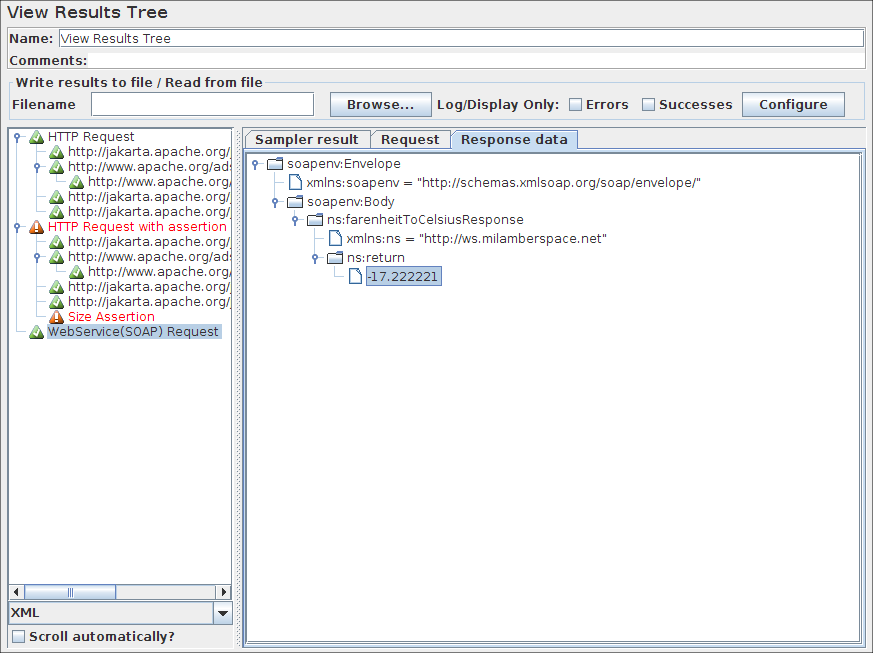
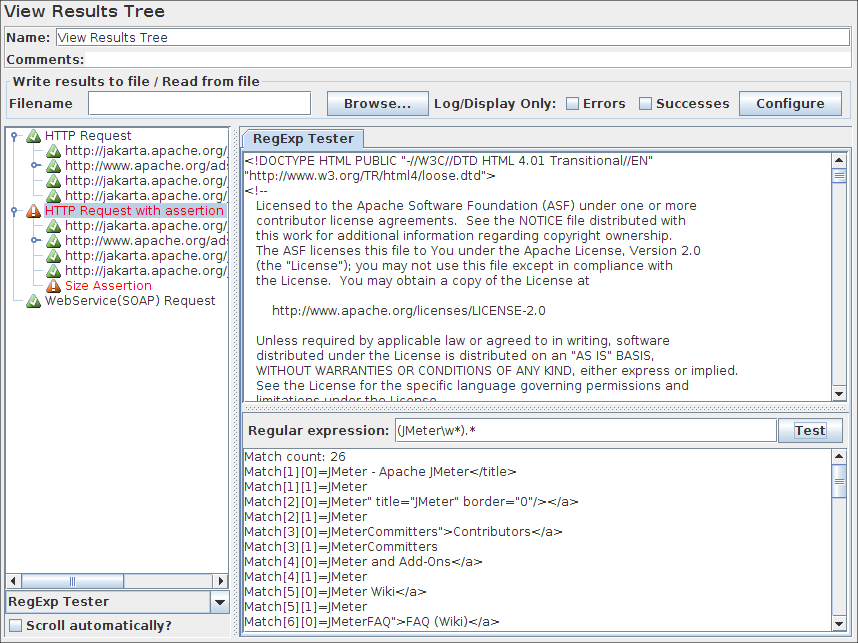
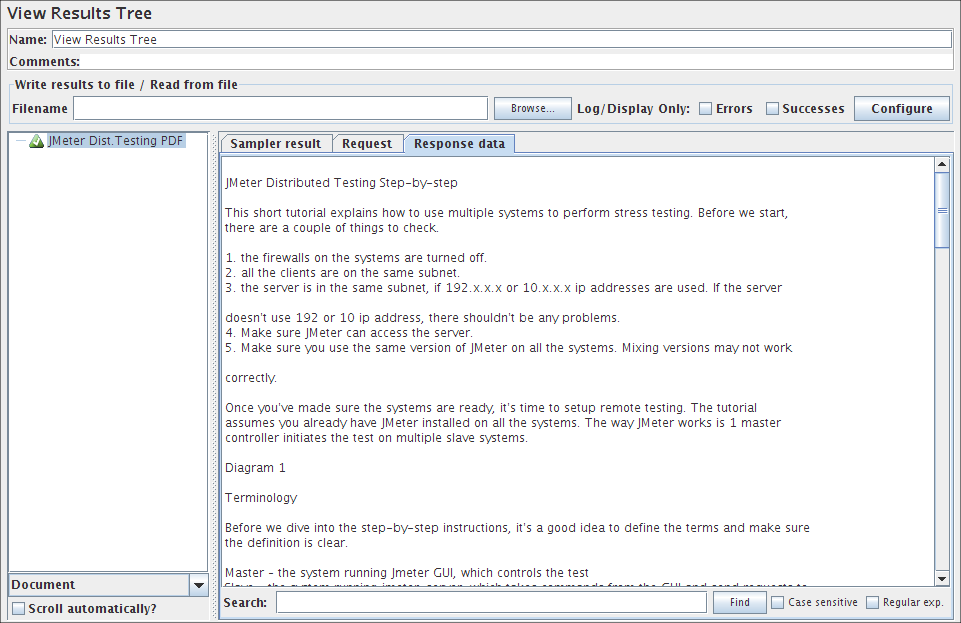
Aggregate Report
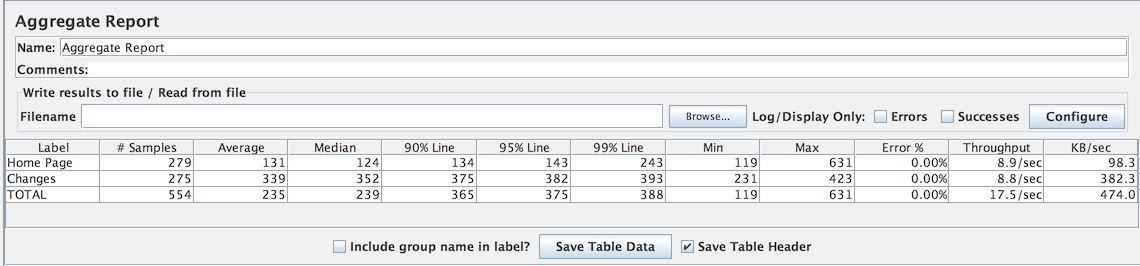
The thoughput is calculated from the point of view of the sampler target (e.g. the remote server in the case of HTTP samples). JMeter takes into account the total time over which the requests have been generated. If other samplers and timers are in the same thread, these will increase the total time, and therefore reduce the throughput value. So two identical samplers with different names will have half the throughput of two samplers with the same name. It is important to choose the sampler names correctly to get the best results from the Aggregate Report.
Calculation of the Median and 90% Line (90th percentile) values requires additional memory. JMeter now combines samples with the same elapsed time, so far less memory is used. However, for samples that take more than a few seconds, the probability is that fewer samples will have identical times, in which case more memory will be needed. Note you can use this listener afterwards to reload a CSV or XML results file which is the recommended way to avoid performance impacts. See the Summary Report for a similar Listener that does not store individual samples and so needs constant memory.
- aggregate_rpt_pct1: defaults to 90th percentile
- aggregate_rpt_pct2: defaults to 95th percentile
- aggregate_rpt_pct3: defaults to 99th percentile
- Label - The label of the sample. If "Include group name in label?" is selected, then the name of the thread group is added as a prefix. This allows identical labels from different thread groups to be collated separately if required.
- # Samples - The number of samples with the same label
- Average - The average time of a set of results
- Median - The median is the time in the middle of a set of results. 50% of the samples took no more than this time; the remainder took at least as long.
- 90% Line - 90% of the samples took no more than this time. The remaining samples took at least as long as this. (90th percentile)
- 95% Line - 95% of the samples took no more than this time. The remaining samples took at least as long as this. (95th percentile)
- 99% Line - 99% of the samples took no more than this time. The remaining samples took at least as long as this. (99th percentile)
- Min - The shortest time for the samples with the same label
- Max - The longest time for the samples with the same label
- Error % - Percent of requests with errors
- Throughput - the Throughput is measured in requests per second/minute/hour. The time unit is chosen so that the displayed rate is at least 1.0. When the throughput is saved to a CSV file, it is expressed in requests/second, i.e. 30.0 requests/minute is saved as 0.5.
- Kb/sec - The throughput measured in Kilobytes per second
Times are in milliseconds.
The figure below shows an example of selecting the "Include group name" checkbox.
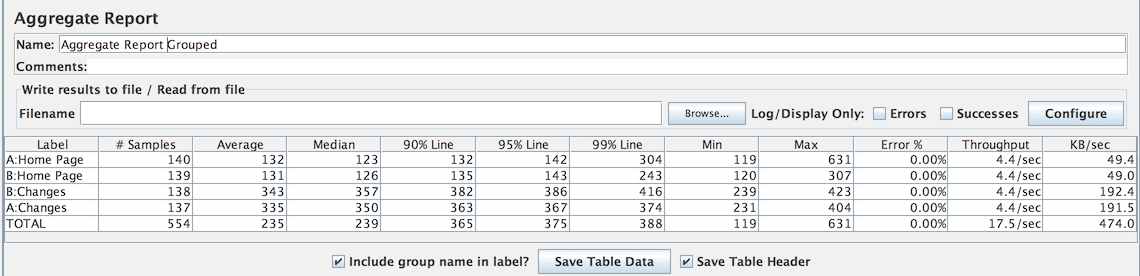
View Results in Table
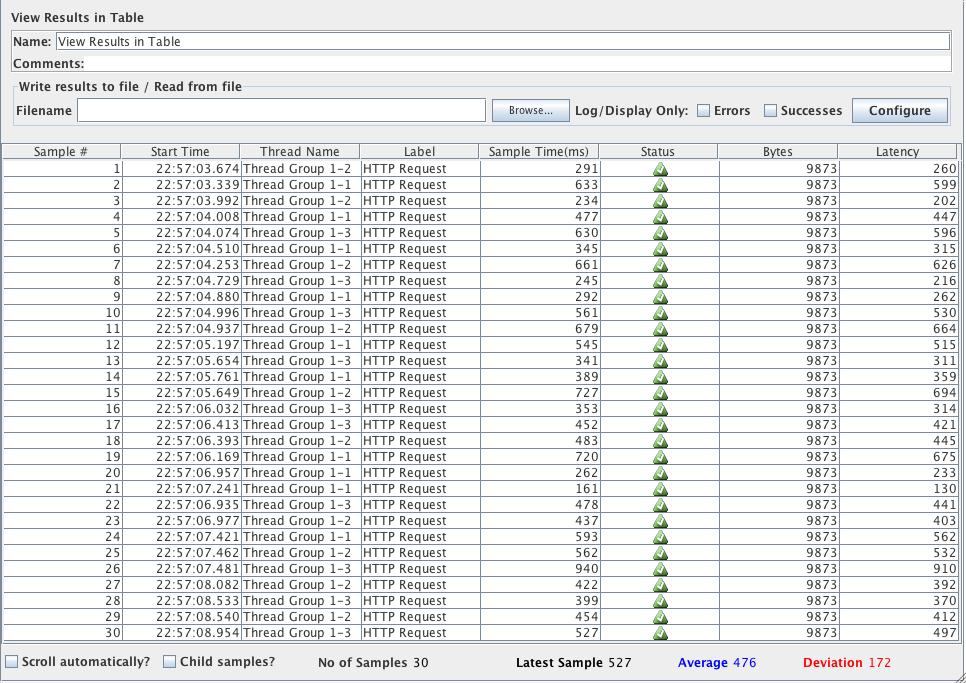
By default, it only displays the main (parent) samples; it does not display the sub-samples (child samples). Versions of JMeter after 2.5.1 have a "Child Samples?" check-box. If this is selected, then the sub-samples are displayed instead of the main samples.
Simple Data Writer
Monitor Results
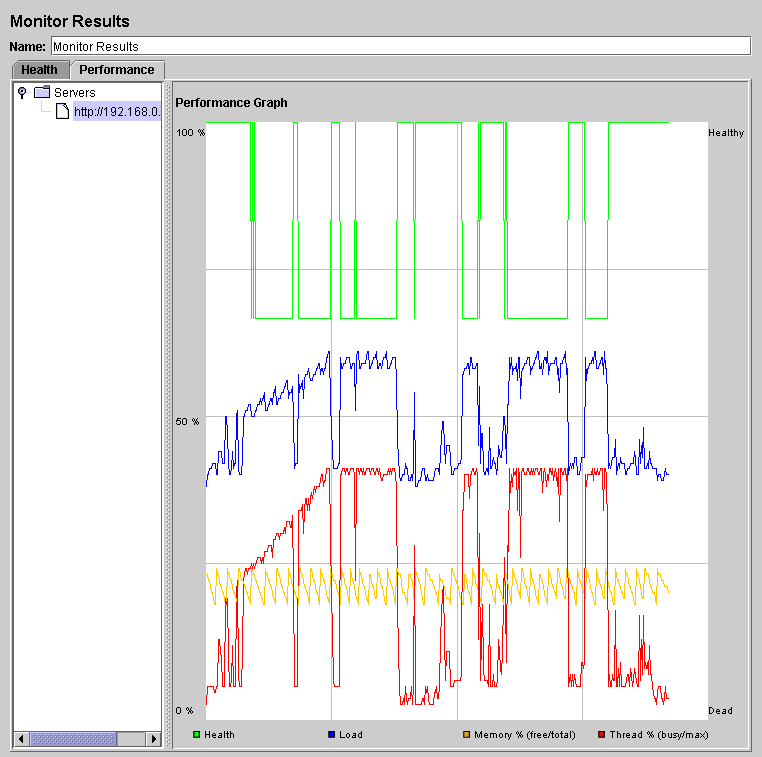
Monitor Results is a new Visualizer for displaying server status. It is designed for Tomcat 5, but any servlet container can port the status servlet and use this monitor. There are two primary tabs for the monitor. The first is the "Health" tab, which will show the status of one or more servers. The second tab labled "Performance" shows the performance for one server for the last 1000 samples. The equations used for the load calculation is included in the Visualizer.
Currently, the primary limitation of the monitor is system memory. A quick benchmark of memory usage indicates a buffer of 1000 data points for 100 servers would take roughly 10Mb of RAM. On a 1.4Ghz centrino laptop with 1Gb of ram, the monitor should be able to handle several hundred servers.
As a general rule, monitoring production systems should take care to set an appropriate interval. Intervals shorter than 5 seconds are too aggressive and have a potential of impacting the server. With a buffer of 1000 data points at 5 second intervals, the monitor would check the server status 12 times a minute or 720 times a hour. This means the buffer shows the performance history of each machine for the last hour.
For a detailed description of how to use the monitor, please refer to Building a Monitor Test Plan
Distribution Graph (alpha)

The distribution graph will display a bar for every unique response time. Since the granularity of System.currentTimeMillis() is 10 milliseconds, the 90% threshold should be within the width of the graph. The graph will draw two threshold lines: 50% and 90%. What this means is 50% of the response times finished between 0 and the line. The same is true of 90% line. Several tests with Tomcat were performed using 30 threads for 600K requests. The graph was able to display the distribution without any problems and both the 50% and 90% line were within the width of the graph. A performant application will generally produce results that clump together. A poorly written application that has memory leaks may result in wild fluctuations. In those situations, the threshold lines may be beyond the width of the graph. The recommended solution to this specific problem is fix the webapp so it performs well. If your test plan produces distribution graphs with no apparent clumping or pattern, it may indicate a memory leak. The only way to know for sure is to use a profiling tool.
Aggregate Graph
The figure below shows an example of settings to draw this graph.
Please note: All this parameters aren't saved in JMeter jmx script.
Parameters 
- Columns to display: Choose the column(s) to display in graph.
- Rectangles color: Clic on right color rectangle open a popup dialog to choose a custom color for column.
- Foreground color Allow to change the value text color.
- Value font: Allow to define font settings for the text.
- Draw outlines bar? To draw or not the border line on bar chart
- Show number grouping? Show or not the number grouping in Y Axis labels.
- Value labels vertical? Change orientation for value label. (Default is horizontal)
- Column label selection: Filter by result label. A regular expression can be used, example: .*Transaction.*
Before display the graph, click on Apply filter button to refresh internal data.
Response Time Graph
The figure below shows an example of settings to draw this graph.
Please note: All this parameters are saved in JMeter .jmx file.
Parameters 
Mailer Visualizer
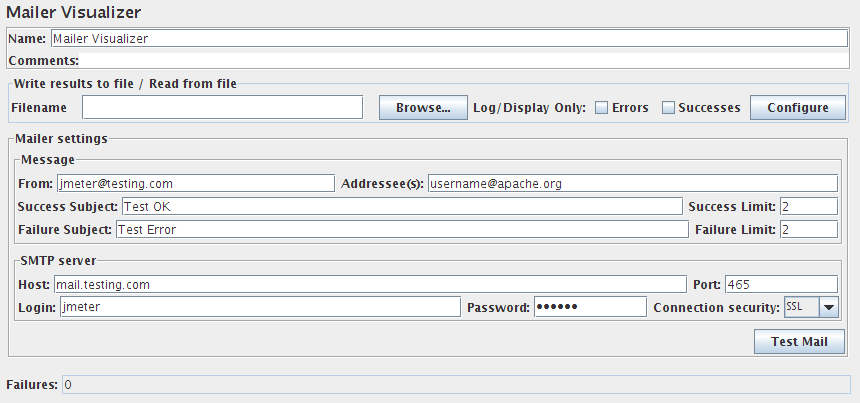
The mailer visualizer can be set up to send email if a test run receives too many failed responses from the server.
Parameters 
BeanShell Listener
The BeanShell Listener allows the use of BeanShell for processing samples for saving etc.
For full details on using BeanShell, please see the BeanShell website.
The test element supports the ThreadListener and TestListener methods. These should be defined in the initialisation file. See the file BeanShellListeners.bshrc for example definitions.
Parameters 
- Parameters - string containing the parameters as a single variable
- bsh.args - String array containing parameters, split on white-space
Before invoking the script, some variables are set up in the BeanShell interpreter:
- log - (Logger) - can be used to write to the log file
- ctx - (JMeterContext) - gives access to the context
- vars - (JMeterVariables) - gives read/write access to variables: vars.get(key); vars.put(key,val); vars.putObject("OBJ1",new Object());
- props - (JMeterProperties - class java.util.Properties) - e.g. props.get("START.HMS"); props.put("PROP1","1234");
- sampleResult, prev - (SampleResult) - gives access to the previous SampleResult
- sampleEvent (SampleEvent) gives access to the current sample event
For details of all the methods available on each of the above variables, please check the Javadoc
If the property beanshell.listener.init is defined, this is used to load an initialisation file, which can be used to define methods etc for use in the BeanShell script.
Summary Report
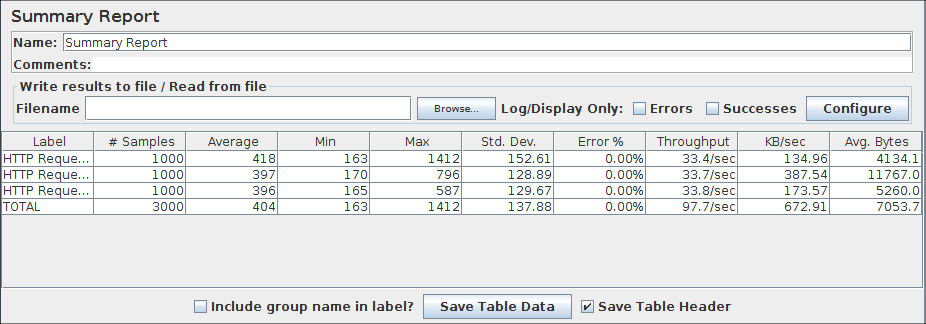
The thoughput is calculated from the point of view of the sampler target (e.g. the remote server in the case of HTTP samples). JMeter takes into account the total time over which the requests have been generated. If other samplers and timers are in the same thread, these will increase the total time, and therefore reduce the throughput value. So two identical samplers with different names will have half the throughput of two samplers with the same name. It is important to choose the sampler labels correctly to get the best results from the Report.
- Label - The label of the sample. If "Include group name in label?" is selected, then the name of the thread group is added as a prefix. This allows identical labels from different thread groups to be collated separately if required.
- # Samples - The number of samples with the same label
- Average - The average elapsed time of a set of results
- Min - The lowest elapsed time for the samples with the same label
- Max - The longest elapsed time for the samples with the same label
- Std. Dev. - the Standard Deviation of the sample elapsed time
- Error % - Percent of requests with errors
- Throughput - the Throughput is measured in requests per second/minute/hour. The time unit is chosen so that the displayed rate is at least 1.0. When the throughput is saved to a CSV file, it is expressed in requests/second, i.e. 30.0 requests/minute is saved as 0.5.
- Kb/sec - The throughput measured in Kilobytes per second
- Avg. Bytes - average size of the sample response in bytes. (in JMeter 2.2 it wrongly showed the value in kB)
Times are in milliseconds.
The figure below shows an example of selecting the "Include group name" checkbox.
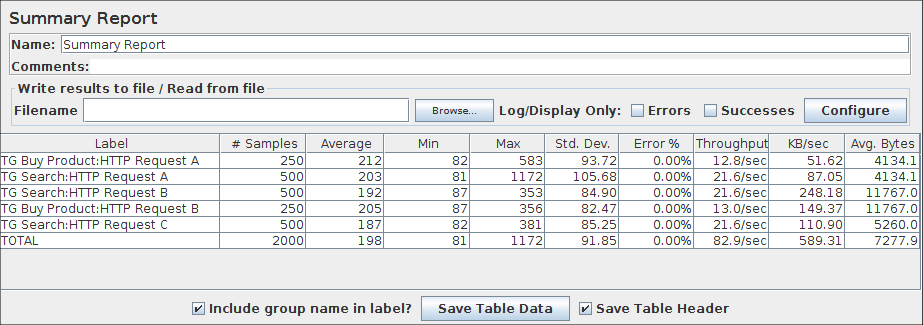
Save Responses to a file
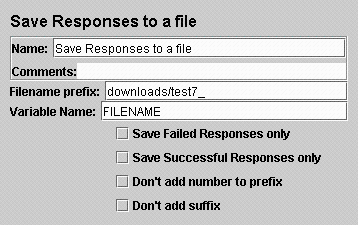
This test element can be placed anywhere in the test plan. For each sample in its scope, it will create a file of the response Data. The primary use for this is in creating functional tests, but it can also be useful where the response is too large to be displayed in the View Results Tree Listener. The file name is created from the specified prefix, plus a number (unless this is disabled, see below). The file extension is created from the document type, if known. If not known, the file extension is set to 'unknown'. If numbering is disabled, and adding a suffix is disabled, then the file prefix is taken as the entire file name. This allows a fixed file name to be generated if required. The generated file name is stored in the sample response, and can be saved in the test log output file if required.
The current sample is saved first, followed by any sub-samples (child samples). If a variable name is provided, then the names of the files are saved in the order that the sub-samples appear. See below.
Parameters 
BSF Listener
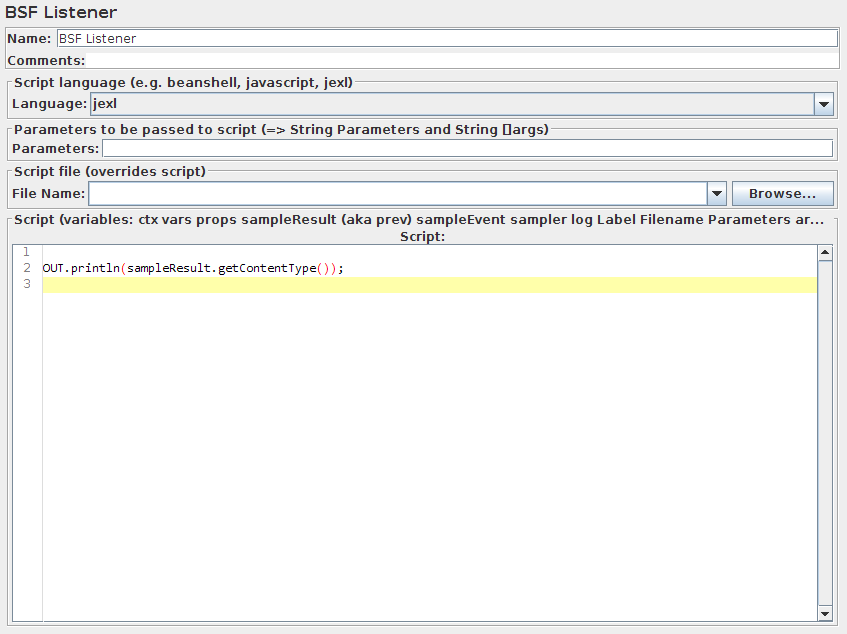
The BSF Listener allows BSF script code to be applied to sample results.
Parameters 
- Parameters - string containing the parameters as a single variable
- args - String array containing parameters, split on white-space
The script (or file) is processed using the BSFEngine.exec() method, which does not return a value.
Before invoking the script, some variables are set up. Note that these are BSF variables - i.e. they can be used directly in the script.
- log - (Logger) - can be used to write to the log file
- Label - the String Label
- Filename - the script file name (if any)
- Parameters - the parameters (as a String)
- args[] - the parameters as a String array (split on whitespace)
- ctx - (JMeterContext) - gives access to the context
- vars - (JMeterVariables) - gives read/write access to variables: vars.get(key); vars.put(key,val); vars.putObject("OBJ1",new Object()); vars.getObject("OBJ2");
- props - (JMeterProperties - class java.util.Properties) - e.g. props.get("START.HMS"); props.put("PROP1","1234");
- sampleResult, prev - (SampleResult) - gives access to the SampleResult
- sampleEvent - (SampleEvent) - gives access to the SampleEvent
- sampler - (Sampler)- gives access to the last sampler
- OUT - System.out - e.g. OUT.println("message")
For details of all the methods available on each of the above variables, please check the Javadoc
JSR223 Listener
The JSR223 Listener allows JSR223 script code to be applied to sample results. For details, see BSF Listener.
Generate Summary Results
# Define the following property to automatically start a summariser with that name
# (applies to non-GUI mode only)
#summariser.name=summary
#
# interval between summaries (in seconds) default 3 minutes
#summariser.interval=30
#
# Write messages to log file
#summariser.log=true
#
# Write messages to System.out
#summariser.out=true
This element is mainly intended for batch (non-GUI) runs. The output looks like the following:
label +   171 in  20.3s =    8.4/s Avg:  1129 Min:  1000 Max:  1250 Err:     0 (0.00%)
label +   263 in  31.3s =    8.4/s Avg:  1138 Min:  1000 Max:  1250 Err:     0 (0.00%)
label =   434 in  50.4s =    8.6/s Avg:  1135 Min:  1000 Max:  1250 Err:     0 (0.00%)
label +   263 in  31.0s =    8.5/s Avg:  1138 Min:  1000 Max:  1250 Err:     0 (0.00%)
label =   697 in  80.3s =    8.7/s Avg:  1136 Min:  1000 Max:  1250 Err:     0 (0.00%)
label +   109 in  12.4s =    8.8/s Avg:  1092 Min:    47 Max:  1250 Err:     0 (0.00%)
label =   806 in  91.6s =    8.8/s Avg:  1130 Min:    47 Max:  1250 Err:     0 (0.00%)
The "label" is the the name of the element. The "+" means that the line is a delta line, i.e. shows the changes since the last output.
The "=" means that the line is a totals line, i.e. it shows the running total.
Entries in the jmeter log file also include time-stamps. The example "806 in 91.6s = 8.8/s" means that there were 806 samples recorded in 91.6 seconds, and that works out at 8.8 samples per second.
The Avg (Average), Min(imum) and Max(imum) times are in milliseconds.
"Err" means number of errors (also shown as percentage).
The last two lines will appear at the end of a test. They will not be synchronised to the appropriate time boundary. Note that the initial and final deltas may be for less than the interval (in the example above this is 30 seconds). The first delta will generally be lower, as JMeter synchronizes to the interval boundary. The last delta will be lower, as the test will generally not finish on an exact interval boundary.
The label is used to group sample results together. So if you have multiple Thread Groups and want to summarize across them all, then use the same label - or add the summariser to the Test Plan (so all thread groups are in scope). Different summary groupings can be implemented by using suitable labels and adding the summarisers to appropriate parts of the test plan.
Parameters 
Comparison Assertion Visualizer
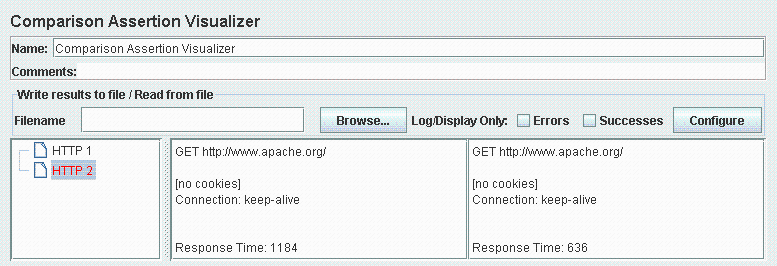
Parameters 
Backend Listener
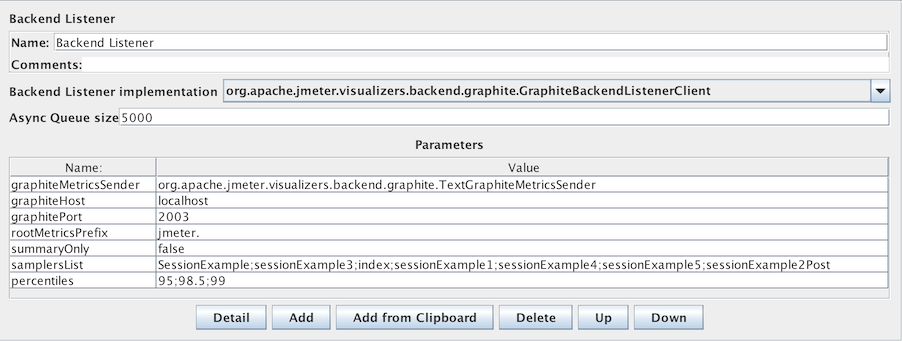
Parameters 
The following parameters apply to the GraphiteBackendListenerClient implementation:
Parameters 
Read this for more details.

18.4 Configuration Elements
Configuration elements can be used to set up defaults and variables for later use by samplers. Note that these elements are processed at the start of the scope in which they are found, i.e. before any samplers in the same scope.
CSV Data Set Config
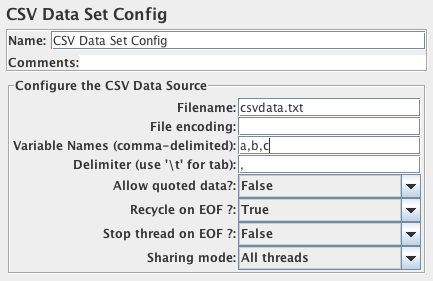
CSV Data Set Config is used to read lines from a file, and split them into variables. It is easier to use than the __CSVRead() and _StringFromFile() functions. It is well suited to handling large numbers of variables, and is also useful for tesing with "random" and unique values. Generating unique random values at run-time is expensive in terms of CPU and memory, so just create the data in advance of the test. If necessary, the "random" data from the file can be used in conjunction with a run-time parameter to create different sets of values from each run - e.g. using concatenation - which is much cheaper than generating everything at run-time.
Versions of JMeter after 2.3.1 allow values to be quoted; this allows the value to contain a delimiter. Previously it was necessary to choose a delimiter that was not used in any values. If "allow quoted data" is enabled, a value may be enclosed in double-quotes. These are removed. To include double-quotes within a quoted field, use two double-quotes. For example:
1,"2,3","4""5" =>
1
2,3
4"5
Versions of JMeter after 2.3.4 support CSV files which have a header line defining the column names. To enable this, leave the "Variable Names" field empty. The correct delimiter must be provided.
Versions of JMeter after 2.7 support CSV files with quoted data that includes new-lines.
By default, the file is only opened once, and each thread will use a different line from the file. However the order in which lines are passed to threads depends on the order in which they execute, which may vary between iterations. Lines are read at the start of each test iteration. The file name and mode are resolved in the first iteration.
See the description of the Share mode below for additional options (JMeter 2.3.2+). If you want each thread to have its own set of values, then you will need to create a set of files, one for each thread. For example test1.csv, test2.csv,... testn.csv. Use the filename test${__threadNum}.csv and set the "Sharing mode" to "Current thread".
As a special case, the string "\t" (without quotes) in the delimiter field is treated as a Tab.
When the end of file (EOF) is reached, and the recycle option is true, reading starts again with the first line of the file.
If the recycle option is false, and stopThread is false, then all the variables are set to <EOF> when the end of file is reached. This value can be changed by setting the JMeter property csvdataset.eofstring.
If the Recycle option is false, and Stop Thread is true, then reaching EOF will cause the thread to be stopped.
Parameters 
- All threads - (the default) the file is shared between all the threads.
- Current thread group - each file is opened once for each thread group in which the element appears
- Current thread - each file is opened separately for each thread
- Identifier - all threads sharing the same identifier share the same file. So for example if you have 4 thread groups, you could use a common id for two or more of the groups to share the file between them. Or you could use the thread number to share the file between the same thread numbers in different thread groups.
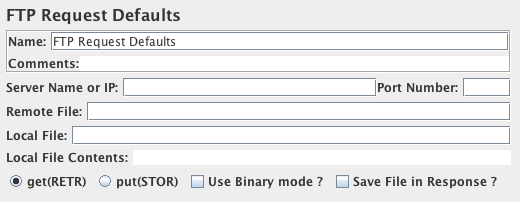
DNS Cache Manager
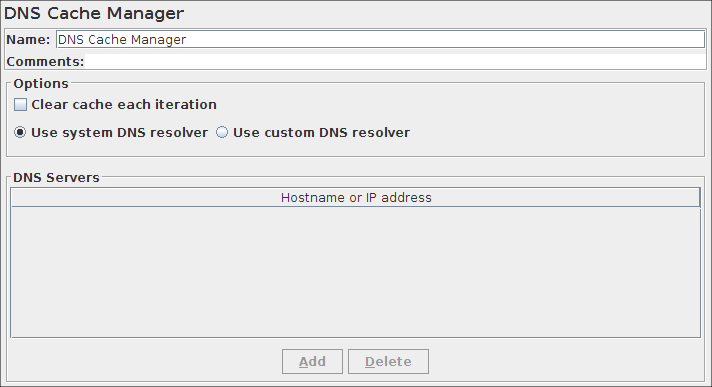
The DNS Cache Manager element allows to test applications, which have several servers behind load balancers (CDN, etc), when user receives content from different IP's. By default JMeter uses JVM DNS cache. That's why only one server from the cluster receives load. DNS Cache Manager resolves name for each thread separately each iteration and saves results of resolving to its internal DNS Cache, which independent from both JVM and OS DNS caches.
Parameters 
networkaddress.cache.ttl=0
HTTP Authorization Manager
The Authorization Manager lets you specify one or more user logins for web pages that are restricted using server authentication. You see this type of authentication when you use your browser to access a restricted page, and your browser displays a login dialog box. JMeter transmits the login information when it encounters this type of page.
The Authorisation headers may not be shown in the Tree View Listener "Request" tab. The Java implementation does pre-emptive authentication, but it does not return the Authorization header when JMeter fetches the headers. The Commons HttpClient (3.1) implementation defaults to pre-emptive and the header will be shown. The HttpComponents implementation does not do pre-emptive auth (it is supported by the library but JMeter does not enable it)
In versions of JMeter after 2.2, the HttpClient sampler defaults to pre-emptive authentication if the setting has not been defined. To disable this, set the values as below, in which case authentication will only be performed in response to a challenge.
jmeter.properties:
httpclient.parameters.file=httpclient.parameters

httpclient.parameters:
http.authentication.preemptive$Boolean=false
Note: the above settings only apply to the HttpClient sampler (and the SOAP samplers, which use Httpclient).
Parameters 
| Sampler | Authentications |
|---|---|
| Java | BASIC |
| HttpClient 3.1 | BASIC, DIGEST |
| HttpClient 4 | BASIC, DIGEST and Kerberos |
Kerberos Configuration:
To configure Kerberos you need to setup at least two JVM system properties:
- -Djava.security.krb5.conf=krb5.conf
- -Djava.security.auth.login.config=jaas.conf
When generating a SPN for Kerberos SPNEGO authentication IE and Firefox will omit the port number from the url. Chrome has an option (--enable-auth-negotiate-port) to include the port number if it differs from the standard ones (80 and 443). That behavior can be emulated by setting the following jmeter property as below.
In jmeter.properties or user.properties, set:
- kerberos.spnego.strip_port=false
Controls:
- Add Button - Add an entry to the authorization table.
- Delete Button - Delete the currently selected table entry.
- Load Button - Load a previously saved authorization table and add the entries to the existing authorization table entries.
- Save As Button - Save the current authorization table to a file.
Download this example. In this example, we created a Test Plan on a local server that sends three HTTP requests, two requiring a login and the other is open to everyone. See figure 10 to see the makeup of our Test Plan. On our server, we have a restricted directory named, "secret", which contains two files, "index.html" and "index2.html". We created a login id named, "kevin", which has a password of "spot". So, in our Authorization Manager, we created an entry for the restricted directory and a username and password (see figure 11). The two HTTP requests named "SecretPage1" and "SecretPage2" make requests to "/secret/index.html" and "/secret/index2.html". The other HTTP request, named "NoSecretPage" makes a request to "/index.html".
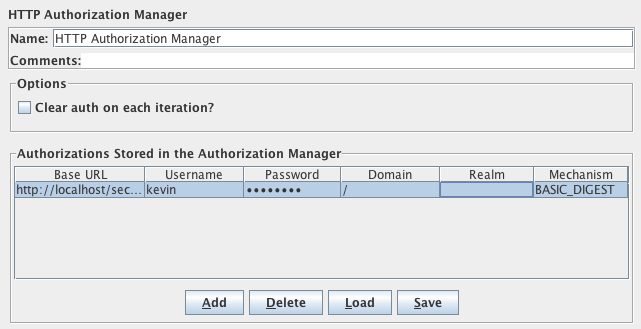
When we run the Test Plan, JMeter looks in the Authorization table for the URL it is requesting. If the Base URL matches the URL, then JMeter passes this information along with the request.
HTTP Cache Manager
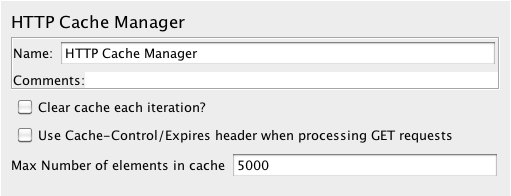
The HTTP Cache Manager is used to add caching functionality to HTTP requests within its scope to simulate browser cache feature. Each Virtual User thread has its own Cache. By default, Cache Manager will store up to 5000 items in cache per Virtual User thread, using LRU algorithm. Use property "maxSize" to modify this value. Note that the more you increase this value the more HTTP Cache Manager will consume memory, so be sure to adapt -Xmx option accordingly.
If a sample is successful (i.e. has response code 2xx) then the Last-Modified and Etag (and Expired if relevant) values are saved for the URL. Before executing the next sample, the sampler checks to see if there is an entry in the cache, and if so, the If-Last-Modified and If-None-Match conditional headers are set for the request.
Additionally, if the "Use Cache-Control/Expires header" option is selected, then the Cache-Control/Expires value is checked against the current time. If the request is a GET request, and the timestamp is in the future, then the sampler returns immediately, without requesting the URL from the remote server. This is intended to emulate browser behaviour. Note that if Cache-Control header is "no-cache", the response will be stored in cache as pre-expired, so will generate a conditional GET request. If Cache-Control has any other value, the "max-age" expiry option is processed to compute entry lifetime, if missing then expire header will be used, if also missing entry will be cached as specified in RFC 2616 section 13.2.4. using Last-Modified time and response Date.
If the requested document has not changed since it was cached, then the response body will be empty. Likewise if the Expires date is in the future. This may cause problems for Assertions.
Parameters 
HTTP Cookie Manager
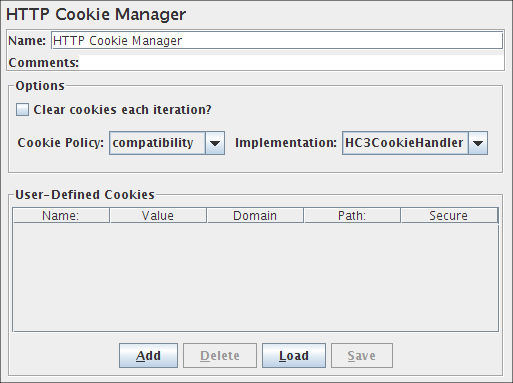
The Cookie Manager element has two functions:
First, it stores and sends cookies just like a web browser. If you have an HTTP Request and
the response contains a cookie, the Cookie Manager automatically stores that cookie and will
use it for all future requests to that particular web site. Each JMeter thread has its own
"cookie storage area". So, if you are testing a web site that uses a cookie for storing
session information, each JMeter thread will have its own session.
Note that such cookies do not appear on the Cookie Manager display, but they can be seen using
the View Results Tree Listener.
JMeter version 2.3.2 and earlier did not check that received cookies were valid for the URL. This meant that cross-domain cookies were stored, and might be used later. This has been fixed in later versions. To revert to the earlier behaviour, define the JMeter property "CookieManager.check.cookies=false".
Received Cookies can be stored as JMeter thread variables (versions of JMeter after 2.3.2 no longer do this by default). To save cookies as variables, define the property "CookieManager.save.cookies=true". Also, cookies names are prefixed with "COOKIE_" before they are stored (this avoids accidental corruption of local variables) To revert to the original behaviour, define the property "CookieManager.name.prefix= " (one or more spaces). If enabled, the value of a cookie with the name TEST can be referred to as ${COOKIE_TEST}.
Second, you can manually add a cookie to the Cookie Manager. However, if you do this, the cookie will be shared by all JMeter threads.
Note that such Cookies are created with an Expiration time far in the future
Since version 2.0.3, cookies with null values are ignored by default. This can be changed by setting the JMeter property: CookieManager.delete_null_cookies=false. Note that this also applies to manually defined cookies - any such cookies will be removed from the display when it is updated. Note also that the cookie name must be unique - if a second cookie is defined with the same name, it will replace the first.
Parameters 
[Note: If you have a website to test with IPv6 address, choose HC4CookieHandler (IPv6 compliant)]
The "domain" is the hostname of the server (without http://); the port is currently ignored.
HTTP Request Defaults

This element lets you set default values that your HTTP Request controllers use. For example, if you are creating a Test Plan with 25 HTTP Request controllers and all of the requests are being sent to the same server, you could add a single HTTP Request Defaults element with the "Server Name or IP" field filled in. Then, when you add the 25 HTTP Request controllers, leave the "Server Name or IP" field empty. The controllers will inherit this field value from the HTTP Request Defaults element.
Parameters 
HTTP Header Manager
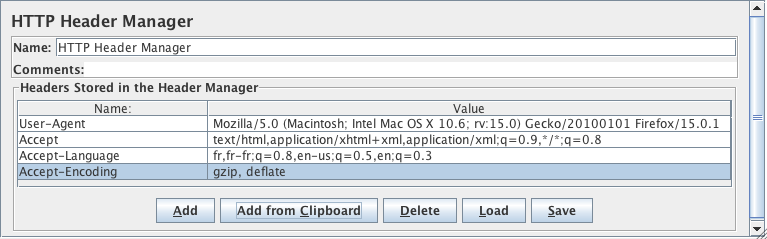
The Header Manager lets you add or override HTTP request headers.
Versions of JMeter up to 2.3.2 supported only one Header Manager per sampler; if there were more in scope, then only the last one would be used.
JMeter now supports multiple Header Managers. The header entries are merged to form the list for the sampler. If an entry to be merged matches an existing header name, it replaces the previous entry, unless the entry value is empty, in which case any existing entry is removed. This allows one to set up a default set of headers, and apply adjustments to particular samplers.
Parameters 
Download this example. In this example, we created a Test Plan that tells JMeter to override the default "User-Agent" request header and use a particular Internet Explorer agent string instead. (see figures 12 and 13).
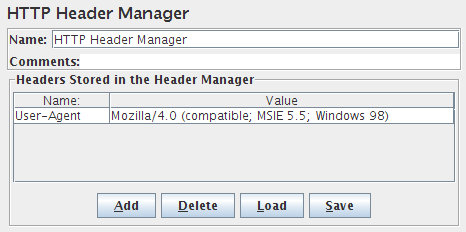
Java Request Defaults
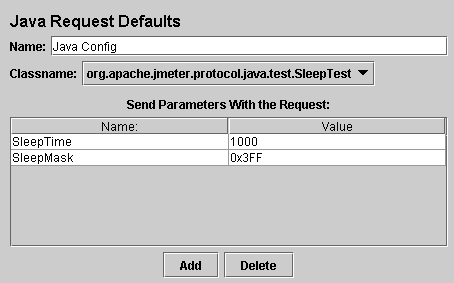
The Java Request Defaults component lets you set default values for Java testing. See the Java Request.
JDBC Connection Configuration
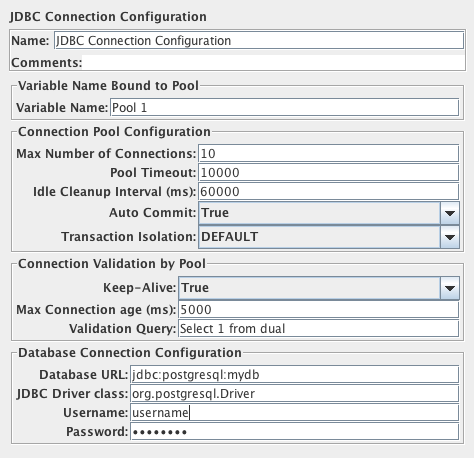
Parameters 
If you really want to use shared pooling (why?), then set the max count to the same as the number of threads to ensure threads don't wait on each other.
Different databases and JDBC drivers require different JDBC settings. The Database URL and JDBC Driver class are defined by the provider of the JDBC implementation.
Some possible settings are shown below. Please check the exact details in the JDBC driver documentation.
If JMeter reports No suitable driver, then this could mean either:
- The driver class was not found. In this case, there will be a log message such as DataSourceElement: Could not load driver: {classname} java.lang.ClassNotFoundException: {classname}
- The driver class was found, but the class does not support the connection string. This could be because of a syntax error in the connection string, or because the the wrong classname was used.
| Database | Driver class | Database URL |
|---|---|---|
| MySQL | com.mysql.jdbc.Driver | jdbc:mysql://host[:port]/dbname |
| PostgreSQL | org.postgresql.Driver | jdbc:postgresql:{dbname} |
| Oracle | oracle.jdbc.OracleDriver | jdbc:oracle:thin:@//host:port/service
OR jdbc:oracle:thin:@(description=(address=(host={mc-name})(protocol=tcp)(port={port-no}))(connect_data=(sid={sid}))) |
| Ingres (2006) | ingres.jdbc.IngresDriver | jdbc:ingres://host:port/db[;attr=value] |
| SQL Server (MS JDBC driver) | com.microsoft.sqlserver.jdbc.SQLServerDriver | jdbc:sqlserver://host:port;DatabaseName=dbname |
| Apache Derby | org.apache.derby.jdbc.ClientDriver | jdbc:derby://server[:port]/databaseName[;URLAttributes=value[;...]] |
Keystore Configuration
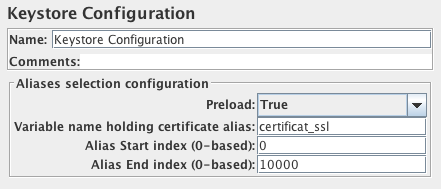
The Keystore Config Element lets you configure how Keystore will be loaded and which keys it will use. This component is typically used in HTTPS scenarios where you don't want to take into account keystore initialization into account in response time.
To use this element, you need to setup first a Java Key Store with the client certificates you want to test, to do that:
- Create your certificates either with Java keytool utility or through your PKI
- If created by PKI, import your keys in Java Key Store by converting them to a format acceptable by JKS
- Then reference the keystore file through the 2 JVM properties (or add them in system.properties):
- -Djavax.net.ssl.keyStore=path_to_keystore
- -Djavax.net.ssl.keyStorePassword=password_of_keystore
Parameters 
- https.use.cached.ssl.context=false is set in jmeter.properties or user.properties
- You use either HTTPClient 3.1 or 4 implementations for HTTP Request
Login Config Element
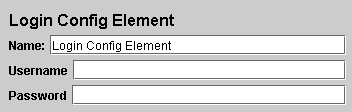
The Login Config Element lets you add or override username and password settings in samplers that use username and password as part of their setup.
Parameters 
LDAP Request Defaults

The LDAP Request Defaults component lets you set default values for LDAP testing. See the LDAP Request.
LDAP Extended Request Defaults
The LDAP Extended Request Defaults component lets you set default values for extended LDAP testing. See the LDAP Extended Request.
TCP Sampler Config
The TCP Sampler Config provides default data for the TCP Sampler
Parameters 
User Defined Variables
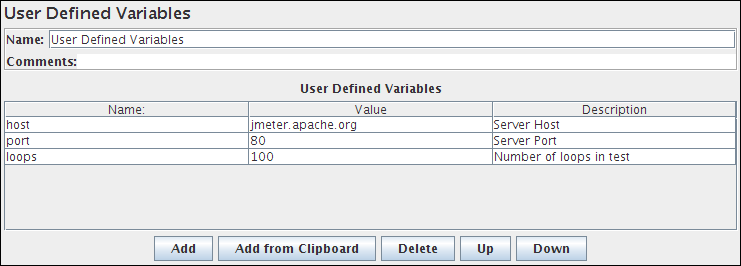
The User Defined Variables element lets you define an initial set of variables, just as in the Test Plan. Note that all the UDV elements in a test plan - no matter where they are - are processed at the start. So you cannot reference variables which are defined as part of a test run, e.g. in a Post-Processor.
UDVs should not be used with functions that generate different results each time they are called. Only the result of the first function call will be saved in the variable. However, UDVs can be used with functions such as __P(), for example:
HOST ${__P(host,localhost)}
which would define the variable "HOST" to have the value of the JMeter property "host", defaulting to "localhost" if not defined.
For defining variables during a test run, see User Parameters. UDVs are processed in the order they appear in the Plan, from top to bottom.
For simplicity, it is suggested that UDVs are placed only at the start of a Thread Group (or perhaps under the Test Plan itself).
Once the Test Plan and all UDVs have been processed, the resulting set of variables is copied to each thread to provide the initial set of variables.
If a runtime element such as a User Parameters Pre-Processor or Regular Expression Extractor defines a variable with the same name as one of the UDV variables, then this will replace the initial value, and all other test elements in the thread will see the updated value.
Parameters 
Random Variable
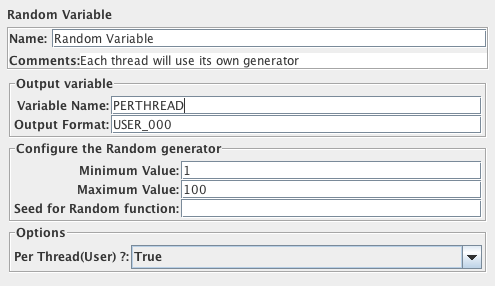
The Random Variable Config Element is used to generate random numeric strings and store them in variable for use later. It's simpler than using User Defined Variables together with the __Random() function.
The output variable is constructed by using the random number generator, and then the resulting number is formatted using the format string. The number is calculated using the formula minimum+Random.nextInt(maximum-minimum+1). Random.nextInt() requires a positive integer. This means that maximum-minimum - i.e. the range - must be less than 2147483647, however the minimum and maximum values can be any long values so long as the range is OK.
Parameters 
Counter

Allows the user to create a counter that can be referenced anywhere in the Thread Group. The counter config lets the user configure a starting point, a maximum, and the increment. The counter will loop from the start to the max, and then start over with the start, continuing on like that until the test is ended.
From version 2.1.2, the counter now uses a long to store the value, so the range is from -2^63 to 2^63-1.
Parameters 
Simple Config Element
The Simple Config Element lets you add or override arbitrary values in samplers. You can choose the name of the value and the value itself. Although some adventurous users might find a use for this element, it's here primarily for developers as a basic GUI that they can use while developing new JMeter components.
Parameters 
MongoDB Source Config
import com.mongodb.DB;
import org.apache.jmeter.protocol.mongodb.config.MongoDBHolder;
DB db = MongoDBHolder.getDBFromSource("value of property MongoDB Source",
            "value of property Database Name");
...
Parameters 
There is maximum amount of time to keep retrying, which is 15s by default.
This can be useful to avoid some exceptions being thrown when a server is down temporarily by blocking the operations.
It also can be useful to smooth the transition to a new master (so that a new master is elected within the retry time).
Note that when using this flag\:
- for a replica set, the driver will trying to connect to the old master for that time, instead of failing over to the new one right away
- this does not prevent exception from being thrown in read/write operations on the socket, which must be handled by application.
Even if this flag is false, the driver already has mechanisms to automatically recreate broken connections and retry the read operations.
Default is false.
It is used solely when establishing a new connection Socket.connect(java.net.SocketAddress, int)
Default is 0 and means no timeout.
Default is 0, which means to use the default 15s if autoConnectRetry is on.
Default is 120,000.
Default is 0 and means no timeout.
Default is false.
All further threads will get an exception right away.
For example if connectionsPerHost is 10 and threadsAllowedToBlockForConnectionMultiplier is 5, then up to 50 threads can wait for a connection.
Default is 5.
If w, wtimeout, fsync or j are specified, this setting is ignored.
Default is false.
Default is false.
Default is false.
Default is 0.
Default is 0.
18.5 Assertions
Assertions are used to perform additional checks on samplers, and are processed after every sampler in the same scope. To ensure that an Assertion is applied only to a particular sampler, add it as a child of the sampler.
Note: Unless documented otherwise, Assertions are not applied to sub-samples (child samples) - only to the parent sample. In the case of BSF and BeanShell Assertions, the script can retrieve sub-samples using the method prev.getSubResults() which returns an array of SampleResults. The array will be empty if there are none.
Versions of JMeter after 2.3.2 include the option to apply certain assertions
to either the main sample, the sub-samples or both.
The default is to apply the assertion to the main sample only.
If the Assertion supports this option, then there will be an entry on the GUI which looks like the following:


Response Assertion
The response assertion control panel lets you add pattern strings to be compared against various fields of the response. The pattern strings are:
- Contains, Matches: Perl5-style regular expressions
- Equals, Substring: plain text, case-sensitive
A summary of the pattern matching characters can be found at ORO Perl5 regular expressions.
You can also choose whether the strings will be expected to match the entire response, or if the response is only expected to contain the pattern. You can attach multiple assertions to any controller for additional flexibility.
Note that the pattern string should not include the enclosing delimiters, i.e. use Price: \d+ not /Price: \d+/.
By default, the pattern is in multi-line mode, which means that the "." meta-character does not match newline. In multi-line mode, "^" and "$" match the start or end of any line anywhere within the string - not just the start and end of the entire string. Note that \s does match new-line. Case is also significant. To override these settings, one can use the extended regular expression syntax. For example:
- (?i)
- ignore case
- (?s)
- treat target as single line, i.e. "." matches new-line
- (?is)
- both the above
- (?i)apple(?-i) Pie
- matches "ApPLe Pie", but not "ApPLe pIe"
- (?s)Apple.+?Pie
- matches Apple followed by Pie, which may be on a subsequent line.
- Apple(?s).+?Pie
- same as above, but it's probably clearer to use the (?s) at the start.
Parameters 
- Main sample only - assertion only applies to the main sample
- Sub-samples only - assertion only applies to the sub-samples
- Main sample and sub-samples - assertion applies to both.
- JMeter Variable - assertion is to be applied to the contents of the named variable
- Text Response - the response text from the server, i.e. the body, excluding any HTTP headers.
- Document (text) - the extract text from various type of documents via Apache Tika (see View Results Tree Document view section).
- URL sampled
- Response Code - e.g. 200
- Response Message - e.g. OK
- Response Headers, including Set-Cookie headers (if any)
The overall success of the sample is determined by combining the result of the assertion with the existing Response status. When the Ignore Status checkbox is selected, the Response status is forced to successful before evaluating the Assertion.
HTTP Responses with statuses in the 4xx and 5xx ranges are normally regarded as unsuccessful. The "Ignore status" checkbox can be used to set the status successful before performing further checks. Note that this will have the effect of clearing any previous assertion failures, so make sure that this is only set on the first assertion.- Contains - true if the text contains the regular expression pattern
- Matches - true if the whole text matches the regular expression pattern
- Equals - true if the whole text equals the pattern string (case-sensitive)
- Substring - true if the text contains the pattern string (case-sensitive)
The pattern is a Perl5-style regular expression, but without the enclosing brackets.
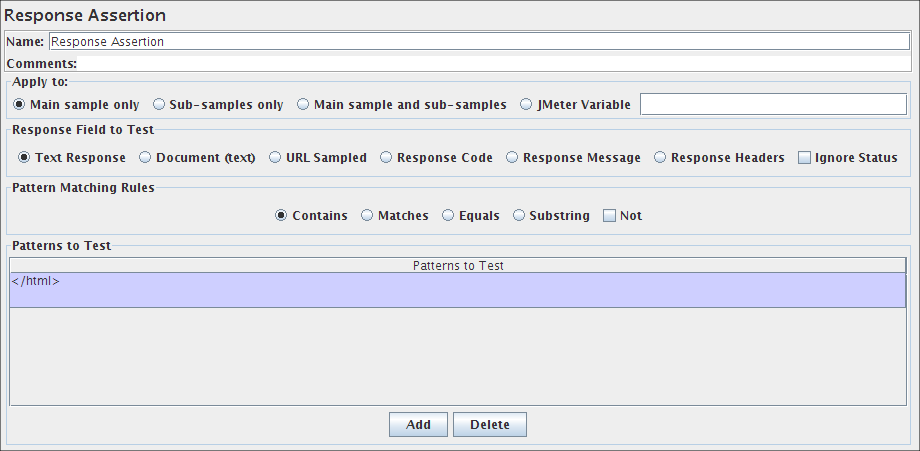
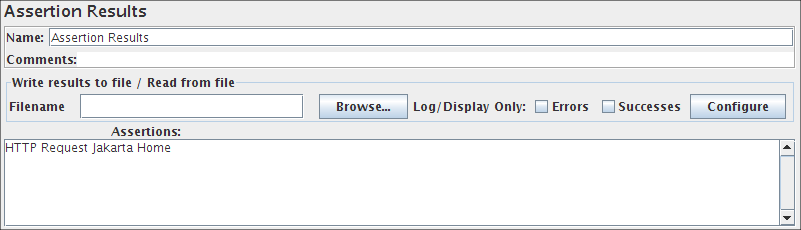
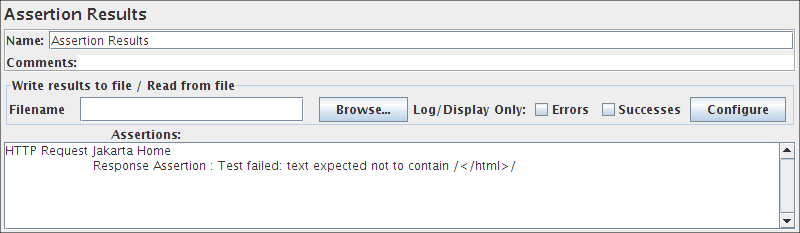
Duration Assertion
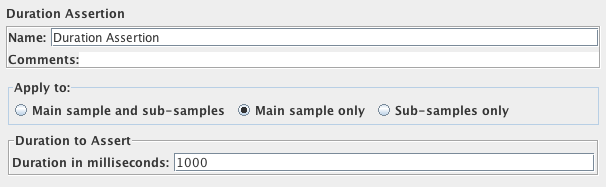
The Duration Assertion tests that each response was received within a given amount of time. Any response that takes longer than the given number of milliseconds (specified by the user) is marked as a failed response.
Parameters 
Size Assertion
The Size Assertion tests that each response contains the right number of bytes in it. You can specify that the size be equal to, greater than, less than, or not equal to a given number of bytes.
Parameters 
- Main sample only - assertion only applies to the main sample
- Sub-samples only - assertion only applies to the sub-samples
- Main sample and sub-samples - assertion applies to both.
- JMeter Variable - assertion is to be applied to the contents of the named variable
XML Assertion

The XML Assertion tests that the response data consists of a formally correct XML document. It does not validate the XML based on a DTD or schema or do any further validation.
Parameters 
BeanShell Assertion
The BeanShell Assertion allows the user to perform assertion checking using a BeanShell script.
For full details on using BeanShell, please see the BeanShell website.
Note that a different Interpreter is used for each independent occurence of the assertion in each thread in a test script, but the same Interpreter is used for subsequent invocations. This means that variables persist across calls to the assertion.
All Assertions are called from the same thread as the sampler.
If the property "beanshell.assertion.init" is defined, it is passed to the Interpreter as the name of a sourced file. This can be used to define common methods and variables. There is a sample init file in the bin directory: BeanShellAssertion.bshrc
The test element supports the ThreadListener and TestListener methods. These should be defined in the initialisation file. See the file BeanShellListeners.bshrc for example definitions.
Parameters 
- Parameters - string containing the parameters as a single variable
- bsh.args - String array containing parameters, split on white-space
There's a sample script you can try.
Before invoking the script, some variables are set up in the BeanShell interpreter. These are strings unless otherwise noted:
- log - the Logger Object. (e.g.) log.warn("Message"[,Throwable])
- SampleResult - the SampleResult Object; read-write
- Response - the response Object; read-write
- Failure - boolean; read-write; used to set the Assertion status
- FailureMessage - String; read-write; used to set the Assertion message
- ResponseData - the response body (byte [])
- ResponseCode - e.g. 200
- ResponseMessage - e.g. OK
- ResponseHeaders - contains the HTTP headers
- RequestHeaders - contains the HTTP headers sent to the server
- SampleLabel
- SamplerData - data that was sent to the server
- ctx - JMeterContext
- vars - JMeterVariables - e.g. vars.get("VAR1"); vars.put("VAR2","value"); vars.putObject("OBJ1",new Object());
- props - JMeterProperties (class java.util.Properties) - e.g. props.get("START.HMS"); props.put("PROP1","1234");
The following methods of the Response object may be useful:
- setStopThread(boolean)
- setStopTest(boolean)
- String getSampleLabel()
- setSampleLabel(String)
MD5Hex Assertion
The MD5Hex Assertion allows the user to check the MD5 hash of the response data.
Parameters 
HTML Assertion

The HTML Assertion allows the user to check the HTML syntax of the response data using JTidy.
Parameters 
XPath Assertion
The XPath Assertion tests a document for well formedness, has the option of validating against a DTD, or putting the document through JTidy and testing for an XPath. If that XPath exists, the Assertion is true. Using "/" will match any well-formed document, and is the default XPath Expression. The assertion also supports boolean expressions, such as "count(//*error)=2". See http://www.w3.org/TR/xpath for more information on XPath.
Some sample expressions:- //title[text()='Text to match'] - matches <text>Text to match</text> anywhere in the response
- /title[text()='Text to match'] - matches <text>Text to match</text> at root level in the response
Parameters 
- prefix1=Full Namespace 1
- prefix2=Full Namespace 2
- ...
- xpath.namespace.config
XML Schema Assertion
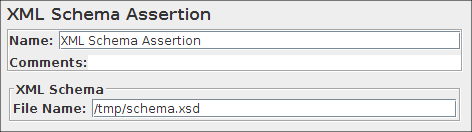
The XML Schema Assertion allows the user to validate a response against an XML Schema.
Parameters 
BSF Assertion
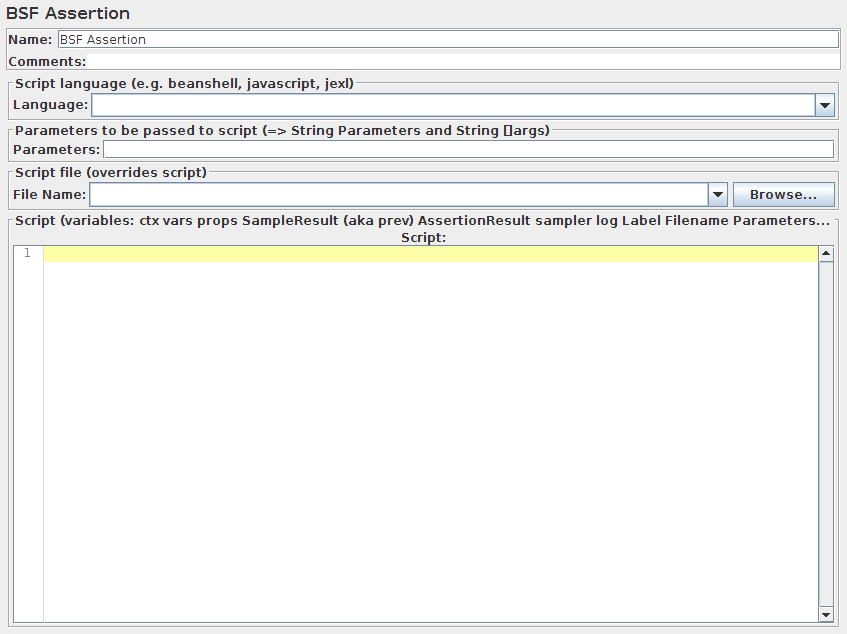
The BSF Assertion allows BSF script code to be used to check the status of the previous sample.
Parameters 
- Parameters - string containing the parameters as a single variable
- args - String array containing parameters, split on white-space
The script (or file) is processed using the BSFEngine.exec() method, which does not return a value.
The following variables are set up for use by the script:
- log - (Logger) - can be used to write to the log file
- Label - the String Label
- Filename - the script file name (if any)
- Parameters - the parameters (as a String)
- args[] - the parameters as a String array (split on whitespace)
- ctx - (JMeterContext) - gives access to the context
- vars - (JMeterVariables) - gives read/write access to variables: vars.get(key); vars.put(key,val); vars.putObject("OBJ1",new Object()); vars.getObject("OBJ2");
- props - (JMeterProperties - class java.util.Properties) - e.g. props.get("START.HMS"); props.put("PROP1","1234");
- SampleResult, prev - (SampleResult) - gives access to the previous SampleResult (if any)
- sampler - (Sampler)- gives access to the current sampler
- OUT - System.out - e.g. OUT.println("message")
- AssertionResult - the assertion result
The script can check various aspects of the SampleResult. If an error is detected, the script should use AssertionResult.setFailureMessage("message") and AssertionResult.setFailure(true).
For futher details of all the methods available on each of the above variables, please check the Javadoc
JSR223 Assertion
The JSR223 Assertion allows JSR223 script code to be used to check the status of the previous sample. For details, see BSF Assertion.
Compare Assertion
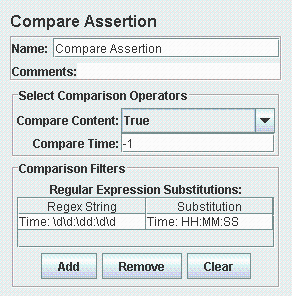
Parameters 
SMIME Assertion
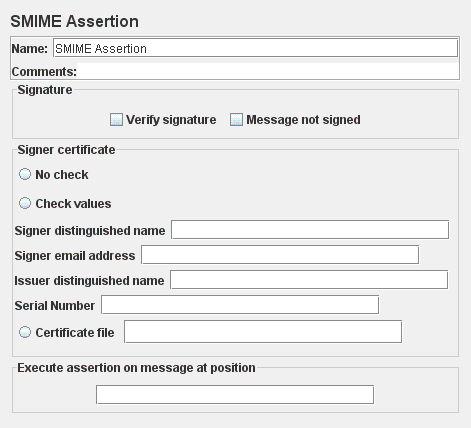
- bcmail-xxx.jar (BouncyCastle SMIME/CMS)
- bcprov-xxx.jar (BouncyCastle Provider)
If using the Mail Reader Sampler, please ensure that you select "Store the message using MIME (raw)" otherwise the Assertion won't be able to process the message correctly.
Parameters 
18.6 Timers
Note that timers are processed before each sampler in the scope in which they are found;
if there are several timers in the same scope, all the timers will be processed before
each sampler.
Timers are only processed in conjunction with a sampler.
A timer which is not in the same scope as a sampler will not be processed at all.
To apply a timer to a single sampler, add the timer as a child element of the sampler.
The timer will be applied before the sampler is executed.
To apply a timer after a sampler, either add it to the next sampler, or add it as the
child of a Test Action Sampler.
Constant Timer
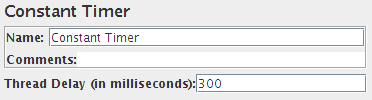
If you want to have each thread pause for the same amount of time between requests, use this timer.
Parameters 
Gaussian Random Timer
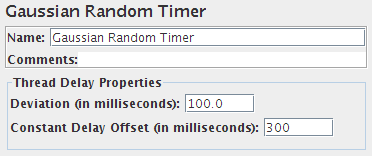
This timer pauses each thread request for a random amount of time, with most of the time intervals ocurring near a particular value. The total delay is the sum of the Gaussian distributed value (with mean 0.0 and standard deviation 1.0) times the deviation value you specify, and the offset value. Another way to explain it, in Gaussian Random Timer, the variation around constant offset has a gaussian curve distribution.
Parameters 
Uniform Random Timer
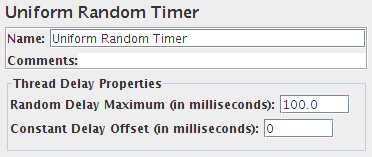
This timer pauses each thread request for a random amount of time, with each time interval having the same probability of occurring. The total delay is the sum of the random value and the offset value.
Parameters 
Constant Throughput Timer
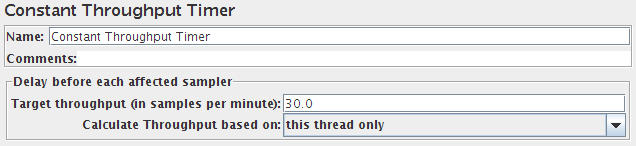
This timer introduces variable pauses, calculated to keep the total throughput (in terms of samples per minute) as close as possible to a give figure. Of course the throughput will be lower if the server is not capable of handling it, or if other timers or time-consuming test elements prevent it.
N.B. although the Timer is called the Constant Throughput timer, the throughput value does not need to be constant. It can be defined in terms of a variable or function call, and the value can be changed during a test. The value can be changed in various ways:
- using a counter variable
- using a JavaScript or BeanShell function to provide a changing value
- using the remote BeanShell server to change a JMeter property
See Best Practices for further details. Note that the throughput value should not be changed too often during a test - it will take a while for the new value to take effect.
Parameters 
- this thread only - each thread will try to maintain the target throughput. The overall throughput will be proportional to the number of active threads.
- all active threads in current thread group - the target throughput is divided amongst all the active threads in the group. Each thread will delay as needed, based on when it last ran.
- all active threads - the target throughput is divided amongst all the active threads in all Thread Groups. Each thread will delay as needed, based on when it last ran. In this case, each other Thread Group will need a Constant Throughput timer with the same settings.
- all active threads in current thread group (shared) - as above, but each thread is delayed based on when any thread in the group last ran.
- all active threads (shared) - as above; each thread is delayed based on when any thread last ran.
The shared and non-shared algorithms both aim to generate the desired thoughput, and will produce similar results. The shared algorithm should generate a more accurate overall transaction rate. The non-shared algortihm should generate a more even spread of transactions across threads.
Synchronizing Timer
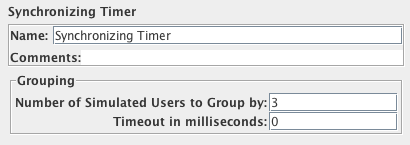
The purpose of the SyncTimer is to block threads until X number of threads have been blocked, and then they are all released at once. A SyncTimer can thus create large instant loads at various points of the test plan.
Parameters 
BeanShell Timer
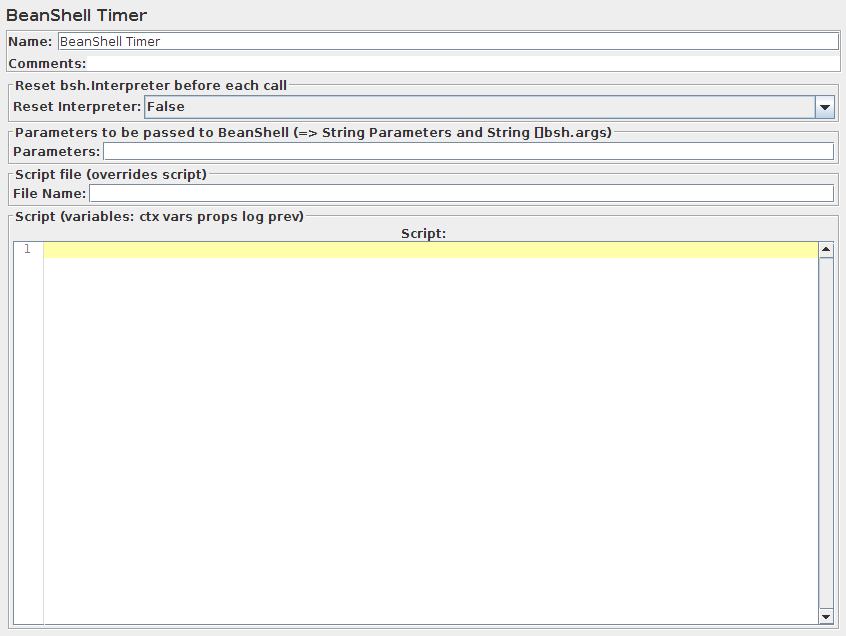
The BeanShell Timer can be used to generate a delay.
For full details on using BeanShell, please see the BeanShell website.
The test element supports the ThreadListener and TestListener methods. These should be defined in the initialisation file. See the file BeanShellListeners.bshrc for example definitions.
Parameters 
- Parameters - string containing the parameters as a single variable
- bsh.args - String array containing parameters, split on white-space
Before invoking the script, some variables are set up in the BeanShell interpreter:
- log - (Logger) - can be used to write to the log file
- ctx - (JMeterContext) - gives access to the context
- vars - (JMeterVariables) - gives read/write access to variables: vars.get(key); vars.put(key,val); vars.putObject("OBJ1",new Object());
- props - (JMeterProperties - class java.util.Properties) - e.g. props.get("START.HMS"); props.put("PROP1","1234");
- prev - (SampleResult) - gives access to the previous SampleResult (if any)
For details of all the methods available on each of the above variables, please check the Javadoc
If the property beanshell.timer.init is defined, this is used to load an initialisation file, which can be used to define methods etc for use in the BeanShell script.
BSF Timer
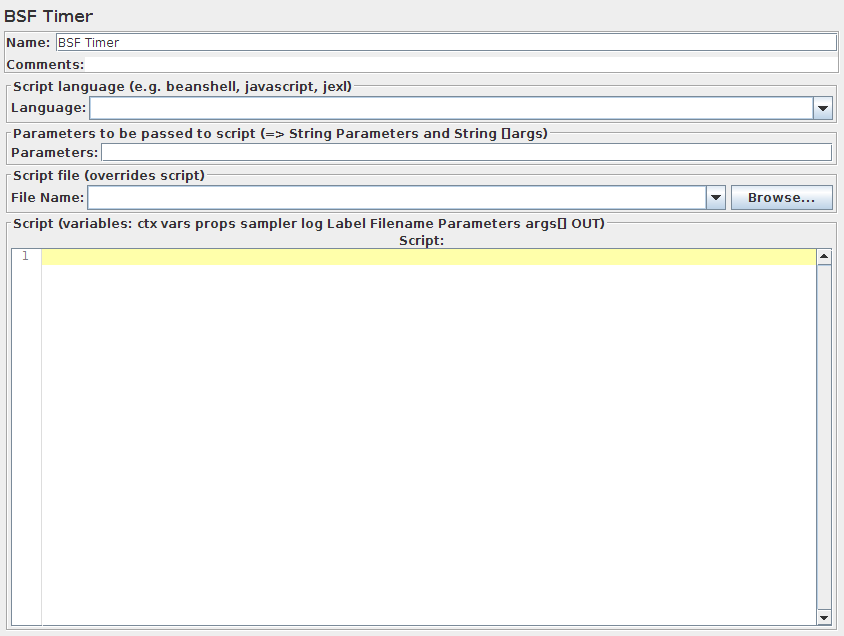
The BSF Timer can be used to generate a delay using a BSF scripting language.
Parameters 
- Parameters - string containing the parameters as a single variable
- args - String array containing parameters, split on white-space
Before invoking the script, some variables are set up in the script interpreter:
- log - (Logger) - can be used to write to the log file
- ctx - (JMeterContext) - gives access to the context
- vars - (JMeterVariables) - gives read/write access to variables: vars.get(key); vars.put(key,val); vars.putObject("OBJ1",new Object());
- props - (JMeterProperties - class java.util.Properties) - e.g. props.get("START.HMS"); props.put("PROP1","1234");
- sampler - the current Sampler
- Label - the name of the Timer
- Filename - the file name (if any)
- OUT - System.out
For details of all the methods available on each of the above variables, please check the Javadoc
JSR223 Timer
The JSR223 Timer can be used to generate a delay using a JSR223 scripting language, For details, see BSF Timer.
Poisson Random Timer
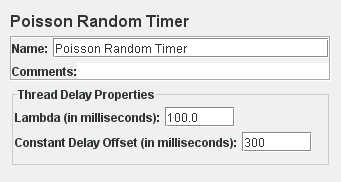
This timer pauses each thread request for a random amount of time, with most of the time intervals ocurring near a particular value. The total delay is the sum of the Poisson distributed value, and the offset value.
Parameters 
18.7 Pre Processors
Preprocessors are used to modify the Samplers in their scope.
HTML Link Parser
This modifier parses HTML response from the server and extracts links and forms. A URL test sample that passes through this modifier will be examined to see if it "matches" any of the links or forms extracted from the immediately previous response. It would then replace the values in the URL test sample with appropriate values from the matching link or form. Perl-type regular expressions are used to find matches.
Consider a simple example: let's say you wanted JMeter to "spider" through your site, hitting link after link parsed from the HTML returned from your server (this is not actually the most useful thing to do, but it serves as a good example). You would create a Simple Controller, and add the "HTML Link Parser" to it. Then, create an HTTP Request, and set the domain to ".*", and the path likewise. This will cause your test sample to match with any link found on the returned pages. If you wanted to restrict the spidering to a particular domain, then change the domain value to the one you want. Then, only links to that domain will be followed.
A more useful example: given a web polling application, you might have a page with several poll options as radio buttons for the user to select. Let's say the values of the poll options are very dynamic - maybe user generated. If you wanted JMeter to test the poll, you could either create test samples with hardcoded values chosen, or you could let the HTML Link Parser parse the form, and insert a random poll option into your URL test sample. To do this, follow the above example, except, when configuring your Web Test controller's URL options, be sure to choose "POST" as the method. Put in hard-coded values for the domain, path, and any additional form parameters. Then, for the actual radio button parameter, put in the name (let's say it's called "poll_choice"), and then ".*" for the value of that parameter. When the modifier examines this URL test sample, it will find that it "matches" the poll form (and it shouldn't match any other form, given that you've specified all the other aspects of the URL test sample), and it will replace your form parameters with the matching parameters from the form. Since the regular expression ".*" will match with anything, the modifier will probably have a list of radio buttons to choose from. It will choose at random, and replace the value in your URL test sample. Each time through the test, a new random value will be chosen.
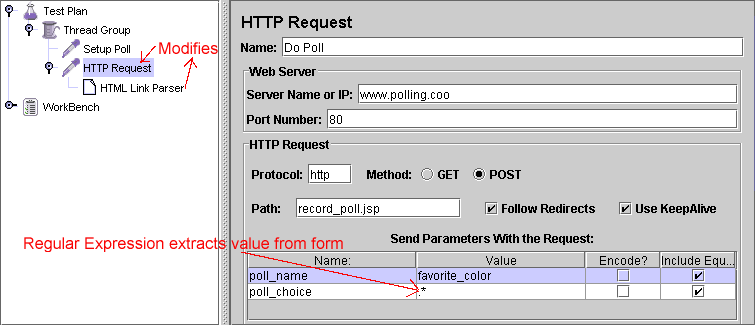
HTTP URL Re-writing Modifier
This modifier works similarly to the HTML Link Parser, except it has a specific purpose for which it is easier to use than the HTML Link Parser, and more efficient. For web applications that use URL Re-writing to store session ids instead of cookies, this element can be attached at the ThreadGroup level, much like the HTTP Cookie Manager. Simply give it the name of the session id parameter, and it will find it on the page and add the argument to every request of that ThreadGroup.
Alternatively, this modifier can be attached to select requests and it will modify only them. Clever users will even determine that this modifier can be used to grab values that elude the HTML Link Parser.
Parameters 
HTML Parameter Mask (DEPRECATED)
The HTML Parameter Mask is used to generate unique values for HTML arguments. By specifying the name of the parameter, a value prefix and suffix, and counter parameters, this modifier will generate values of the form "name=prefixcountersuffix". Any HTTP Request that it modifies, it will replace any parameter with the same name or add the appropriate parameter to the requests list of arguments.
As an example, the username for a login script could be modified to send a series of values
such as:
user_1
user_2
user_3
user_4, etc.
Parameters 
User Parameters
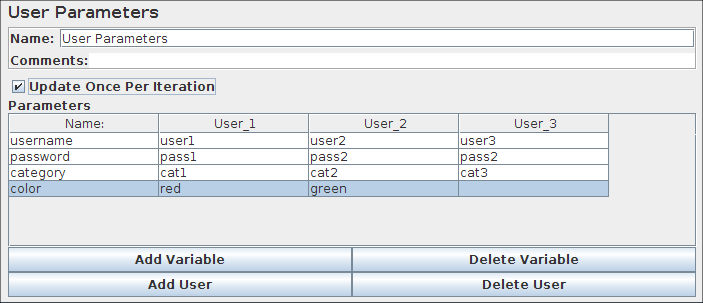
Allows the user to specify values for User Variables specific to individual threads.
User Variables can also be specified in the Test Plan but not specific to individual threads. This panel allows you to specify a series of values for any User Variable. For each thread, the variable will be assigned one of the values from the series in sequence. If there are more threads than values, the values get re-used. For example, this can be used to assign a distinct user id to be used by each thread. User variables can be referenced in any field of any jMeter Component.
The variable is specified by clicking the Add Variable button in the bottom of the panel and filling in the Variable name in the 'Name:' column. To add a new value to the series, click the 'Add User' button and fill in the desired value in the newly added column.
Values can be accessed in any test component in the same thread group, using the function syntax: ${variable}.
See also the CSV Data Set Config element, which is more suitable for large numbers of parameters
Parameters 
BeanShell PreProcessor
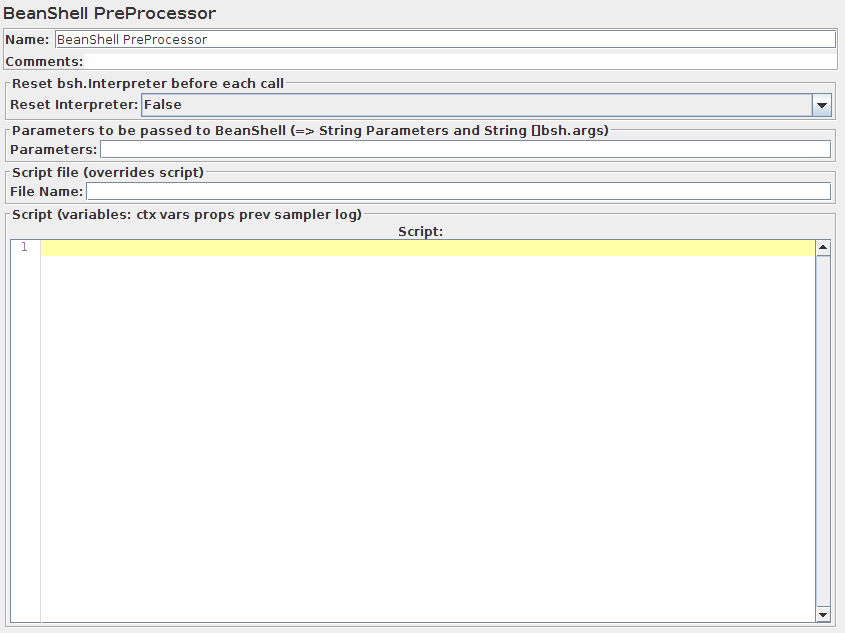
The BeanShell PreProcessor allows arbitrary code to be applied before taking a sample.
For full details on using BeanShell, please see the BeanShell website.
The test element supports the ThreadListener and TestListener methods. These should be defined in the initialisation file. See the file BeanShellListeners.bshrc for example definitions.
Parameters 
- Parameters - string containing the parameters as a single variable
- bsh.args - String array containing parameters, split on white-space
Before invoking the script, some variables are set up in the BeanShell interpreter:
- log - (Logger) - can be used to write to the log file
- ctx - (JMeterContext) - gives access to the context
- vars - (JMeterVariables) - gives read/write access to variables: vars.get(key); vars.put(key,val); vars.putObject("OBJ1",new Object());
- props - (JMeterProperties - class java.util.Properties) - e.g. props.get("START.HMS"); props.put("PROP1","1234");
- prev - (SampleResult) - gives access to the previous SampleResult (if any)
- sampler - (Sampler)- gives access to the current sampler
For details of all the methods available on each of the above variables, please check the Javadoc
If the property beanshell.preprocessor.init is defined, this is used to load an initialisation file, which can be used to define methods etc for use in the BeanShell script.
BSF PreProcessor

The BSF PreProcessor allows BSF script code to be applied before taking a sample.
Parameters 
- Parameters - string containing the parameters as a single variable
- args - String array containing parameters, split on white-space
The script (or file) is processed using the BSFEngine.exec() method, which does not return a value.
The following BSF variables are set up for use by the script:
- log - (Logger) - can be used to write to the log file
- Label - the String Label
- Filename - the script file name (if any)
- Parameters - the parameters (as a String)
- args[] - the parameters as a String array (split on whitespace)
- ctx - (JMeterContext) - gives access to the context
- vars - (JMeterVariables) - gives read/write access to variables: vars.get(key); vars.put(key,val); vars.putObject("OBJ1",new Object()); vars.getObject("OBJ2");
- props - (JMeterProperties - class java.util.Properties) - e.g. props.get("START.HMS"); props.put("PROP1","1234");
- sampler - (Sampler)- gives access to the current sampler
- OUT - System.out - e.g. OUT.println("message")
For details of all the methods available on each of the above variables, please check the Javadoc
JSR223 PreProcessor
The JSR223 PreProcessor allows JSR223 script code to be applied before taking a sample. For details, see BSF PreProcessor.
JDBC PreProcessor
The JDBC PreProcessor enables you to run some SQL statement just before a sample runs. This can be useful if your JDBC Sample requires some data to be in DataBase and you cannot compute this in a setup Thread group. For details, see JDBC Request.
See the following Test plan:
In the linked test plan,"Create Price Cut-Off" JDBC PreProcessor calls a stored procedure to create a Price Cut-Off in Database,
this one will be used by "Calculate Price cut off".
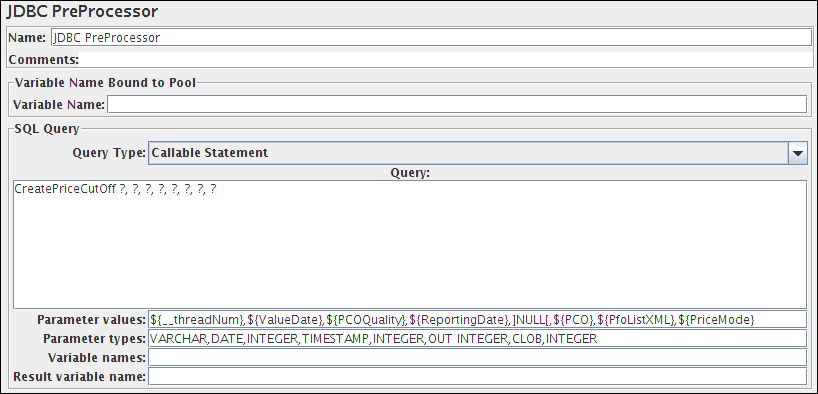
RegEx User Parameters

Allows to specify dynamic values for HTTP parameters extracted from another HTTP Request using regular expressions. RegEx User Parameters are specific to individual threads.
This component allows you to specify reference name of a regular expression that extracts names and values of HTTP request parameters. Regular expression group numbers must be specified for parameter's name and also for parameter's value. Replacement will only occur for parameters in the Sampler that uses this RegEx User Parameters which name matches
Parameters 
Example:
Suppose we have a request which returns a form with 3 input parameters and we want to extract the value of 2 of them to inject them in next request
1. - Create Post Processor Regular Expression for first HTTP Request
- refName - set name of a regular expression Ex. (listParams)
- regular expression - expression that will extract input names and input values attributes
Ex: input name="([^"]+?)" value="([^"]+?)" - template would be empty
- match nr - -1 (in order to iterate through all the possible matches)
2. - Create Pre Processor RegEx User Parameters for second HTTP Request
- refName - set the same reference name of a regular expression, would be listParams in our example
- parameter names group number - group number of regular expression for parameter names, would be 1 in our example
- parameter values group number - group number of regular expression for parameter values, would be 2 in our example
See also the Regular Expression Extractor element, which is used to extract parametes names and values
18.8 Post-Processors
As the name suggests, Post-Processors are applied after samplers. Note that they are applied to all the samplers in the same scope, so to ensure that a post-processor is applied only to a particular sampler, add it as a child of the sampler.
Note: Unless documented otherwise, Post-Processors are not applied to sub-samples (child samples) - only to the parent sample. In the case of BSF and BeanShell post-processors, the script can retrieve sub-samples using the method prev.getSubResults() which returns an array of SampleResults. The array will be empty if there are none.
Post-Processors are run before Assertions, so they do not have access to any Assertion Results, nor will the sample status reflect the results of any Assertions. If you require access to Assertion Results, try using a Listener instead. Also note that the variable JMeterThread.last_sample_ok is set to "true" or "false" after all Assertions have been run.
Regular Expression Extractor
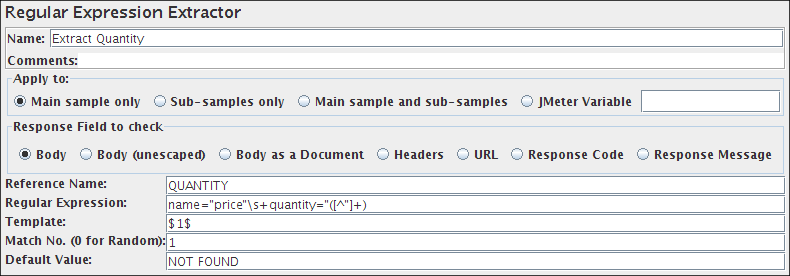
Allows the user to extract values from a server response using a Perl-type regular expression. As a post-processor, this element will execute after each Sample request in its scope, applying the regular expression, extracting the requested values, generate the template string, and store the result into the given variable name.
Parameters 
- Main sample only - only applies to the main sample
- Sub-samples only - only applies to the sub-samples
- Main sample and sub-samples - applies to both.
- JMeter Variable - assertion is to be applied to the contents of the named variable
- Body - the body of the response, e.g. the content of a web-page (excluding headers)
- Body (unescaped) - the body of the response, with all Html escape codes replaced.
Note that Html escapes are processed without regard to context, so some incorrect substitutions
may be made.
Note that this option highly impacts performances, so use it only when absolutely necessary and be aware of its impacts
- Body as a Document - the extract text from various type of documents via Apache Tika (see View Results Tree Document view section).
Note that the Body as a Document option can impact performances, so ensure it is Ok for your test
- Request Headers - may not be present for non-HTTP samples
- Response Headers - may not be present for non-HTTP samples
- URL
- Response Code - e.g. 200
- Response Message - e.g. OK
- Use a value of zero to indicate JMeter should choose a match at random.
- A positive number N means to select the nth match.
- Negative numbers are used in conjunction with the ForEach controller - see below.
However, if you have several test elements that set the same variable, you may wish to leave the variable unchanged if the expression does not match. In this case, remove the default value once debugging is complete.
If the match number is set to a non-negative number, and a match occurs, the variables are set as follows:
- refName - the value of the template
- refName_gn, where n=0,1,2 - the groups for the match
- refName_g - the number of groups in the Regex (excluding 0)
- refName_g0
- refName_g1
- refName_g
If the match number is set to a negative number, then all the possible matches in the sampler data are processed. The variables are set as follows:
- refName_matchNr - the number of matches found; could be 0
- refName_n, where n = 1,2,3 etc - the strings as generated by the template
- refName_n_gm, where m=0,1,2 - the groups for match n
- refName - always set to the default value
- refName_gn - not set
See also Response Assertion for some examples of how to specify modifiers, and for further information on JMeter regular expressions.
CSS/JQuery Extractor

Allows the user to extract values from a server response using a CSS/JQuery selector like syntax. As a post-processor, this element will execute after each Sample request in its scope, applying the CSS/JQuery expression, extracting the requested nodes, extracting the node as text or attribute value and store the result into the given variable name.
Parameters 
- Main sample only - only applies to the main sample
- Sub-samples only - only applies to the sub-samples
- Main sample and sub-samples - applies to both.
- JMeter Variable - assertion is to be applied to the contents of the named variable
- E[foo] an E element with a "foo" attribute
- ancestor child:child elements that descend from ancestor, e.g. .body p finds p elements anywhere under a block with class "body"
- :lt(n): find elements whose sibling index (i.e. its position in the DOM tree relative to its parent) is less than n; e.g. td:lt(3)
- :contains(text): find elements that contain the given text. The search is case-insensitive; e.g. p:contains(jsoup)
- ...
This is the equivalent Element#attr(name) function for JSoup if an atttribute is set.
If empty this is the equivalent of Element#text() function for JSoup if not value is set for attribute.
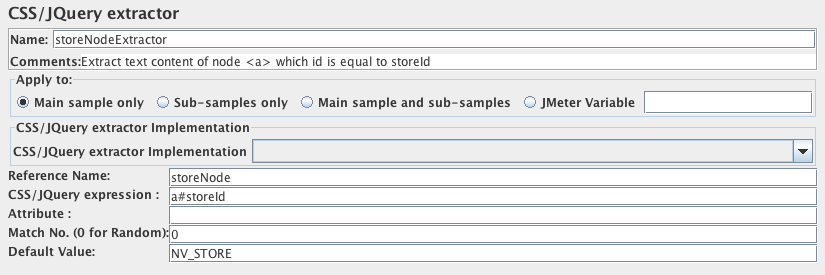
- Use a value of zero to indicate JMeter should choose a match at random.
- A positive number N means to select the nth match.
- Negative numbers are used in conjunction with the ForEach controller - see below.
However, if you have several test elements that set the same variable, you may wish to leave the variable unchanged if the expression does not match. In this case, remove the default value once debugging is complete.
If the match number is set to a non-negative number, and a match occurs, the variables are set as follows:
- refName - the value of the template
If the match number is set to a negative number, then all the possible matches in the sampler data are processed. The variables are set as follows:
- refName_matchNr - the number of matches found; could be 0
- refName_n, where n = 1,2,3 etc - the strings as generated by the template
- refName - always set to the default value
XPath Extractor
Parameters 
- Main sample only - only applies to the main sample
- Sub-samples only - only applies to the sub-samples
- Main sample and sub-samples - applies to both.
- JMeter Variable - assertion is to be applied to the contents of the named variable
- "Use Tidy" should be checked on for HTML response. Such response is converted to valid XHTML (XML compatible HTML) using Tidy
- "Use Tidy" should be unchecked for both XHTML or XML response (for example RSS)
//mynamespace:tagname
by
//*[local-name()='tagname' and namespace-uri()='uri-for-namespace']
where "uri-for-namespace" is the uri for the "mynamespace" namespace. (not applicable if Tidy is selected)
For example //title would return "<title>Apache JMeter</title>" rather than "Apache JMeter".
In this case, //title/text() would return "Apache JMeter".
To allow for use in a ForEach Controller, the following variables are set on return:
- refName - set to first (or only) match; if no match, then set to default
- refName_matchNr - set to number of matches (may be 0)
- refName_n - n=1,2,3 etc. Set to the 1st, 2nd 3rd match etc.
Note: The next refName_n variable is set to null - e.g. if there are 2 matches, then refName_3 is set to null, and if there are no matches, then refName_1 is set to null.
XPath is query language targeted primarily for XSLT transformations. However it is usefull as generic query language for structured data too. See XPath Reference or XPath specification for more information. Here are few examples:
- /html/head/title
- extracts title element from HTML response
- /book/page[2]
- extracts 2nd page from a book
- /book/page
- extracts all pages from a book
- //form[@name='countryForm']//select[@name='country']/option[text()='Czech Republic'])/@value
- extracts value attribute of option element that match text 'Czech Republic' inside of select element with name attribute 'country' inside of form with name attribute 'countryForm'
- All elements and attribute names are converted to lowercase
- Tidy attempts to correct improperly nested elements. For example - original (incorrect) ul/font/li becomes correct ul/li/font
Result Status Action Handler
Parameters 
- Continue - ignore the error and continue with the test
- Start next thread loop - does not execute samplers following the sampler in error for the current iteration and restarts the loop on next iteration
- Stop Thread - current thread exits
- Stop Test - the entire test is stopped at the end of any current samples.
- Stop Test Now - the entire test is stopped abruptly. Any current samplers are interrupted if possible.
BeanShell PostProcessor
The BeanShell PreProcessor allows arbitrary code to be applied after taking a sample.
For JMeter versions after 2.2 the BeanShell Post-Processor no longer ignores samples with zero-length result data
For full details on using BeanShell, please see the BeanShell website.
The test element supports the ThreadListener and TestListener methods. These should be defined in the initialisation file. See the file BeanShellListeners.bshrc for example definitions.
Parameters 
- Parameters - string containing the parameters as a single variable
- bsh.args - String array containing parameters, split on white-space
The following BeanShell variables are set up for use by the script:
- log - (Logger) - can be used to write to the log file
- ctx - (JMeterContext) - gives access to the context
- vars - (JMeterVariables) - gives read/write access to variables: vars.get(key); vars.put(key,val); vars.putObject("OBJ1",new Object());
- props - (JMeterProperties - class java.util.Properties) - e.g. props.get("START.HMS"); props.put("PROP1","1234");
- prev - (SampleResult) - gives access to the previous SampleResult
- data - (byte [])- gives access to the current sample data
For details of all the methods available on each of the above variables, please check the Javadoc
If the property beanshell.postprocessor.init is defined, this is used to load an initialisation file, which can be used to define methods etc for use in the BeanShell script.
BSF PostProcessor
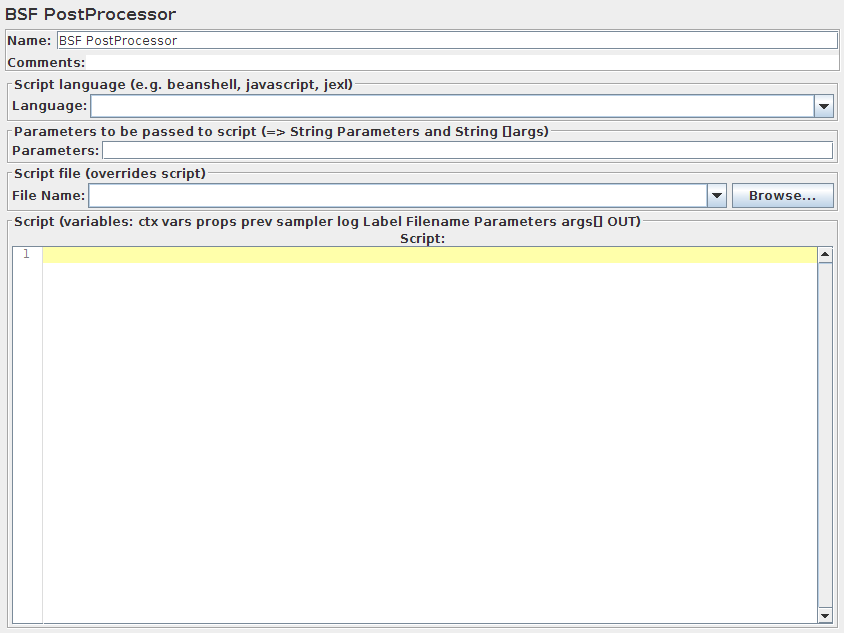
The BSF PostProcessor allows BSF script code to be applied after taking a sample.
Parameters 
- Parameters - string containing the parameters as a single variable
- args - String array containing parameters, split on white-space
The script (or file) is processed using the BSFEngine.exec() method, which does not return a value.
Before invoking the script, some variables are set up. Note that these are BSF variables - i.e. they can be used directly in the script.
- log - (Logger) - can be used to write to the log file
- Label - the String Label
- Filename - the script file name (if any)
- Parameters - the parameters (as a String)
- args[] - the parameters as a String array (split on whitespace)
- ctx - (JMeterContext) - gives access to the context
- vars - (JMeterVariables) - gives read/write access to variables: vars.get(key); vars.put(key,val); vars.putObject("OBJ1",new Object()); vars.getObject("OBJ2");
- props - (JMeterProperties - class java.util.Properties) - e.g. props.get("START.HMS"); props.put("PROP1","1234");
- prev - (SampleResult) - gives access to the previous SampleResult (if any)
- sampler - (Sampler)- gives access to the current sampler
- OUT - System.out - e.g. OUT.println("message")
For details of all the methods available on each of the above variables, please check the Javadoc
JSR223 PostProcessor
The JSR223 PostProcessor allows JSR223 script code to be applied after taking a sample. For details, see the BSF PostProcessor.
JDBC PostProcessor
The JDBC PostProcessor enables you to run some SQL statement just after a sample has run. This can be useful if your JDBC Sample changes some data and you want to reset state to what it was before the JDBC sample run.
In the linked test plan,"JDBC PostProcessor" JDBC PostProcessor calls a stored procedure to delete from Database the Price Cut-Off that was created by PreProcessor.
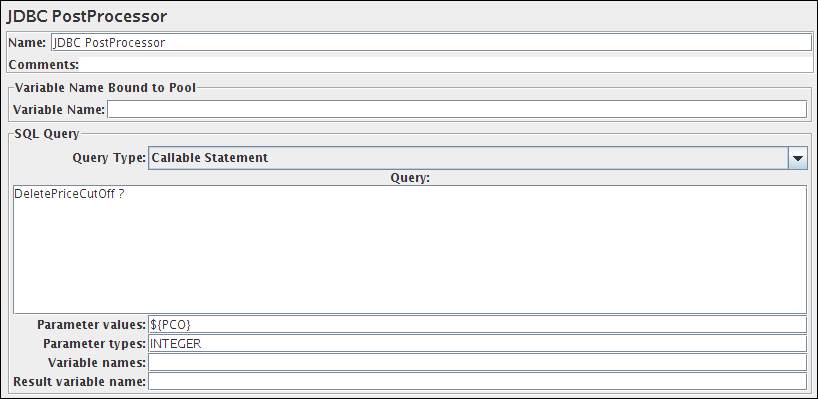
18.9 Miscellaneous Features
Test Plan
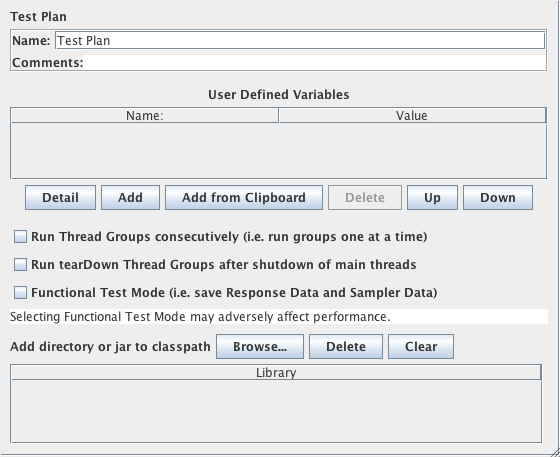
The Test Plan is where the overall settings for a test are specified.
Static variables can be defined for values that are repeated throughout a test, such as server names. For example the variable SERVER could be defined as www.example.com, and the rest of the test plan could refer to it as ${SERVER}. This simplifies changing the name later.
If the same variable name is reused on one of more User Defined Variables Configuration elements, the value is set to the last definition in the test plan (reading from top to bottom). Such variables should be used for items that may change between test runs, but which remain the same during a test run.
Note that the Test Plan cannot refer to variables it defines. If you need to construct other variables from the Test Plan variables, use a User Defined Variables test element.
Selecting Functional Testing instructs JMeter to save the additional sample information - Response Data and Sampler Data - to all result files. This increases the resources needed to run a test, and may adversely impact JMeter performance. If more data is required for a particular sampler only, then add a Listener to it, and configure the fields as required. [The option does not affect CSV result files, which cannot currently store such information.]
Also, an option exists here to instruct JMeter to run the Thread Group serially rather than in parallel.
Run tearDown Thread Groups after shutdown of main threads: if selected, the tearDown groups (if any) will be run after graceful shutdown of the main threads. The tearDown threads won't be run if the test is forcibly stopped.
Test plan now provides an easy way to add classpath setting to a specific test plan. The feature is additive, meaning that you can add jar files or directories, but removing an entry requires restarting JMeter. Note that this cannot be used to add JMeter GUI plugins, because they are processed earlier. However it can be useful for utility jars such as JDBC drivers. The jars are only added to the search path for the JMeter loader, not for the system class loader.
JMeter properties also provides an entry for loading additional classpaths. In jmeter.properties, edit "user.classpath" or "plugin_dependency_paths" to include additional libraries. See JMeter's Classpath and Configuring JMeter for details.
Thread Group
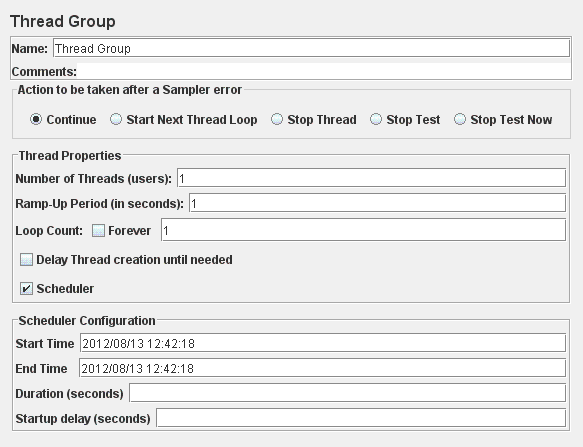
A Thread Group defines a pool of users that will execute a particular test case against your server. In the Thread Group GUI, you can control the number of users simulated (num of threads), the ramp up time (how long it takes to start all the threads), the number of times to perform the test, and optionally, a start and stop time for the test.
See also tearDown Thread Group and setUp Thread Group.
When using the scheduler, JMeter runs the thread group until either the number of loops is reached or the duration/end-time is reached - whichever occurs first. Note that the condition is only checked between samples; when the end condition is reached, that thread will stop. JMeter does not interrupt samplers which are waiting for a response, so the end time may be delayed arbitrarily.
Parameters 
- Continue - ignore the error and continue with the test
- Start Next Loop - ignore the error, start next loop and continue with the test
- Stop Thread - current thread exits
- Stop Test - the entire test is stopped at the end of any current samples.
- Stop Test Now - the entire test is stopped abruptly. Any current samplers are interrupted if possible.
If not selected, all threads are created when the test starts (they then pause for the appropriate proportion of the ramp-up time). This is the original default, and is appropriate for tests where threads are active throughout most of the test.
WorkBench
The WorkBench simply provides a place to temporarily store test elements while not in use, for copy/paste purposes, or any other purpose you desire. When you save your test plan, WorkBench items are not saved with it by default unless you check "Save Workbench" option. Your WorkBench can be saved independently, if you like (right-click on WorkBench and choose Save).
Certain test elements are only available on the WorkBench:
Parameters
SSL Manager
The SSL Manager is a way to select a client certificate so that you can test applications that use Public Key Infrastructure (PKI). It is only needed if you have not set up the appropriate System properties.
Choosing a Client CertificateYou may either use a Java Key Store (JKS) format key store, or a Public Key Certificate Standard #12 (PKCS12) file for your client certificates. There is a feature of the JSSE libraries that require you to have at least a six character password on your key (at least for the keytool utility that comes with your JDK).
To select the client certificate, choose Options->SSL Manager from the menu bar. You will be presented with a file finder that looks for PKCS12 files by default. Your PKCS12 file must have the extension '.p12' for SSL Manager to recognize it as a PKCS12 file. Any other file will be treated like an average JKS key store. If JSSE is correctly installed, you will be prompted for the password. The text box does not hide the characters you type at this point--so make sure no one is looking over your shoulder. The current implementation assumes that the password for the keystore is also the password for the private key of the client you want to authenticate as.
Or you can set the appropriate System properties - see the system.properties file.
The next time you run your test, the SSL Manager will examine your key store to see if it has at least one key available to it. If there is only one key, SSL Manager will select it for you. If there is more than one key, it currently selects the first key. There is currently no way to select other entries in the keystore, so the desired key must be the first.
Things to Look Out ForYou must have your Certificate Authority (CA) certificate installed properly if it is not signed by one of the five CA certificates that ships with your JDK. One method to install it is to import your CA certificate into a JKS file, and name the JKS file "jssecacerts". Place the file in your JRE's lib/security folder. This file will be read before the "cacerts" file in the same directory. Keep in mind that as long as the "jssecacerts" file exists, the certificates installed in "cacerts" will not be used. This may cause problems for you. If you don't mind importing your CA certificate into the "cacerts" file, then you can authenticate against all of the CA certificates installed.
HTTP(S) Test Script Recorder (was: HTTP Proxy Server ) 
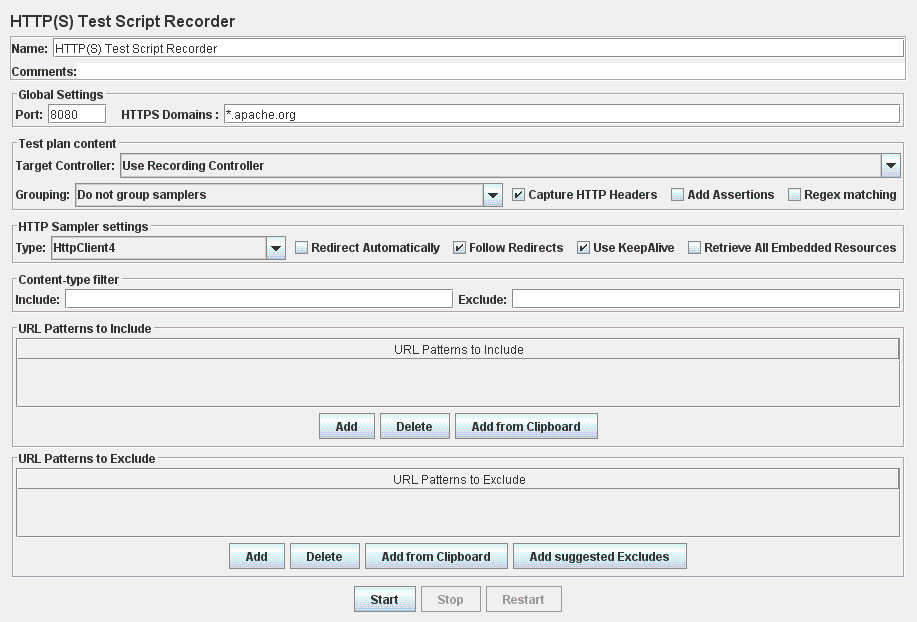
The HTTP(S) Test Script Recorder allows JMeter to intercept and record your actions while you browse your web application
with your normal browser. JMeter will create test sample objects and store them
directly into your test plan as you go (so you can view samples interactively while you make them).
Ensure you read this wiki page to setup correctly JMeter.
To use the recorder, add the HTTP(S) Test Script Recorder element to the workbench. Select the WorkBench element in the tree, and right-click on this element to get the Add menu (Add --> Non-Test Elements --> HTTP(S) Test Script Recorder).
The recorder is implemented as an HTTP(S) proxy server. You need to set up your browser use the proxy for all HTTP and HTTPS requests. [Do not use JMeter as the proxy for any other request types - FTP, etc. - as JMeter cannot handle them.]
Ideally use private browsing mode when recording the session. This should ensure that the browser starts with no stored cookies, and prevents certain changes from being saved. For example, Firefox does not allow certificate overrides to be saved permanently.
HTTPS recording and certificates
HTTPS connections use certificates to authenticate the connection between the browser and the web server. When connecting via HTTPS, the server presents the certificate to the browser. To authenticate the certificate, the browser checks that the server certificate is signed by a Certificate Authority (CA) that is linked to one of its in-built root CAs. [Browsers also check that the certificate is for the correct host or domain, and that it is valid and not expired.] If any of the browser checks fail, it will prompt the user who can then decided whether to allow the connection to proceed.
JMeter needs to use its own certificate to enable it to intercept the HTTPS connection from the browser. Effectively JMeter has to pretend to be the target server.
For versions of JMeter from 2.10, JMeter will generate its own certificate(s). These are generated with a validity period defined by the property proxy.cert.validity, default 7 days, and random passwords. If JMeter detects that it is running under Java 7 or later, it will generate certificates for each target server as necessary (dynamic mode) unless the following property is defined: proxy.cert.dynamic_keys=false. When using dynamic mode, the certificate will be for the correct host name, and will be signed by a JMeter-generated CA certificate. By default, this CA certificate won't be trusted by the browser, however it can be installed as a trusted certificate. Once this is done, the generated server certificates will be accepted by the browser. This has the advantage that even embedded HTTPS resources can be intercepted, and there is no need to override the browser checks for each new server. (Browsers don't prompt for embedded resources. So with earlier versions, embedded resources would only be downloaded for servers that were already 'known' to the browser)
Unless a keystore is provided (and you define the property proxy.cert.alias), JMeter needs to use the keytool application to create the keystore entries. Versions of JMeter after 2.10 include code to check that keytool is available by looking in various standard places. If JMeter is unable to find the keytool application, it will report an error. If necessary, the systen property keytool.directory can be used to tell JMeter where to find keytool. This should be defined in the file system.properties.
The JMeter certificates are generated (if necessary) when the Start button is pressed. Certificate generation can take some while, during which time the GUI will be unresponsive. The cursor is changed to an hour-glass whilst this is happening. When certificate generation is complete, the GUI will display a pop-up dialogue containing the details of the certificate for the root CA. This certificate needs to be installed by the browser in order for it to accept the host certificates generated by JMeter; see below for details.
If necessary, you can force JMeter to regenerate the keystore (and the exported certificates - ApacheJMeterTemporaryRootCA[.usr|.crt]) by deleting the keystore file proxyserver.jks from the JMeter directory.
With versions of JMeter up to 2.9, it used a single certificate for all target servers.
[Likewise if JMeter is not being run under Java 7 or later]
This certificate is not one of the certificates that browsers normally trust, and will not be for the
correct host.
As a consequence:
- The browser should display a dialogue asking if you want to accept the certificate or not. For example:
1) The server's name "www.example.com" does not match the certificate's name
   "JMeter Proxy (DO NOT TRUST)". Somebody may be trying to eavesdrop on you.
2) The certificate for "JMeter Proxy (DO NOT TRUST)" is signed by the unknown Certificate Authority
   "JMeter Proxy (DO NOT TRUST)". It is not possible to verify that this is a valid certificate.
You will need to accept the certificate in order to allow the JMeter Proxy to intercept the SSL traffic in order to record it. However, do not accept this certificate permanently; it should only be accepted temporarily. Browsers only prompt this dialogue for the certificate of the main url, not for the resources loaded in the page, such as images, css or javascript files hosted on a secured external CDN. If you have such resources (gmail has for example), you'll have to first browse manually to these other domains in order to accept JMeter's certificate for them. Check in jmeter.log for secure domains that you need to register certificate for. - If the browser has already registered a validated certificate for this domain, the browser will detect JMeter as a security breach and will refuse to load the page. If so, you have to remove the trusted certificate from your browser's keystore.
Versions of JMeter from 2.10 onwards still support this method, and will continue to do so if the you define the following property: proxy.cert.alias The following properties can be used to change the certificate that is used:
- proxy.cert.directory - the directory in which to find the certificate (default = JMeter bin/)
- proxy.cert.file - name of the keystore file (default "proxyserver.jks")
- proxy.cert.keystorepass - keystore password (default "password") [Ignored if using JMeter certificate]
- proxy.cert.keypassword - certificate key password (default "password") [Ignored if using JMeter certificate]
- proxy.cert.type - the certificate type (default "JKS") [Ignored if using JMeter certificate]
- proxy.cert.factory - the factory (default "SunX509") [Ignored if using JMeter certificate]
- proxy.cert.alias - the alias for the key to be used. If this is defined, JMeter does not attempt to generate its own certificate(s).
- proxy.ssl.protocol - the protocol to be used (default "SSLv3")
Installing the JMeter CA certificate for HTTPS recording
As mentioned above, when run under Java 7, JMeter can generate certificates for each server. For this to work smoothly, the root CA signing certificate used by JMeter needs to be trusted by the browser. The first time that the recorder is started, it will generate the certificates if necessary. The root CA certificate is exported into a file with the name ApacheJMeterTemporaryRootCA in the current launch directory. When the certificates have been set up, JMeter will show a dialog with the current certificate details. At this point, the certificate can be imported into the browser, as per the instructions below.
Note that once the root CA certificate has been installed as a trusted CA, the browser will trust any certificates signed by it. Until such time as the certificate expires or the certificate is removed from the browser, it will not warn the user that the certificate is being relied upon. So anyone that can get hold of the keystore and password can use the certificate to generate certificates which will be accepted by any browsers that trust the JMeter root CA certificate. For this reason, the password for the keystore and private keys are randomly generated and a short validity period used. The passwords are stored in the local preferences area. Please ensure that only trusted users have access to the host with the keystore.
Installing the certificate in Firefox
Choose the following options:
- Tools / Options
- Advanced / Certificates
- View Certificates
- Authorities
- Import ...
- Browse to the JMeter launch directory, and click on the file ApacheJMeterTemporaryRootCA.crt, press Open
- Click View and check that the certificate details agree with the ones displayed by the JMeter Test Script Recorder
- If OK, select "Trust this CA to identify web sites", and press OK
- Close dialogs by pressing OK as necessary
Installing the certificate in Chrome or Internet Explorer
Both Chrome and Internet Explorer use the same trust store for certificates.
- Browse to the JMeter launch directory, and click on the file ApacheJMeterTemporaryRootCA.crt, and open it
- Click on the "Details" tab and check that the certificate details agree with the ones displayed by the JMeter Test Script Recorder
- If OK, go back to the "General" tab, and click on "Install Certificate ..." and follow the Wizard prompts
Installing the certificate in Opera
- Tools / Preferences / Advanced / Security
- Manage Certificates...
- Select "Intermediate" tab, click "Import..."
- Browse to the JMeter launch directory, and click on the file ApacheJMeterTemporaryRootCA.usr, and open it
Parameters 
For example, *.apache.org,*.incubator.apache.org
Note that wildcard domains only apply to one level, i.e. podling.incubator.apache.org matches *.incubator.apache.org but not *.apache.org
- Do not group samplers: store all recorded samplers sequentially, without any grouping.
- Add separators between groups: add a controller named "--------------" to create a visual separation between the groups. Otherwise the samplers are all stored sequentially.
- Put each group in a new controller: create a new Simple Controller for each group, and store all samplers for that group in it.
- Store 1st sampler of each group only: only the first request in each group will be recorded. The "Follow Redirects" and "Retrieve All Embedded Resources..." flags will be turned on in those samplers.
- Put each group in a new transaction controller: create a new Transaction Controller for each group, and store all samplers for that group in it.
Note: see "Recording and redirects" section below for important information.
Recording and redirects
During recording, the browser will follow a redirect response and generate an additional request. The Proxy will record both the original request and the redirected request (subject to whatever exclusions are configured). The generated samples have "Follow Redirects" selected by default, because that is generally better. [Redirects may depend on the original request, so repeating the originally recorded sample may not always work.]
Now if JMeter is set to follow the redirect during replay, it will issue the original request, and then replay the redirect request that was recorded. To avoid this duplicate replay, JMeter tries to detect when a sample is the result of a previous redirect. If the current response is a redirect, JMeter will save the redirect URL. When the next request is received, it is compared with the saved redirect URL and if there is a match, JMeter will disable the generated sample. It also adds comments to the redirect chain. This assumes that all the requests in a redirect chain will follow each other without any intervening requests. To disable the redirect detection, set the property proxy.redirect.disabling=false
Includes and Excludes
The include and exclude patterns are treated as regular expressions (using Jakarta ORO).
They will be matched against the host name, port (actual or implied) path and query (if any) of each browser request.
If the URL you are browsing is
"http://jmeter.apache.org/jmeter/index.html?username=xxxx",
then the regular expression will be tested against the string:
"jmeter.apache.org:80/jmeter/index.html?username=xxxx".
Thus, if you want to include all .html files, your regular expression might look like:
".*\.html(\?.*)?" - or ".*\.html"
if you know that there is no query string or you only want html pages without query strings.
If there are any include patterns, then the URL must match at least one of the patterns , otherwise it will not be recorded. If there are any exclude patterns, then the URL must not match any of the patterns , otherwise it will not be recorded. Using a combination of includes and excludes, you should be able to record what you are interested in and skip what you are not.
N.B. the string that is matched by the regular expression must be the same as the whole host+path string.
Thus "\.html" will not match j.a.o/index.html
Capturing binary POST data
Versions of JMeter from 2.3.2 are able to capture binary POST data. To configure which content-types are treated as binary, update the JMeter property proxy.binary.types. The default settings are as follows:
# These content-types will be handled by saving the request in a file:
proxy.binary.types=application/x-amf,application/x-java-serialized-object
# The files will be saved in this directory:
proxy.binary.directory=user.dir
# The files will be created with this file filesuffix:
proxy.binary.filesuffix=.binary
Adding timers
It is also possible to have the proxy add timers to the recorded script. To do this, create a timer directly within the HTTP(S) Test Script Recorder component. The proxy will place a copy of this timer into each sample it records, or into the first sample of each group if you're using grouping. This copy will then be scanned for occurences of variable ${T} in its properties, and any such occurences will be replaced by the time gap from the previous sampler recorded (in milliseconds).
When you are ready to begin, hit "start".
Where Do Samples Get Recorded?
JMeter places the recorded samples in the Target Controller you choose. If you choose the default option "Use Recording Controller", they will be stored in the first Recording Controller found in the test object tree (so be sure to add a Recording Controller before you start recording).
If the Proxy does not seem to record any samples, this could be because the browser is not actually using the proxy. To check if this is the case, try stopping the proxy. If the browser still downloads pages, then it was not sending requests via the proxy. Double-check the browser options. If you are trying to record from a server running on the same host, then check that the browser is not set to "Bypass proxy server for local addresses" (this example is from IE7, but there will be similar options for other browsers). If JMeter does not record browser URLs such as http://localhost/ or http://127.0.0.1/, try using the non-loopback hostname or IP address, e.g. http://myhost/ or http://192.168.0.2/.
Handling of HTTP Request Defaults
If the HTTP(S) Test Script Recorder finds enabled HTTP Request Defaults directly within the controller where samples are being stored, or directly within any of its parent controllers, the recorded samples will have empty fields for the default values you specified. You may further control this behaviour by placing an HTTP Request Defaults element directly within the HTTP(S) Test Script Recorder, whose non-blank values will override those in the other HTTP Request Defaults. See Best Practices with the HTTP(S) Test Script Recorder for more info.
User Defined Variable replacement
Similarly, if the HTTP(S) Test Script Recorder finds User Defined Variables (UDV) directly within the controller where samples are being stored, or directly within any of its parent controllers, the recorded samples will have any occurences of the values of those variables replaced by the corresponding variable. Again, you can place User Defined Variables directly within the HTTP(S) Test Script Recorder to override the values to be replaced. See Best Practices with the Test Script Recorder for more info.
Replacement by Variables: by default, the Proxy server looks for all occurences of UDV values. If you define the variable WEB with the value www, for example, the string www will be replaced by ${WEB} wherever it is found. To avoid this happening everywhere, set the "Regex Matching" check-box. This tells the proxy server to treat values as Regexes (using the perl5 compatible regex matchers provided by ORO).
If "Regex Matching" is selected every variable will be compiled into a perl compatible regex enclosed in \b( and )\b. That way each match will start and end at a word boundary.
If you don't want your regex to be enclosed with those boundary matchers, you have to enclose your regex within parens, e.g ('.*?') to match 'name' out of You can call me 'name'.
If you want to match a whole string only, enclose it in (^ and $), e.g. (^thus$). The parens are neccessary, since the normally added boundary characters will prevent ^ and $ to match.
If you want to match /images at the start of a string only, use the value (^/images). Jakarta ORO also supports zero-width look-ahead, so one can match /images/... but retain the trailing / in the output by using (^/images(?=/))".
Look out for overlapping matchers. For example the value .* as a regex in a variable named regex will partly match a previous replaced variable, which will result in something like ${{regex}, which is most probably not the desired result.
If there are any problems interpreting any variables as patterns, these are reported in jmeter.log, so be sure to check this if UDVs are not working as expected.
When you are done recording your test samples, stop the proxy server (hit the "stop" button). Remember to reset your browser's proxy settings. Now, you may want to sort and re-order the test script, add timers, listeners, a cookie manager, etc.
How can I record the server's responses too?
Just place a View Results Tree listener as a child of the HTTP(S) Test Script Recorder and the responses will be displayed. You can also add a Save Responses to a file Post-Processor which will save the responses to files.
Associating requests with responses
If you define the property proxy.number.requests=true JMeter will add a number to each sampler and each response. Note that there may be more responses than samplers if excludes or includes have been used. Responses that have been excluded will have labels enclosed in [ and ], for example [23 /favicon.ico]
Cookie Manager
If the server you are testing against uses cookies, remember to add an HTTP Cookie Manager to the test plan when you have finished recording it. During recording, the browser handles any cookies, but JMeter needs a Cookie Manager to do the cookie handling during a test run. The JMeter Proxy server passes on all cookies sent by the browser during recording, but does not save them to the test plan because they are likely to change between runs.
Authorization Manager
The HTTP(S) Test Script Recorder grabs "Authentication" header, tries to compute the Auth Policy. If Authorization Manager was added to target controller manually, HTTP(S) Test Script Recorder will find it and add authorization(matching ones will be removed). Otherwise Authorization Manager will be added to target controller with authorization object. You may have to fix automatically computed values after recording.
Uploading files
Some browsers (e.g. Firefox and Opera) don't include the full name of a file when uploading files. This can cause the JMeter proxy server to fail. One solution is to ensure that any files to be uploaded are in the JMeter working directory, either by copying the files there or by starting JMeter in the directory containing the files.
Recording HTTP Based Non Textual Protocols not natively available in JMeter
You may have to record an HTTP protocol that is not handled by default by JMeter (Custom Binary Protocol, Adobe Flex, Microsoft Silverlight... ). Although JMeter does not provide a native proxy implementation to record these protocols, you have the ability to record these protocols by implementing a custom SamplerCreator. This Sampler Creator will translate the binary format into a HTTPSamplerBase subclass that can be added to the JMeter Test Case. For more details see "Extending JMeter".
HTTP Mirror Server
The HTTP Mirrror Server is a very simple HTTP server - it simply mirrors the data sent to it. This is useful for checking the content of HTTP requests.
It uses default port 8081 since 2.6.
Parameters 
Parameters 
headerA=valueA|headerB=valueB would set headerA to valueA and headerB to valueB.
You can also use the following query parameters:
Parameters 
Property Display
The Property Display shows the values of System or JMeter properties. Values can be changed by entering new text in the Value column. It is available only on the WorkBench.
Parameters 
Debug Sampler
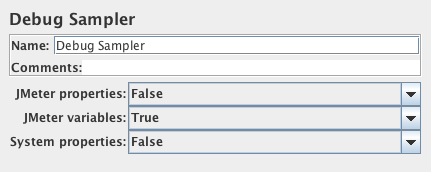
The Debug Sampler generates a sample containing the values of all JMeter variables and/or properties.
The values can be seen in the View Results Tree Listener Response Data pane.
Parameters 
Debug PostProcessor
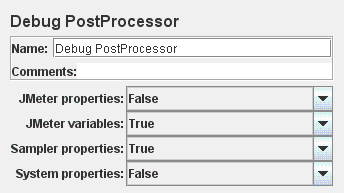
The Debug PostProcessor creates a subSample with the details of the previous Sampler properties, JMeter variables, properties and/or System Properties.
The values can be seen in the View Results Tree Listener Response Data pane.
Parameters 
Test Fragment
The Test Fragment is used in conjunction with the Include Controller and Module Controller.
Parameters 
setUp Thread Group
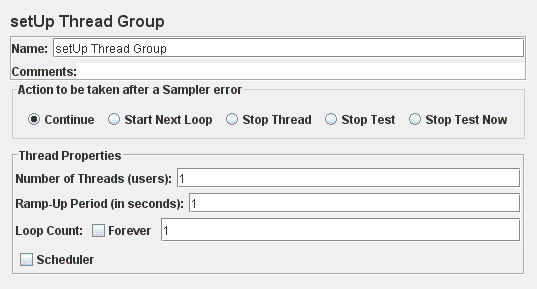
A special type of ThreadGroup that can be utilized to perform Pre-Test Actions. The behavior of these threads is exactly like a normal Thread Group element. The difference is that these type of threads execute before the test proceeds to the executing of regular Thread Groups.
tearDown Thread Group
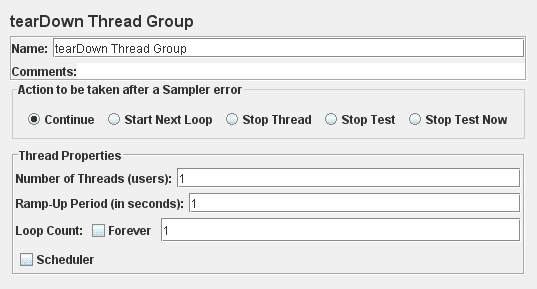
A special type of ThreadGroup that can be utilized to perform Post-Test Actions. The behavior of these threads is exactly like a normal Thread Group element. The difference is that these type of threads execute after the test has finished executing its regular Thread Groups.