
This feature allows the Visual Studio user to browse managed repositories and add and delete Maven dependencies to and from the repositories from within the Visual Studio IDE.
A remote repository must be configured before attempting to use this feature. Please see the Remote Repository section for instructions.
Note: Adding dependencies should be done using Visual Studio while manually adding is not recommended. At this time, the Visual Studio add-in will not detect changes to the Maven dependencies and add them to your Visual Studio project. If you manually add a dependency and re-import the project in Visual Studio, the recently added dependencies are deleted from the pom.xml file.
Adding a Maven artifact allows you to refer to a DLL or other dependency that may not yet be installed on the local machine. This is done by consulting a Maven remote repository for available dependencies, and adding a reference to the Maven pom.xml.
When adding an artifact dependency into a web site project, there will be no changes in the pom.xml. This is because the artifacts are put directly into the project's bin\ directory (one is created when this is missing), thus, <dependencies> in the pom.xml is not needed.
To add an artifact:
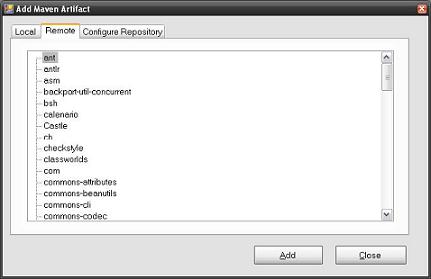
The artifacts will be added as a reference to the project and added as a dependency in the POM file. It is also downloaded to the C:\Documents and Settings\[user_home]\.m2\uac directory.
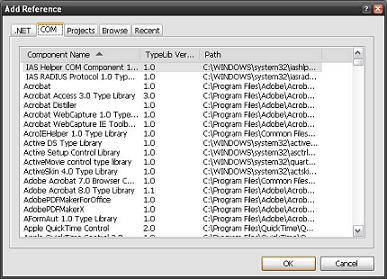
You can also add traditional references to the project and have NPanday translate them into Maven dependencies.
To add references to the project:
NPanday will take care of adding the reference to the Maven POM automatically. In most cases this will also be made available on any other system building from the Maven project. In the case of an inter-project dependency, it will rely on the project being built on the target machine before the project that has the dependency on it - but all that is needed here is to build the whole solution as Maven will then take care of the correct ordering.
However, some references are non-portable when they are added.
When Adding Intra Solution references use the Visual Studio "Add Reference" and not the "Add Maven Artifact" command. This sets the csproj/vbproj file & the pom.xml correctly simultaenously, and allows VS to build the project without needing to resolve the reference.
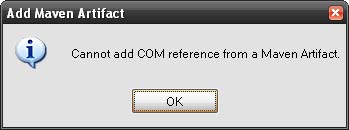
When adding a COM reference, the actual reference (DLL) is copied to C:\WINDOWS\assembly\GAC_MSIL. Wherein, the path to the reference found in this directory is used as the reference's <systemPath> in the pom.xml. References such as this rely on the given DLL being available at the same location on each machine.
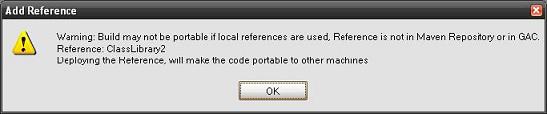
When adding an artifact reference that is not installed in the system, NPanday will prompt a warning message then adds the reference in the pom.xml as a system scope dependency.
However, the above warning message is not displayed for web site projects even if the artifact reference to be added is not installed in the system. This is because the artifact references for web projects are directly added in the project's bin\ directory (one is created when this is missing), thus, no need to add it in the pom.xml.
The following POM snippet shows a system dependency:
  <dependency>
    <groupId>artifact_group_id</groupId>
    <artifactId>my.lib</artifactId>
    <version>2.2</version>
    <type>library</type>
    <scope>system</scope>
    <systemPath>C:\path\to\your\library.dll</systemPath>
  </dependency>
The Remove Artifact feature removes the artifact as a reference to the project and as a dependency in the POM file.
To remove an artifact, you can select the artifacts to remove and click the Delete key. This works for both Visual Basic and C# projects.
Alternatively, to remove Visual Basic project artifact:
Alternatively, to remove C# project artifact:
This has covered all options for adding one of Maven's most powerful features - dependency resolution - to your .NET projects by using NPanday.
The next section continues with web references. You can also go back to the index.
In the next section we revisit importing a project into Maven. Other topics are available on the index.