
This section provides more details on how on importing a Visual Studio project using the Generate Solution's POM Information... feature works. As we saw in the Quickstart example, this feature will generate pom.xml files from an existing Visual Studio solution file. The generated pom.xml file will contain the latest versions of the artifact dependencies used for the project.
Note: ASP.NET MVC should be installed to get the proper behavior when importing projects especially those projects with unsupported project types. See MVC projects for more details.
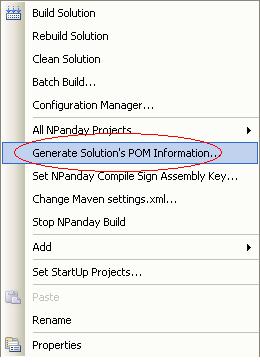
To import a project, first select Generate Solution's POM Information... from the project's context menu:
In the pop-up screen, Browse to the directory location of the parent solution file to use.
The Group ID is generated by default with the format of [company_id].[solution_name].
The SCM Tag is optional. If you provide a url that is not reachable (e.g: it is authenticated and the credentials are not supplied or incorrect) by the Addin, you will see a warning, but the url will still be added to the parent pom.
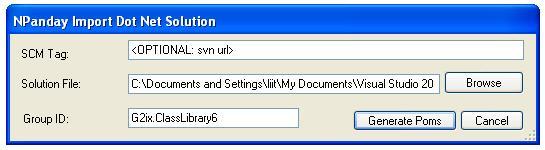
When you are ready, click Generate POMs.
Underscores and spaces in the artifact's Group ID are automatically deleted when added to the project's pom.xml. The table below shows the conversion of certain values of groupIds.
| Artifact Group Id | Converted Group Id |
| The.Project | The.Project |
| the.project | the.project |
| the project | TheProject |
| the_project | TheProject |
Next, the project unit tests window will appear. If you have modules that are for unit tests only, select them and click OK.
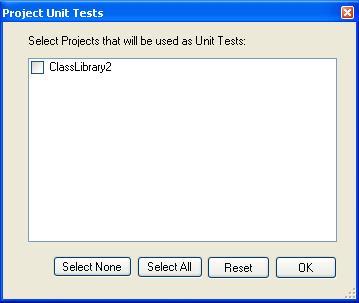
pom.xml files will be generated for all the projects that are included in the solution file, including the parent project and its sub-projects, if there are any.
Note: The Units Tests window is not displayed when importing unsupported project types. Hence, an unsupported project type warning is displayed. For multi-module projects with supported and/or unsupported project types, the supported projects are included in the parent POM while for the unsupported project types, these are not included in the parent POM, and a warning is displayed.
For projects with web references, the pom.xml generated will contain maven-wsdl-plugin configuration similar to the following:
  <plugin>
    <groupId>npanday.plugin</groupId>
    <artifactId>maven-wsdl-plugin</artifactId>
    <extensions>true</extensions>
    <executions>
      <execution>
        <goals>
          <goal>wsdl</goal>
        </goals>
      </execution>
    </executions>
    <configuration>
      <webreferences>
        <webreference>
          <namespace>AnotherWebService</namespace>
          <path>Web References/AnotherWebService/AnotherWS.wsdl</path>
          <output>Web References/AnotherWebService/</output>
        </webreference>
      </webreferences>
    </configuration>
  </plugin>
The wsdl goal is the one responsible for building and creating webservice proxy classes. And, all the web references used in the project are listed inside the <webreferences> tag. For more instructions on adding, renaming, and deleting web references, refer to Web References section of this guide.
Other project types will generate corresponding plugins needed to build that type of project (for example, the compile plugin, aspx plugin, or msbuild plugin).
If the project you are importing includes a resource file, the maven-resgen plugin is added to pom.xml during import.
In the plugin's configuration, you can find the list of resource (resx) files with corresponding names. By default, RootNamespace is the assembly name and RootNamespace.Filename is the filename of the resx files.
To ensure that the plugin works, the following are required:
Note: Changing the codefile(.cs/.vb) automatically updates the resource(resx) file. In some instances, however, this does not hold true.
Once the above requirements are met, the importer automatically does the work and there is no need to edit pom.xml.
Removing the configuration part of the maven-resgen plugin allows the plugin to locate all the resx files and compile them as ArtifactId.Filename. If you set the namespace as the artifactId, you do not need to list all the resx files in the pom.xml.
Note: This feature does not support cultured esx files such as eu-US, it, jp, de, eu-UK, and even custom culture.
If the project you are Importing is a WPF/WCF project and it contains a XAML file the MSBuildPlugin will be automatically added into that project's pom file.
  <plugin>
    <groupId>npanday.plugin</groupId>
    <artifactId>NPanday.Plugin.Msbuild.JavaBinding</artifactId>
    <executions>
      <execution>
        <goals>
          <goal>compile</goal>
        </goals>
      </execution>
    </executions>
  </plugin>
This will generate the needed *.g.cs/*.g.vb files that are needed for those XAML files.
Note: The user would encounter double dependency errors, if the project was created with 3.0 .NET framework. We suggest that you change your framework to 3.5 and then delete the references that are already included as defaults in NPanday. This will then allow your project to run successfully.
As of NPanday 1.1, MVC projects are not support for import as Maven projects from the Visual Studio Add-in. However, in some situations they may be incorrectly imported as a normal C# or VB project.
To avoid this problem, make sure you have installed ASP.NET MVC Release Candidate 2 which can be obtained from http://www.microsoft.com/downloads/details.aspx?FamilyID=ee4b2e97-8a72-449a-82d2-2f720d421031&displaylang=en.
This must be installed to skip the unsupported project types and be able to get the correct project type GUID.
This section has described how to import a project, and the nuances of various different supported project types.
You can now read on about executing Maven goals, or go back to the index.