
This section is provides a quick overview of the NPanday .NET Build Tool by creating a sample project. You must first have installed the Add-in according to the instructions in the installation guide.
Start Visual Studio ensuring that your PATH is set correctly, as described in the installation guide.
Next, in Visual Studio start the NPanday Build System from Tools>NPanday Build System. You will see NPanday starting in the Visual Studio Output pane.
Note: After you start the NPanday Build System and it is running, it no longer appears as an option on the Tools menu (and reappears again when Visual Studio is stopped and started). Therefore, if you had previously started the NPanday Build System and it is still running, you do not need to start it again in this step.
Creating a project for use with NPanday is the same as you would normally do so for any project within Visual Studio. In this case, we will create a class library.
You now have a simple, standard, project. However, nothing has been generated for Maven to be able to build it, so for that we need to generate a pom.xml file.
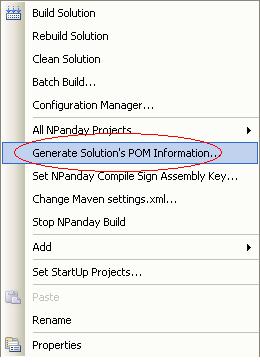
NPanday makes creating the POM file(s) easy. To do so, right click on the project solution (or any of the projects) in the Solution Explorer and select Generate Solution's POM Information...:
Next, you will see the following dialog:
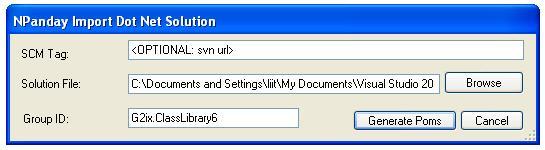
We'll look at this in more detail shortly, but for now accept the default settings, and do likewise on the next dialog asking about test projects. Finally, NPanday will inform you that it has created two pom.xml files: one for the solution, and one for the class library project. These files won't appear in the Solution Explorer - NPanday keeps them hidden as they don't need to be modified directly. However, they should be checked into your source control system to ensure that they can be used by other developers and the shared build infrastructure. In the next section we will take a closer look at the POM files.
First, we need to understand what the pom.xml file is. This is the sole descriptor used by Maven to build an entire project. In some respects, it is similar to the .sln and .csproj (or .vbproj) files, however Maven uses a different approach - while these are 'scripts', the POM is 'declarative', indicating where parts of the project are located, and which Maven plugins are used to build the project, utilizing that project information. By being declarative in this fashion, many plugins can operate on the same information without having to reconfigure each specifically.
Let's look at POM for the solution first:
<?xml version="1.0" encoding="utf-8"?>
<project xmlns:xsi="http://www.w3.org/2001/XMLSchema-instance" xmlns:xsd="http://www.w3.org/2001/XMLSchema"
         xmlns="http://maven.apache.org/POM/4.0.0">
  <modelVersion>4.0.0</modelVersion>
  <groupId>MyCompany.NPandayTestQS</groupId>
  <artifactId>NPandayTestQS-parent</artifactId>
  <packaging>pom</packaging>
  <name>MyCompany.NPandayTestQS : NPandayTestQS-parent</name>
  <version>1.0-SNAPSHOT</version>
  <modules>
    <module>NPandayTestQS</module>
  </modules>
</project>
You will notice a few important elements here. First, there is the Group ID which is the value that you entered into the previous dialog. There is also an Artifact ID that is the name of the solution with 'parent' appended. Further down, there is a Version that is set to the default of 1.0-SNAPSHOT. These 3 elements constitute the project co-ordinate, which is a unique identifier across all projects you can access to this particular project. This is the reason that the solution appends -parent to the end, to distinguish it from the child project with the same name.
Within the group/artifact ID combination, each project is then versioned to distinguish between different releases. The default is 1.0-SNAPSHOT, which means "in development towards the 1.0 release". Maven places special significance on the SNAPSHOT addition to a version, which means that the project is changing. When a version is set to a concrete one such as 1.0, Maven considers it to always remain the same and changes to go under a new version (such as 1.1-SNAPSHOT).
We will later use these co-ordinates to locate and utilize dependencies on other projects from within our own project, even if we don't have a copy locally.
We also see the Modules section that shows which subproject exist. This contains a reference to the class library's project directory - so let's now look at the POM for that:
<?xml version="1.0" encoding="utf-8"?>
<project xmlns:xsi="http://www.w3.org/2001/XMLSchema-instance" xmlns:xsd="http://www.w3.org/2001/XMLSchema"
         xmlns="http://maven.apache.org/POM/4.0.0">
  <parent>
    <artifactId>NPandayTestQS-parent</artifactId>
    <groupId>MyCompany.NPandayTestQS</groupId>
    <version>1.0-SNAPSHOT</version>
    <relativePath>..\pom.xml</relativePath>
  </parent>
  <modelVersion>4.0.0</modelVersion>
  <artifactId>NPandayTestQS</artifactId>
  <packaging>library</packaging>
  <name>MyCompany.NPandayTestQS : NPandayTestQS</name>
  <build>
    <sourceDirectory>./</sourceDirectory>
    <plugins>
      <plugin>
        <groupId>npanday.plugin</groupId>
        <artifactId>maven-compile-plugin</artifactId>
        <extensions>true</extensions>
        <configuration>
          <frameworkVersion>2.0.50727</frameworkVersion>
          <includeSources>
            <includeSource>Class1.cs</includeSource>
            <includeSource>Properties\AssemblyInfo.cs</includeSource>
          </includeSources>
        </configuration>
      </plugin>
    </plugins>
  </build>
</project>
This project starts with the Parent definition, which points back to the project for the solution. This is used to inherit any shared settings among subprojects (though by default, there is nothing saved in the parent POM that will be shared).
Next we have the artifact ID for this project, which uses the library name. The group ID and version can be omitted, since by default they will use the same one as the parent project.
In this project, we have altered the Packaging element to be of type library. While the parent was a pom, indicating it didn't build anything additional, this type indicates that Maven and NPanday should include all the standard build steps for a .NET class library.
Along with this we now have a Build section. This contains two further elements - first, the source directory, that says the Visual Studio convention of storing source files in the project directory (and subdirectories) will be followed. Next is the Plugins section, which is where Maven is told to use NPanday to compile, and what framework and source code to use. For other project types, additional plugins may be added (see the Plugins Reference for more available plugins).
While it is not necessary to be able to create these POM files to be able to use NPanday, understanding how they work, and in particular the Maven co-ordinate system, will help to understand what NPanday is doing "behind the scenes" when you use some of its other functionality.
With this in place, we can now check that Maven is able to build the project. Right click on the solution or project and select All NPanday Projects, then Build [compile].

In the Output Window (if the NPanday Execution Output view is selected from the dropdown), you will see something similar to the following:
------------------------------------------------------------------
Executing Maven
Pom File: C:\...\Visual Studio 2008\Projects\NPandayTestQS\pom.xml
Goal: compile
Arguments: compile
NPanday Command: c:\...\apache-maven-2.2.1\bin\mvn.bat compile


------------------------------------------------------------------

[INFO] Scanning for projects...
[INFO] Reactor build order:
[INFO]   MyCompany.NPandayTestQS : NPandayTestQS-parent
[INFO]   MyCompany.NPandayTestQS : NPandayTestQS
[INFO] ------------------------------------------------------------------------
[INFO] Building MyCompany.NPandayTestQS : NPandayTestQS-parent
[INFO]    task-segment: [compile]
[INFO] ------------------------------------------------------------------------
[INFO] No goals needed for project - skipping
[INFO] ------------------------------------------------------------------------
[INFO] Building MyCompany.NPandayTestQS : NPandayTestQS
[INFO]    task-segment: [compile]
[INFO] ------------------------------------------------------------------------
[INFO] [compile:initialize {execution: default-initialize}]
...
[INFO] [resolver:resolve {execution: default-resolve}]
...
[INFO] [NPanday.Plugin.Settings.JavaBinding:generate-settings {execution: default-generate-settings}]
[INFO] [compile:generate-assembly-info {execution: default-generate-assembly-info}]
...
[INFO] [compile:process-sources {execution: default-process-sources}]
...
[INFO] [compile:process-test-sources {execution: default-process-test-sources}]
...
[INFO] [resgen:copy-resources {execution: default-copy-resources}]
[INFO] [resgen:generate {execution: default-generate}]
[INFO] [resgen:generate-existing-resx-to-resource {execution: default-generate-existing-resx-to-resource}]
[INFO] [compile:compile {execution: default-compile}]
...
[INFO]
[INFO] ------------------------------------------------------------------------
[INFO] Reactor Summary:
[INFO] ------------------------------------------------------------------------
[INFO] MyCompany.NPandayTestQS : NPandayTestQS-parent ........ SUCCESS [0.005s]
[INFO] MyCompany.NPandayTestQS : NPandayTestQS ............... SUCCESS [10.547s]
[INFO] ------------------------------------------------------------------------
[INFO] ------------------------------------------------------------------------
[INFO] BUILD SUCCESSFUL
[INFO] ------------------------------------------------------------------------
[INFO] Total time: 18 seconds
[INFO] Finished at: Wed Feb 03 12:58:47 EST 2010
[INFO] Final Memory: 12M/24M
[INFO] ------------------------------------------------------------------------
NPanday Execution is Successful!
Here, both projects are built (since it was run from the solution level). The solution POM has no steps to perform to compile. However, you can see several steps (compile:initialize, resolver:resolve, and so on) performed for the library. These are all defined by the POM's packaging element.
Of course, the existing built-in commands are still available for building from Visual Studio, so development need not change day to day - but the build is there to be sure that the POM works as expected, so that you have the same build as other systems that will use it.
You may have noticed that there were other options that Build - namely Test, Install and Clean. There are other parts of what is known as the Maven Build Lifecycle.
Maven uses the POM to drive builds that a constructed as patterns. No matter what type of project you are building it can be shaped to Maven's build lifecycle, which is a sequence of phases always run in the same order, and for which a given phase can be sure that the previous phases have always executed as part of this build.
There are quite a number of phases that Maven plugins can participate, and that you can run from the mvn command, but the Visual Studio Add-in exposes the primary ones:
What this means is that if you run mvn install, you will actually run compile, then test, then install (and the intermediate steps). Maven views testing as important, so this structure ensures that you run any unit tests you have before using the final DLL, for example. Running the install phase is the most common one used when building a project with Maven.
The installation phase is different to the traditional meaning of installing software. Maven maintains a local repository on the current machine (by default in %HOMEDRIVE%%HOMEPATH%\.m2\repository) where all build output is stored. This common storage allows sharing between different projects on the same machine when they express a dependency on another project. You have already encountered this when installing NPanday, as Maven uses the local repository to house it's own functionality as well.
We'll also learn later that Maven utilizes remote repositories to obtain dependencies from other sources, and to publish build output for sharing with other users. In this case, the local repository acts as a local intermediatary and cache between Maven and the remote repositories.
In addition to the above phase, there is the Clean option, which uses a different 'lifecycle' for cleaning up any build output such as the target, Bin and Obj directories.
In this simple example, we've seen how we can turn an existing .NET project into a functional Maven project, and learned some of the basic terminology and interactions with the new build system. In further parts of the guide, we will learn more about how Visual Studio and Maven interact through NPanday.
You can now read on about working with references, or go back to the index.