Table of Contents
The goal of this chapter is to create a new Java project in IntelliJ IDEA
containing a basic Cayenne mapping. It presents an introduction to
CayenneModeler GUI tool, showing how to create the initial mapping
objects: DataDomain, DataNode, DataMap.
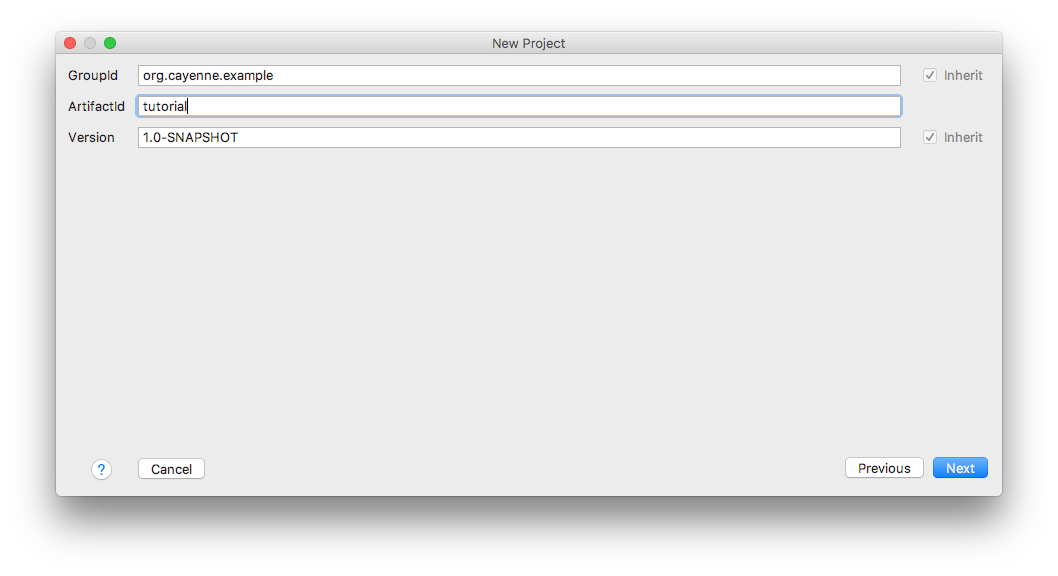
In IntelliJ IDEA select " > > " and then select "Maven" and click "Next". In the dialog shown on the screenshot below, fill the "Group Id" and "Artifact Id" fields and click "Next".
On next dialog screen you can customize directory for your project and click "Finish". Now you should have a new empty project.
Although later in this tutorial we'll be using Maven to include Cayenne runtime jars in the project, you'll still need to download Cayenne to get access to the CayenneModeler tool.
Note
If you are really into Maven, you can start CayenneModeler from Maven too. We'll do it in a more traditional way here.
Download the latest release. Unpack the distribution somewhere in the file system and start CayenneModeler, following platform-specific instructions. On most platforms it is done simply by doubleclicking the Modeler icon. The welcome screen of the Modeler looks like this:
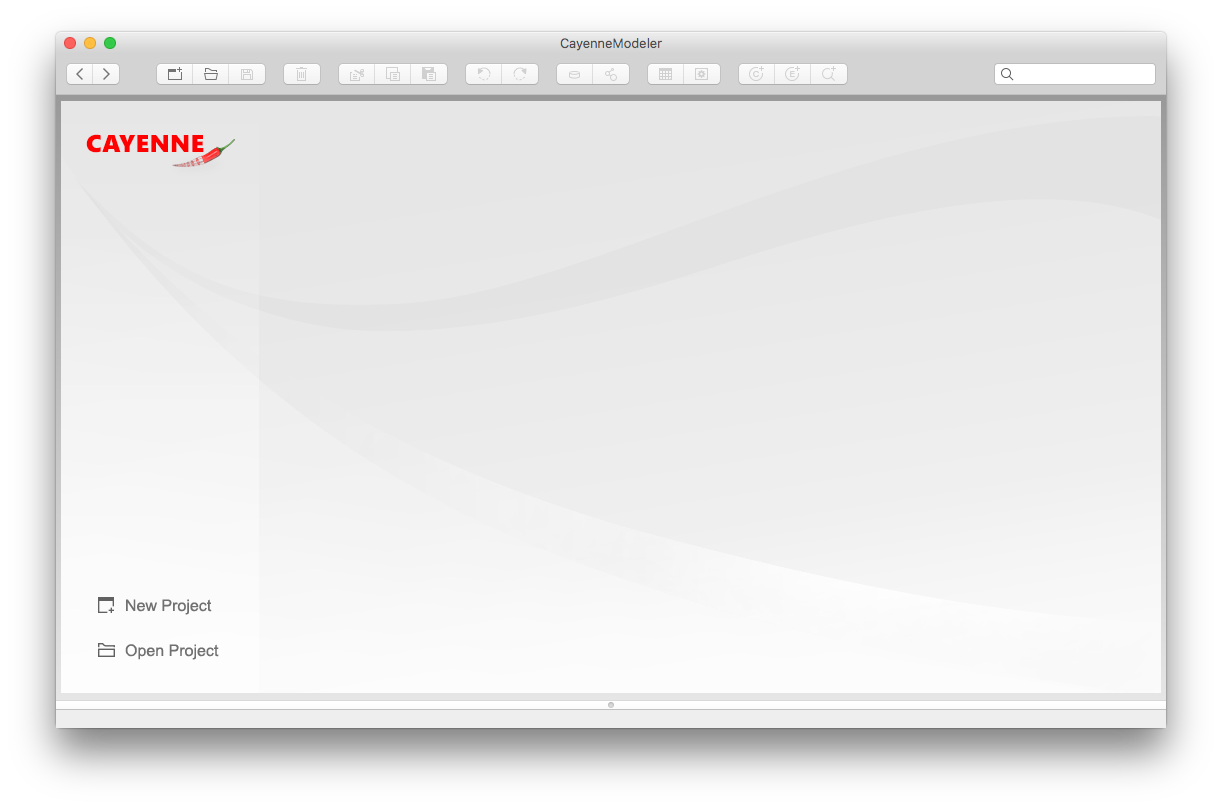
Click on the "New Project" button on Welcome screen. A new mapping project will appear that contains a single DataDomain. The meaning of a DataDomain is explained elsewhere in the User Guide. For now it is sufficient to understand that DataDomain is the root of your mapping project.
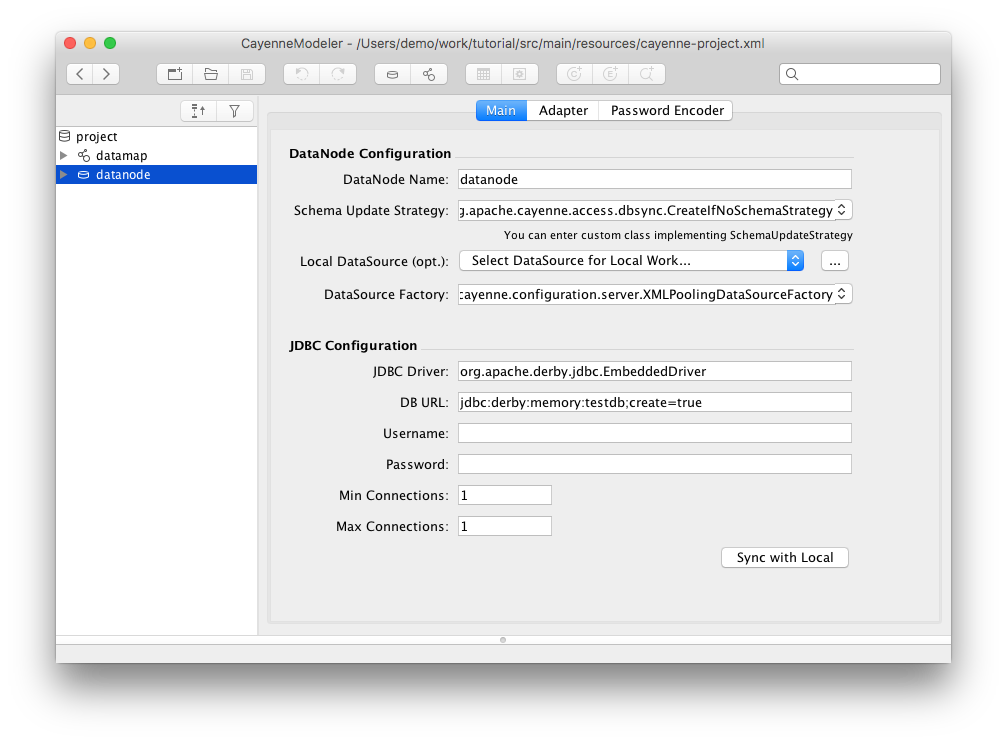
The next project object you will create is a DataNode. DataNode is a descriptor of a single database your application
will connect to. Cayenne mapping project can use more than one database, but for now,
we'll only use one. With "project" selected on the left, click on "Create DataNode"
button ![]() on the toolbar (or select "Project > Create DataNode" from the menu).
on the toolbar (or select "Project > Create DataNode" from the menu).
A new DataNode is displayed. Now you need to specify JDBC connection parameters. For an in-memory Derby database you can enter the following settings:
JDBC Driver: org.apache.derby.jdbc.EmbeddedDriver
DB URL: jdbc:derby:memory:testdb;create=true
Note
We are creating an in-memory database here. So when you stop your application, all the data will be lost. In most real-life cases you'll be connecting to a database that actually persists its data on disk, but an in-memory DB will do for the simple tutorial.
Also you will need to change "Schema Update Strategy". Select
"org.apache.cayenne.access.dbsync.CreateIfNoSchemaStrategy" from the dropdown, so that
Cayenne creates a new schema on Derby based on the ORM mapping when the application
starts.
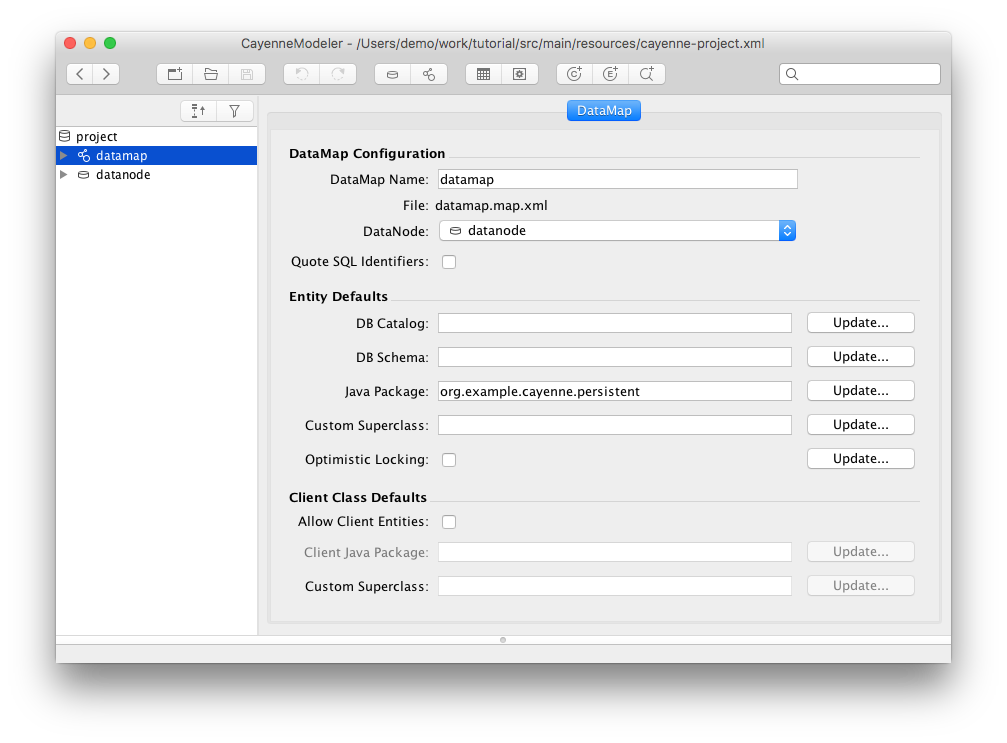
Now you will create a DataMap. DataMap is an object
that holds all the mapping information. To create it, click on "Create DataMap" button
![]() (or select a corresponding menu item). Note that the newly created DataMap is
automatically linked to the DataNode that you created in the previous step. If there is
more than one DataNode, you may need to link a DataMap to the correct node manually. In
other words a DataMap within DataDomain must point to a database described by the
map.
(or select a corresponding menu item). Note that the newly created DataMap is
automatically linked to the DataNode that you created in the previous step. If there is
more than one DataNode, you may need to link a DataMap to the correct node manually. In
other words a DataMap within DataDomain must point to a database described by the
map.
You can leave all the DataMap defaults unchanged except for one - "Java Package".
Enter "org.example.cayenne.persistent". This name will later be used for all persistent
classes.
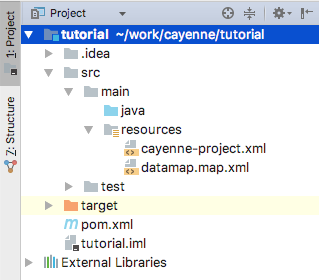
Before you proceed with the actual mapping, let's save the project. Click on "Save"
button in the toolbar and navigate to the "tutorial" IDEA project folder that was
created earlier in this section and its "src/main/resources" subfolder and save the
project there. Now go back to IDEA and you will see two Cayenne XML files.
Note that the location of the XML files is not coincidental. Cayenne runtime looks for
"cayenne-*.xml" file in the application CLASSPATH and "src/main/resources" folder should
already be a "class folder" in IDEA for our project (and is also a standard location
that Maven would copy to a jar file, if we were using Maven from command-line).
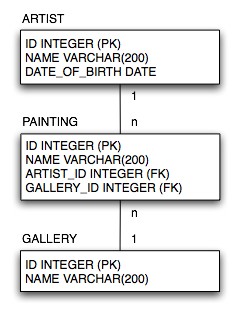
The goal of this section is to learn how to create a simple Object-Relational model with CayenneModeler. We will create a complete ORM model for the following database schema:
Note
Very often you'd have an existing database already, and it can be quickly imported in Cayenne via "Tools > Reengineer Database Schema". This will save you lots of time compared to manual mapping. However understanding how to create the mapping by hand is important, so we are showing the "manual" approach below.
Lets go back to CayenneModeler where we have the newly created project open and start by adding the ARTIST table. Database tables are called "DbEntities" in Cayenne mapping (those can be actual tables or database views).
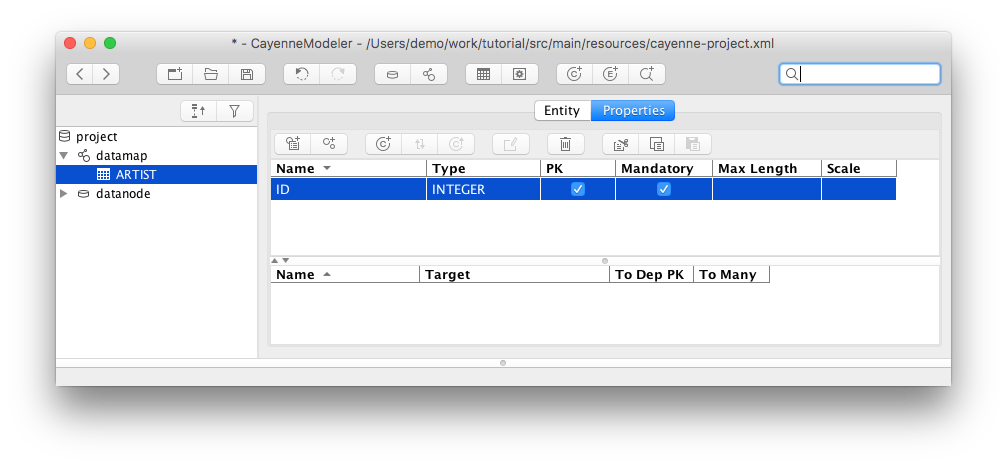
Select "datamap" on the left-hand side project tree and click "Create DbEntity" button ![]() (or use "Project > Create DbEntity" menu). A new DbEntity is created. In "DbEntity
Name" field enter "ARTIST". Then click on "Create Attribute" button
(or use "Project > Create DbEntity" menu). A new DbEntity is created. In "DbEntity
Name" field enter "ARTIST". Then click on "Create Attribute" button ![]() on the entity
toolbar. This action changes the view to the "Attribute"
tab and adds a new attribute (attribute means a "table column" in this case) called
"untitledAttr". Let's rename it to ID, make it an
on the entity
toolbar. This action changes the view to the "Attribute"
tab and adds a new attribute (attribute means a "table column" in this case) called
"untitledAttr". Let's rename it to ID, make it an INTEGER and make it a PK:
Similarly add NAME VARCHAR(200) and DATE_OF_BIRTH DATE attributes. After that repeat
this procedure for PAINTING and GALLERY entities to match DB schema shown above.
Note
Don't forget to save your project periodically to avoid losing your work.
Now we need to specify relationships between ARTIST, PAINTING and GALLERY tables. Start by creating a one-to-many ARTIST/PAINTING relationship:
Select the ARTIST DbEntity on the left and click on the "Properties" tab.
Click on "Create Relationship" button on the entity toolbar
 - a relationship called "untitledRel" is created.
Choose the "Target" to be "Painting".
Click on the "Database Mapping" button
 - relationship
configuration dialog is presented. Here you can assign a name to the
relationship and also its complimentary reverse relationship. This name can be
anything (this is really a symbolic name of the database referential
constraint), but it is recommended to use a valid Java identifier, as this will
save some typing later. We'll call the relationship "paintings" and reverse
relationship "artist".
- relationship
configuration dialog is presented. Here you can assign a name to the
relationship and also its complimentary reverse relationship. This name can be
anything (this is really a symbolic name of the database referential
constraint), but it is recommended to use a valid Java identifier, as this will
save some typing later. We'll call the relationship "paintings" and reverse
relationship "artist".Click on "Add" button on the right to add a join
Select "ID" column for the "Source" and "ARTIST_ID" column for the target.
Relationship information should now look like this:
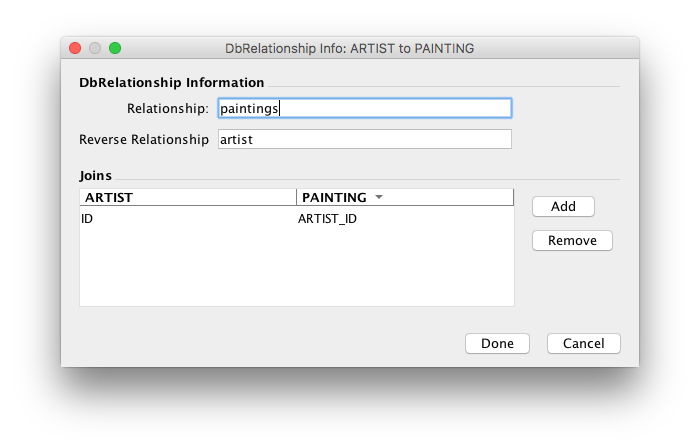
Click "Done" to confirm the changes and close the dialog.
Two complimentary relationships have been created - from ARTIST to PAINTING and back. Still you may have noticed one thing is missing - "paintings" relationship should be to-many, but "To Many" checkbox is not checked. Let's change that - check the checkbox for "paintings" relationship, and then click on PAINTING DbEntity, and uncheck "artist" relationship "To Many" to make the reverse relationship "to-one" as it should be.
Repeat the steps above to create a many-to-one relationship from PAINTING to GALLERY, calling the relationships pair "gallery" and "paintings".
Now that the database schema mapping is complete, CayenneModeler can create mappings of Java classes (aka "ObjEntities") by deriving everything from DbEntities. At present there is no way to do it for the entire DataMap in one click, so we'll do it for each table individually.
Select "ARTIST" DbEntity and click on "Create ObjEntity" button
 either on the entity toolbar or on the main toolbar. An ObjEntity called
"Artist" is created with a Java class field set to
"org.example.cayenne.persistent.Artist". The modeler transformed the database
names to the Java-friendly names (e.g., if you click on the "Attributes" tab,
you'll see that "DATE_OF_BIRTH" column was converted to "dateOfBirth" Java class
attribute).
either on the entity toolbar or on the main toolbar. An ObjEntity called
"Artist" is created with a Java class field set to
"org.example.cayenne.persistent.Artist". The modeler transformed the database
names to the Java-friendly names (e.g., if you click on the "Attributes" tab,
you'll see that "DATE_OF_BIRTH" column was converted to "dateOfBirth" Java class
attribute).Select "GALLERY" DbEntity and click on "Create ObjEntity" button again - you'll see a "Gallery" ObjEntity created.
Finally, do the same thing for "PAINTING".
Now you need to synchronize relationships. Artist and Gallery entities were created when there was no related "Painting" entity, so their relationships were not set.
Click on the "Artist" ObjEntity. Now click on "Sync ObjEntity with DbEntity" button on the toolbar
 - you will see the "paintings" relationship
appear.
- you will see the "paintings" relationship
appear.Do the same for the "Gallery" entity.
Unless you want to customize the Java class and property names (which you can do easily) the mapping is complete.
Here we'll generate the Java classes from the model that was created in the previous
section. CayenneModeler can be used to also generate the database schema, but since we
specified "CreateIfNoSchemaStrategy" earlier when we created a DataNode, we'll skip the
database schema step. Still be aware that you can do it if you need to via "Tools >
Create Database Schema".
Select "Tools > Generate Classes" menu.
For "Type" select "Standard Persistent Objects", if it is not already selected.
For the "Output Directory" select "
src/main/java" folder under your IDEA project folder (this is a "peer" location to thecayenne-*.xmllocation we selected before).Click on "Classes" tab and check the "Check All Classes" checkbox (unless it is already checked and reads "Uncheck all Classes").
Click "Generate"
Now go back to IDEA - you should see pairs of classes generated for each mapped
entity. You probably also see that there's a bunch of red squiggles next to the newly
generated Java classes in IDEA. This is because our project does not include Cayenne as
a Maven dependency yet. Let's fix it now by adding "cayenne-server"
artifact in the bottom of the pom.xml file. Also we should tell Maven
compile plugin that our project needs Java 8. The resulting POM should look like
this:
<project xmlns="http://maven.apache.org/POM/4.0.0" xmlns:xsi="http://www.w3.org/2001/XMLSchema-instance"
        xsi:schemaLocation="http://maven.apache.org/POM/4.0.0 http://maven.apache.org/maven-v4_0_0.xsd">
    <modelVersion>4.0.0</modelVersion>
    <groupId>org.example.cayenne</groupId>
    <artifactId>tutorial</artifactId>
    <version>0.0.1-SNAPSHOT</version>

    <dependencies>
        <dependency>
            <groupId>org.apache.cayenne</groupId>
            <artifactId>cayenne-server</artifactId>
            <!-- Here specify the version of Cayenne you are actually using -->
            <version>4.1.M2-SNAPSHOT</version>
        </dependency>
        <dependency>
            <groupId>org.slf4j</groupId>
            <artifactId>slf4j-simple</artifactId>
            <version>1.7.25</version>
        </dependency>
    </dependencies>

    <build>
        <plugins>
            <!-- Tell maven to support Java 8 -->
            <plugin>
                <groupId>org.apache.maven.plugins</groupId>
                <artifactId>maven-compiler-plugin</artifactId>
                <version>3.6.1</version>
                <configuration>
                    <source>1.8</source>
                    <target>1.8</target>
                </configuration>
            </plugin>
        </plugins>
    </build>
</project>
Your computer must be connected to the internet. Once you edit the pom.xml, IDEA
will download the needed Cayenne jar file and add it to the project build path. As a
result, all the errors should disappear. In tutorial for console output we use slf4j-simple logger
implementation. Due to use SLF4J logger in Apache Cayenne, you can use your custom logger (e.g. log4j
or commons-logging) through bridges.
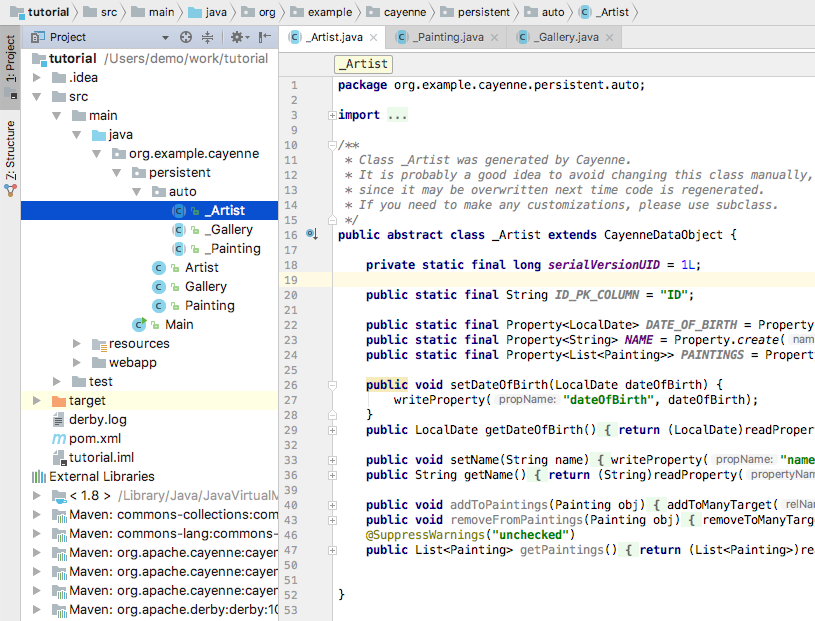
Now let's check the entity class pairs. Each one is made of a superclass (e.g. _Artist)
and a subclass (e.g. Artist). You should not modify the
superclasses whose names start with "_" (underscore), as they will be replaced on
subsequent generator runs. Instead all custom logic should be placed in the subclasses
in "org.example.cayenne.persistent" package - those will never be overwritten by the
class generator.
Class Generation Hint
Often you'd start by generating classes from the Modeler, but at the later stages of the project the generation is usually automated either via Ant cgen task or Maven cgen mojo. All three methods are interchangeable, however Ant and Maven methods would ensure that you never forget to regenerate classes on mapping changes, as they are integrated into the build cycle.