|
|
| Home > Documentation > User Interface development with JSF |
JavaServer Faces technology provides
JavaServer Faces is a flexible technology that uses the existing user interface and web tier mechanisms but it does not tie up the applications to a particular mark-up language, protocol and client device. It encapsulates various UI component functionality enabling it render data to various client devices by developing required custom tags. JavaServer Faces technology provides a custom renderer and a JSP custom tag library for rendering to an HTML client, allowing developers of Java Platform, Enterprise Edition (Java EE) applications to use JavaServer Faces technology in their applications.
JavaServer Faces technology clearly separates presentation logic from the application logic. Several development roles can be created and designated during the application development state. The JSF technology is developed through Java Community Process under JSR-127.
Apache geronimo v2.1 uses Apache MyFaces v1.2.2 for JSF implementation. This tutorial illustrates the following aspects of JSF.
The tutorial is divided into the following sections.
In order to develop, deploy and run the application, the following environment is required.
The entire application can be downloaded from this link.
1. Download Apache Geronimo2.1 and install it on the server. Look into the geronimo documentation for instructions.
2. Install the eclipse IDE and download geronimo eclipse plugin and install it on top of eclipse. Look into the geronimo eclipse plugin documentation for instructions.
3. Create a runtime environment for Apache Geronimo2.1 in the eclipse. Look into the geronimo eclipse plugin documentation for instructions to install a runtime for Apache Geronimo2.1.
1. Start the eclipse wizard and right click on the Project Explorer and click on the New => Dynamic Web Project

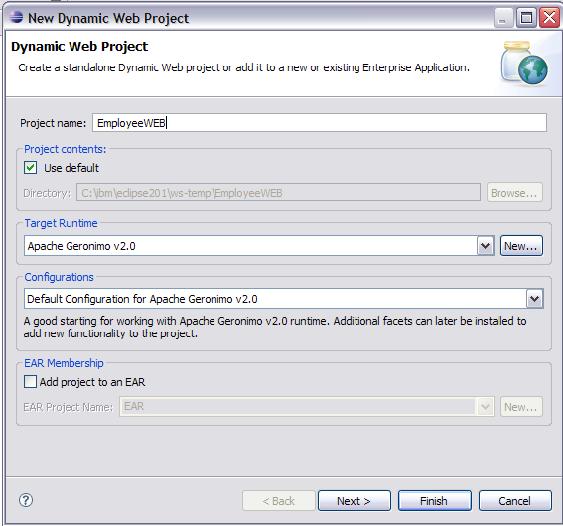
2. Enter the project name as EmployeeWEB and click on the Next button.
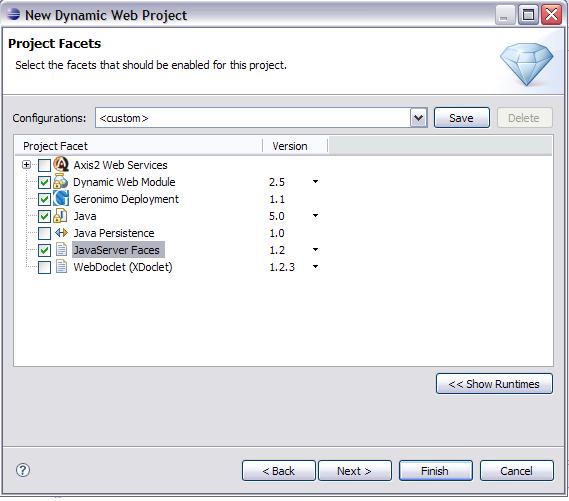
3. On the New Dynamic Web Project wizard, check on the Project Facet checkboxes and select the version values as below screen shot, and click on the Next button.
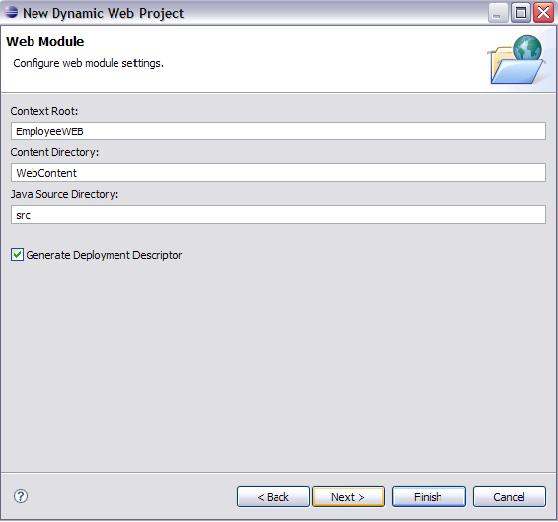
4. On the Web Module wizard, make sure that Generate Deployment Descriptor is checked as below and click on the Next button.
5. On the Geronimo Deployment Plan wizard, provide the moduleId values as below screen shot and click on the Next button.

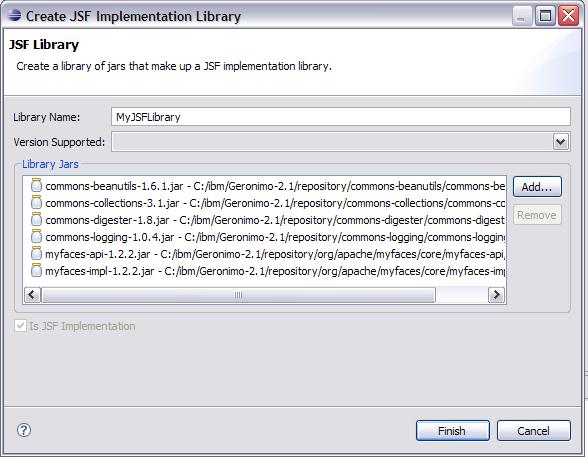
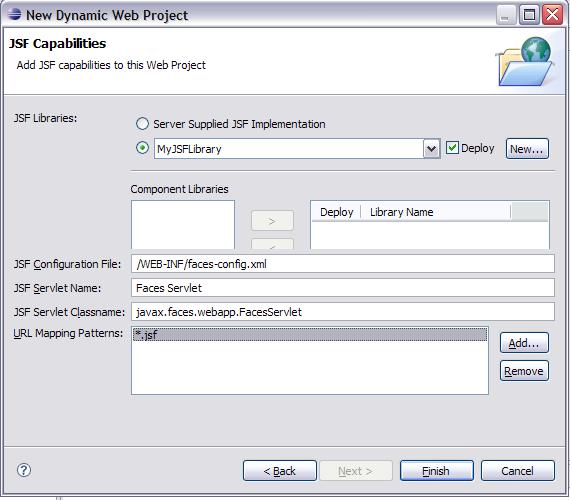
6. On the JSF Capabilities wizard, check the second radio button and click on the New button
by the side of the combo box. This will open Create JSF Implementation Library wizard.
Provide the Library Name as MyJSFLibrary and add the following jars by
clicking on the Add button. Finally, click on the Finish button.
7. Now, on the JSF Capabilities wizard, add the URL Mapping Patterns as *.jsf and click on the Finish button.
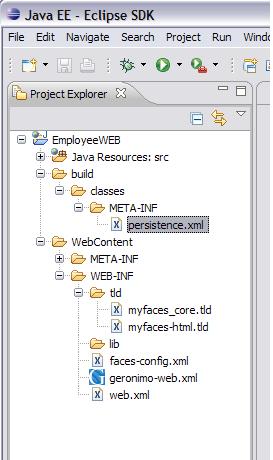
8. This will create EmployeeWEB application in the Project Explorer as below screen shot.

9. Right click on the WEB-INF folder and navigate to New => Folder and create a folder by name tld as given in the screen shot below.

10. Copy myfaces_core.tld and myfaces-html.tld files into the tld folder. These *.tld files are available in the myfaces-api-1.2.2.jar file.
11. We are going to use JPA to connect to EmployeeDB database created in the embedded Derby database. JPA uses persistence.xml file for configuration. Create a META-INF folder in the EmployeeWEB => build => classes folder in the Project Explorer. The contents of the persistence.xml are as follows.
12. Right click on the EmployeeWEB and navigate to New => Class and create Employee.java as given in the below screen shot. Click on the Finish button after providing the values.
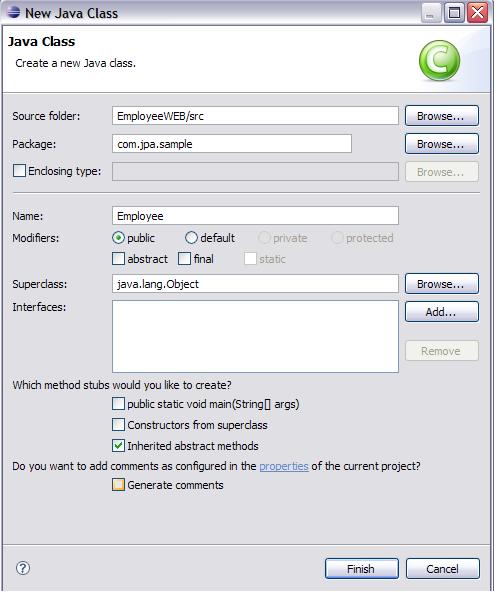
13. The contents of the com.jpa.sample.Employee are as follows. This is the entity class used with JPA for persistence.
14. Similarly, create sample.jsf.Employee. The contents of the class are as follows. This is the managed bean used by JSF.
15. Right click on the EmployeeWEB project and create index.jsp as follows.

The contents of the index.jsp are as follows.
16. Similarly, create addEmployee.jsp and the contents are as follows.
17. Similarly, create editEmployee.jsp and the contents are as follows.
18. Similarly, create RetrieveEmployee.jsp and the contents are as follows.
19. Open the geronimo-web.xml and replace the existing contents with the following contents. We explain the contents later when creating the datasource.
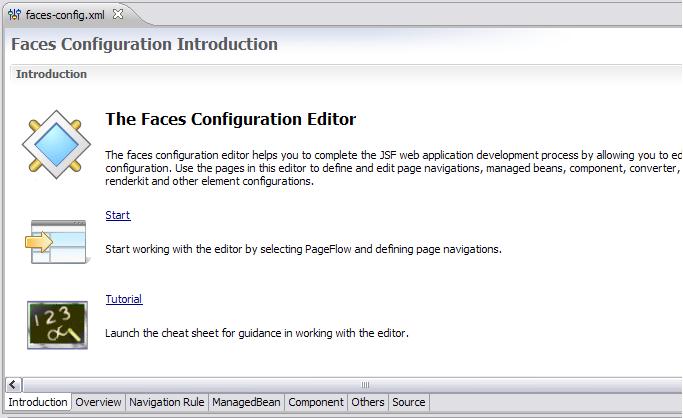
20. Click on the faces-config.xml to open Faces Configuration Editor.
21. Click on the ManagedBean tab below and Click on the Add button.
This will open New Managed Bean Wizard.

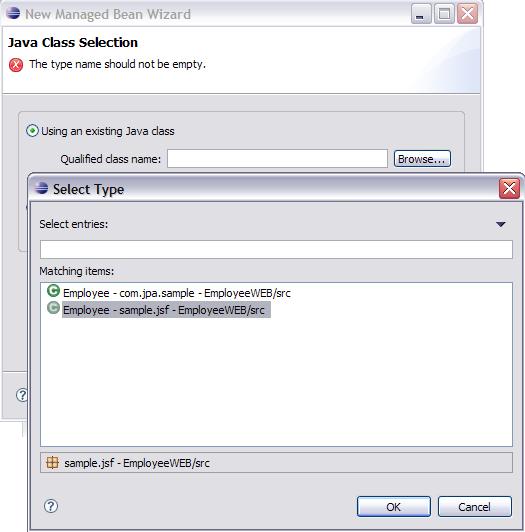
22. Click on the browse button and search for sample.jsf.Employee class and click on the OK button.
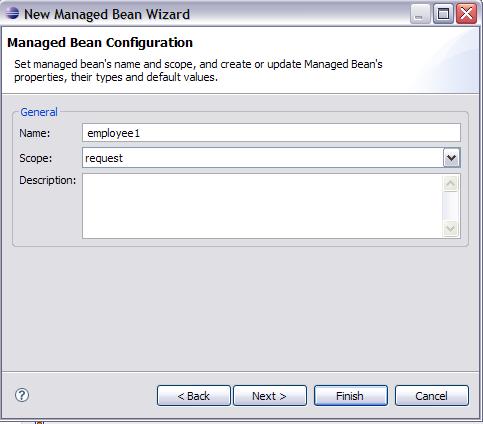
23. Click on the Next button on the New Managed Bean Wizard. On the next screen, select Scope as request and click on the Next button.
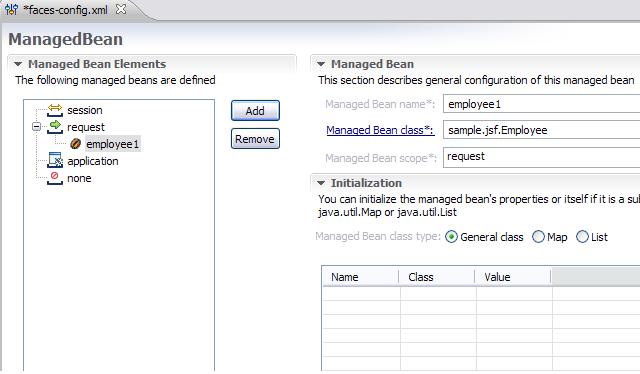
24. Click on the Next button and finally, click on the Finish button. This will bring up the following screen shot as below.
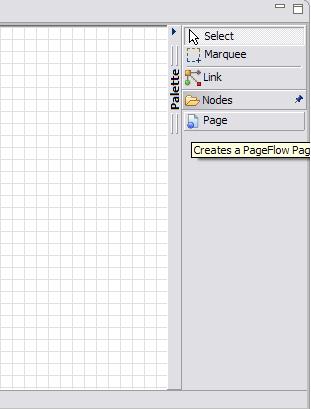
25. Click on the Navigation Rule tab and move the mouse over Palette to bring it to the front.
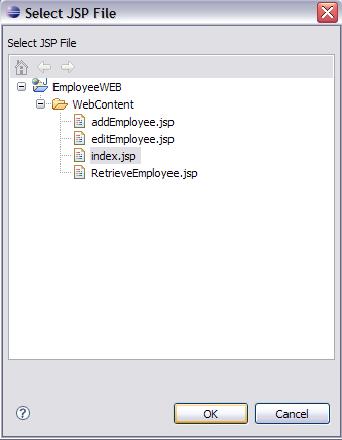
26. Click on the Page and move the mouse over main area and click once. This will bring up Select JSP File wizard. Select the index.jsp and click on the OK button.
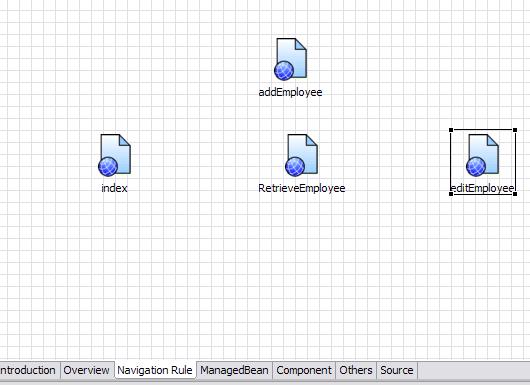
27. Similarly, add other JSPs also to the main area as follows.
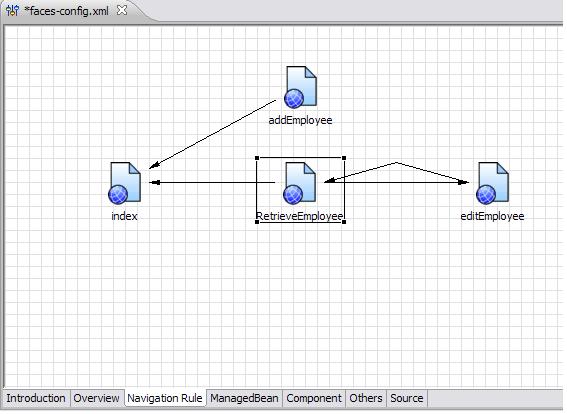
28. Bring the Palette to the front and click on the Link.
addEmployee.jsp on the main area and click onceindex.jsp and click once.RetrieveEmployee.jspindex.jsp and click once. RtrieveEmployee.jsp andeditEmployee.jsp and click once. editEmployee.jsp and move theRetrieveEmployee.jsp and click once.The above actions create navigation rules and look like the screen shot below.
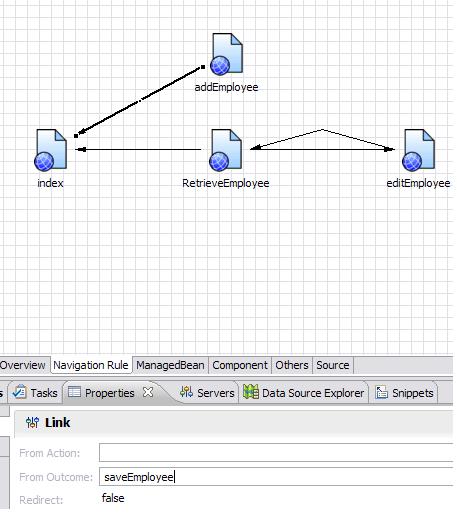
29. Press the escape button once and click on the link between addEmployee.jsp and index.jsp.
On the Properties window at the bottom, go to the From Outcome textbox
and provide the value as saveEmployee.
30. Similarly, Click on the link between RetrieveEmployee.jsp and index.jsp, and on the Properties window at the bottom, go to the From Outcome textbox and provide the value as cancel.
32. Similarly, Click on the link between RetrieveEmployee.jsp and editEmployee.jsp, and on the Properties window at the bottom, go to the From Outcome textbox and provide the value as retrieveEmployee.
33. Similarly, Click on the link between editEmployee.jsp and RetrieveEmployee.jsp, and on the Properties window at the bottom, go to the From Outcome textbox and provide the value as saveEmployee.
34. Click on the Source button to view the XML content generated out of these navigations rules and configuration. The contents should be as follows.
35. This finishes the WEB application creation and JSF configuration. Export the EmployeeWEB to a EmployeeWEB.war file.
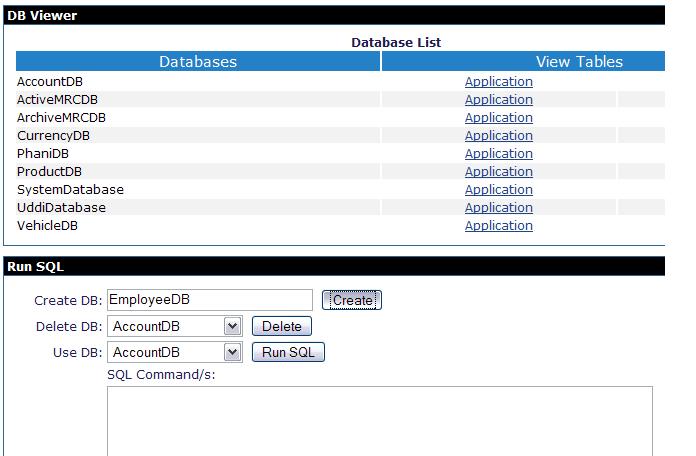
1. Start the geronimo server and click on the Console Navigation => Embedded DB => DB manager. Enter EmployeeDB in the Create DB textbox as shown in the below screen shot and click on the Create button.
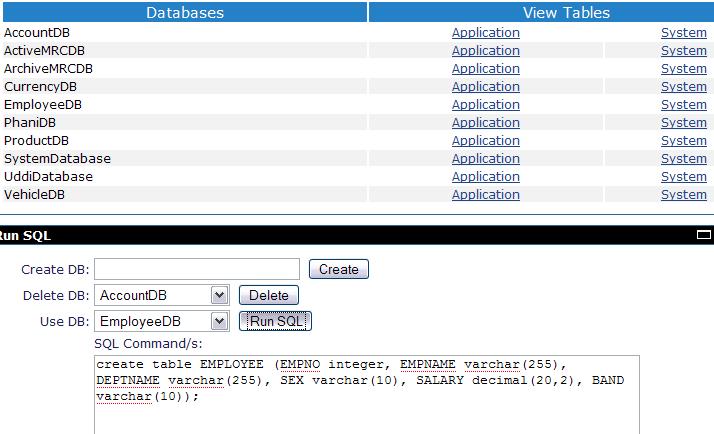
2. Create Employee table by entering the below SQL statement and clicking on the Run SQL button as shown in the below screen shot.
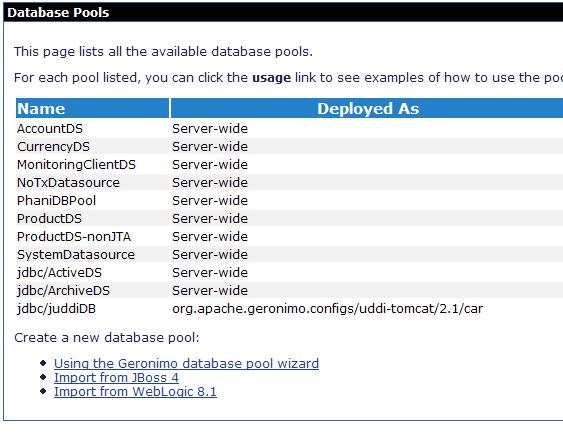
3. Click on the Console Navigation => Services => Database Pools, and click on the Using the Geronimo database pool wizard link to create a new datasource.
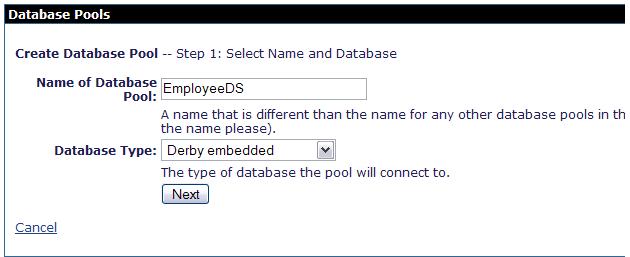
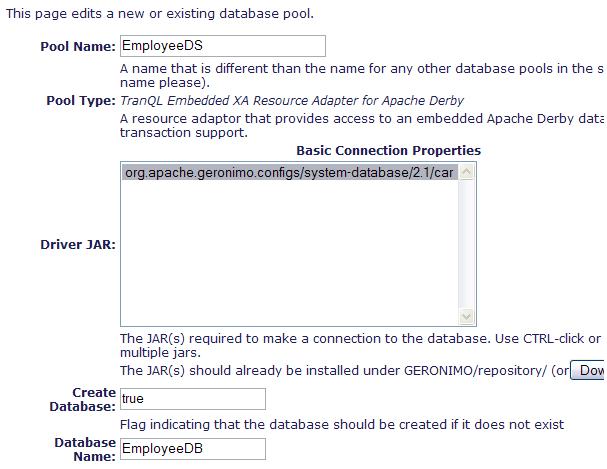
4. On the next screen, enter EmployeeDS in the Name of Database Pool textbox and select Derby embedded in the Database Type combo box. Click on the Next button.
5. On the next screen, select the configuration in the Driver JAR select box and enter EmployeeDB in the Database Name textbox, and click on the Deploy button at the bottom.
6. This will deploy the EmployeeDS database pool. The moduleId of the database pool is console.dbpool/EmployeeDS/1.0/rar which is declared as a dependency in the geronimo-web.xml. This is because, JPA uses this database source to persist entities.
1. Deploy the EmployeeWEB.war file using the command prompt as follows.
C:\Geronimo-2.1\bin>deploy.bat --user system --password manager deploy EmployeeWEB.war
Using GERONIMO_BASE:   C:\Geronimo-2.1
Using GERONIMO_HOME:   C:\Geronimo-2.1
Using GERONIMO_TMPDIR: var\temp
Using JRE_HOME:        C:\SDK-May-31-2007\jre
    Deployed EmployeeJSF/WEB/1.0/car @ /EmployeeWEB
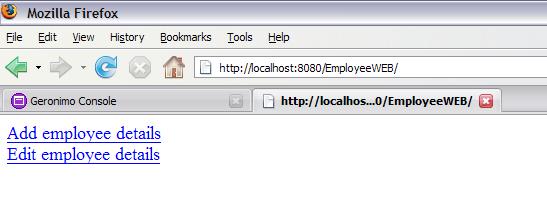
1. Open a browser window and hit the URL http://localhost:8080/EmployeeWEB/. This will bring up the below screen.
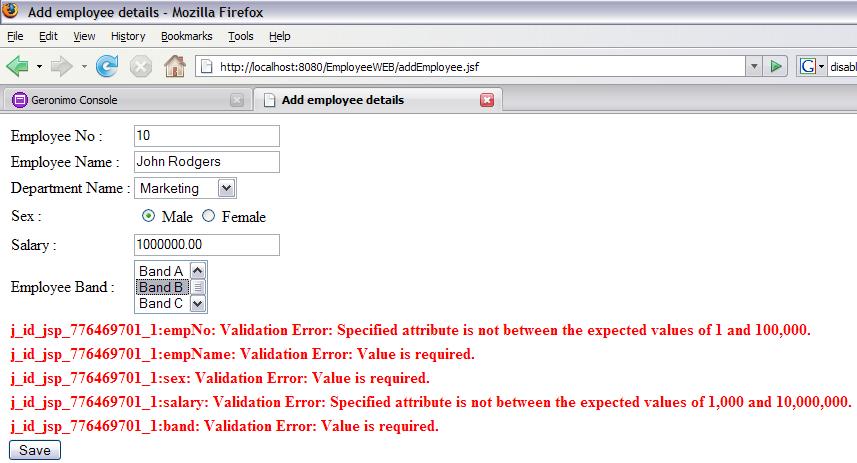
2. Click on the Add employee details link to get the below screen to add employees into the database. Just click on the Save button without entering any values. The JSF complains with validation errors as below.

3. Enter the values as given in the screen below and click on the Save button. This will take back to the main page.
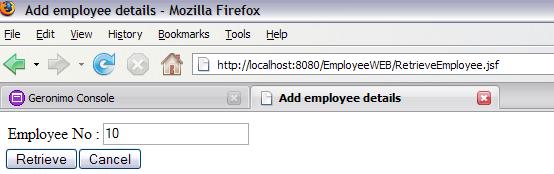
4. Click on the Edit employee details link to get the below screen. Enter Employee No value as 10 and click on the Retrieve button.
5. This will bring up the details of the employee whose employee number is 10. We can edit the values as required and click on the Save button.

|
|
Privacy Policy - Copyright © 2003-2011, The Apache Software Foundation, Licensed under ASL 2.0. |