
18 Working with AJAX - Reference Documentation
Authors: Andrea Del Bene, Martin Grigorov, Carsten Hufe, Christian Kroemer, Daniel Bartl, Paul Borș, Tobias Soloschenko
Version: 6.x
Table of Contents
18 Working with AJAX
AJAX has become a must-have for nearly all kinds of web application. This technology does not only help to achieve a better user experience but it also allows to improve the bandwidth performance of web applications. Using AJAX usually means writing tons of JavaScript code to handle asynchronous requests and to update user interface, but with Wicket we can leave all this boilerplate code to the framework and we don't even need to write a single line of JavaScript to start using AJAX.In this chapter we will learn how to leverage the AJAX support provided by Wicket to make our applications fully Web 2.0 compliant.18.1 How to use AJAX components and behaviors
Wicket support for AJAX is implemented in file wicket-ajax-jquery.js which makes complete transparent to Java code any detail about AJAX communication.AJAX components and behaviors shipped with Wicket expose one or more callback methods which are executed when they receive an AJAX request. One of the arguments of these methods is an instance of interfaceorg.apache.wicket.ajax.AjaxRequestTarget.For example component AjaxLink (in package org.apache.wicket.ajax.markup.html) defines abstract method onClick(AjaxRequestTarget target) which is executed when user clicks on the component:new AjaxLink("ajaxLink"){ @Override public void onClick(AjaxRequestTarget target) { //some server side code… } };
add(Component… components). With this method we tell Wicket to render again the specified components and refresh their markup via AJAX:new AjaxLink("ajaxLink"){ @Override public void onClick(AjaxRequestTarget target) { //modify the model of a label and refresh it on browser label.setDefaultModelObject("Another value 4 label."); target.add(label); } };
AjaxRequestTarget. This can be done using one of the two methods seen in paragraph 4.3:final Label label = new Label("labelComponent", "Initial value."); //autogenerate a markup id label.setOutputMarkupId(true); add(label); //… new AjaxLink("ajaxLink"){ @Override public void onClick(AjaxRequestTarget target) { //modify the model of a label and refresh it on client side label.setDefaultModelObject("Another value 4 label."); target.add(label); } };
new AjaxLink("ajaxLink"){
	@Override
	public void onClick(AjaxRequestTarget target) {
	    target.appendJavaScript(";alert('Hello!!');");
	}
};
Repeaters component that haveorg.apache.wicket.markup.repeater.AbstractRepeateras base class (likeListView,RepeatingView, etc...) can not be directly updated via AJAX.If we want to refresh their markup via AJAX we must add one of their parent containers to theAjaxRequestTarget.
18.2 Build-in AJAX components
Wicket distribution comes with a number of built-in AJAX components ready to be used. Some of them are the ajaxified version of common components like links and buttons, while others are AJAX-specific components.AJAX components are not different from any other component seen so far and they don't require any additional configuration to be used. As we will shortly see, switching from a classic link or button to the ajaxified version is just a matter of appending “Ajax” to the component class name.This paragraph provides an overview of what we can find in Wicket to start writing AJAX-enhanced web applications.Links and buttons
In the previous paragraph we have already introduced component AjaxLink. Wicket provides also the ajaxified versions of submitting components SubmitLink and Button which are simply called AjaxSubmitLink and AjaxButton. These components come with a version of methods onSubmit, onError and onAfterSubmit that takes in input also an instance ofAjaxRequestTarget.Both components are in package org.apache.wicket.ajax.markup.html.form.Fallback components
Building an entire site using AJAX can be risky as some clients may not support this technology. In order to provide an usable version of our site also to these clients, we can use componentsAjaxFallbackLink and AjaxFallbackButton which are able to automatically degrade to a standard link or to a standard button if client doesn't support AJAX.AJAX Checkbox
Classorg.apache.wicket.ajax.markup.html.form.AjaxCheckBox is a checkbox component that updates its model via AJAX when user changes its value. Its AJAX callback method is onUpdate(AjaxRequestTarget target). The component extends standard checkbox component CheckBox adding an AjaxFormComponentUpdatingBehavior to itself (we will see this behavior later in paragraph 16.3.3).AJAX editable labels
An editable label is a special label that can be edited by the user when she/he clicks on it. Wicket ships three different implementations for this component (all inside packageorg.apache.wicket.extensions.ajax.markup.html):
- AjaxEditableLabel: it's a basic version of editable label. User can edit the content of the label with a text field. This is also the base class for the other two editable labels.
- AjaxEditableMultiLineLabel: this label supports multi-line values and uses a text area as editor component.
- AjaxEditableChoiceLabel: this label uses a drop-down menu to edit its value.
- onEdit(AjaxRequestTarget target): called when user clicks on component. The default implementation shows the component used to edit the value of the label.
- onSubmit(AjaxRequestTarget target): called when the value has been successfully updated with the new input.
- onError(AjaxRequestTarget target): called when the new inserted input has failed validation.
- onCancel(AjaxRequestTarget target): called when user has exited from editing mode pressing escape key. The default implementation brings back the label to its initial state hiding the editor component.
EditableLabelPage.java which shows all these three components together. You can see this page in action at http://www.wicket-library.com/wicket-examples-6.0.x/ajax/editable-label :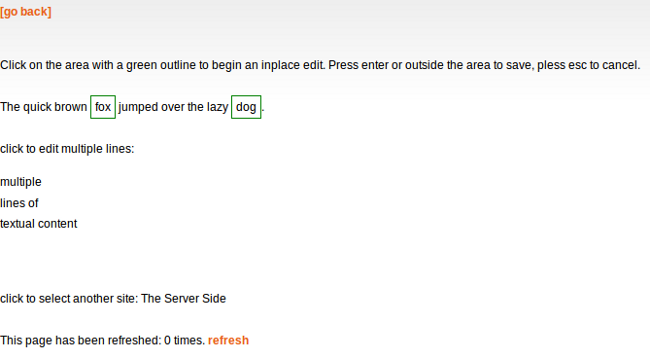
Autocomplete text field
On Internet we can find many examples of text fields that display a list of suggestions (or options) while the user types a text inside them. This feature is known as autocomplete functionality.Wicket offers an out-of-the-box implementation of an autocomplete text field with componentorg.apache.wicket.extensions.ajax.markup.html.autocomplete.AutoCompleteTextField.When using AutoCompleteTextField we are required to implement its abstract method getChoices(String input) where the input parameter is the current input of the component. This method returns an iterator over the suggestions that will be displayed as a drop-down menu: Suggestions are rendered using a render which implements interface
 IAutoCompleteRenderer. The default implementation simply calls toString() on each suggestion object. If we need to work with a custom render we can specify it via component constructor.AutoCompleteTextField supports a wide range of settings that are passed to its constructor with class AutoCompleteSettings.One of the most interesting parameter we can specify for AutoCompleteTextField is the throttle delay which is the amount of time (in milliseconds) that must elapse between a change of input value and the transmission of a new Ajax request to display suggestions. This parameter can be set with method setThrottleDelay(int):AutoCompleteSettings settings = new AutoCompleteSettings(); //set throttle to 400 ms: component will wait 400ms before displaying the options settings.setThrottleDelay(400); //... AutoCompleteTextField field = new AutoCompleteTextField<T>("field", model) { @Override protected Iterator getChoices(String arg0) { //return an iterator over the options } };
AutoCompletePagePage.java which shows an example of autocomplete text field. The running example is available at http://www.wicket-library.com/wicket-examples-6.0.x/ajax/autocomplete .Modal window
Classorg.apache.wicket.extensions.ajax.markup.html.modal.ModalWindow is an implementation of a modal window based on AJAX: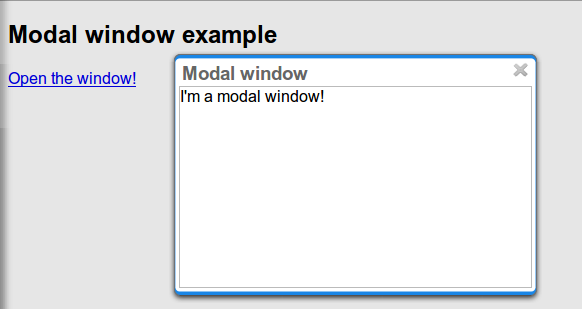 The content of a modal window can be either another component or a page. In the first case the id of the component used as content must be retrieved with method getContentId().If instead we want to use a page as window content, we must implement the inner interface
 ModalWindow.PageCreator and pass it to method setPageCreator. The page used as content will be embedded in a <iframe> tag.To display a modal window we must call its method show(AjaxRequestTarget target). This is usually done inside the AJAX callback method of another component (like an AjaxLink). The following markup and code are taken from project BasicModalWindowExample and illustrate a basic usage of a modal window:HTML:
<body>
	<h2>Modal Windod example</h2>
	<a wicket:id="openWindow">Open the window!</a>
	<div wicket:id="modalWindow"></div>
</body>
public HomePage(final PageParameters parameters) {
   	super(parameters);
   	final ModalWindow modalWindow = new ModalWindow("modalWindow");
   	Label label = new Label(modalWindow.getContentId(), "I'm a modal window!");   	modalWindow.setContent(label);
   	modalWindow.setTitle("Modal window");   	add(modalWindow);
   	add(new AjaxLink("openWindow") {
	  @Override
	  public void onClick(AjaxRequestTarget target) {
		modalWindow.show(target);
	  }
	});
}
ModalWindow must be added to a markup tag, like we did in our example using a <div> tag. Wicket will automatically hide this tag in the final markup appending the style value display:none.
The component provides different setter methods to customize the appearance of the window:
- setTitle(String): specifies the title of the window
- setResizable(boolean): by default the window is resizeable. If we need to make its size fixed we can use this method to turn off this feature.
- setInitialWidth(int) and setInitialHeight(int): set the initial dimensions of the window.
- setMinimalWidth(int) and setMinimalHeight(int): specify the minimal dimensions of the window.
- setCookieName(String): this method can be used to specify the name of the cookie used on client side to store size and position of the window when it is closed. The component will use this cookie to restore these two parameters the next time the window will be opened. If no cookie name is provided, the component will not remember its last position and size.
- setCssClassName(String): specifies the CSS class used for the window.
- setAutoSize(boolean): when this flag is set to true the window will automatically adjust its size to fit content width and height. By default it is false.
close(AjaxRequestTarget target). The currently opened window can be closed also with the following JavaScript instruction:Wicket.Window.get().close();
ModalWindow gives the opportunity to perform custom actions when window is closing. Inner interface ModalWindow.WindowClosedCallback can be implemented and passed to window's method setWindowClosedCallback to specify the callback that must be executed after window has been closed:modalWindow.setWindowClosedCallback(new ModalWindow.WindowClosedCallback() { @Override public void onClose(AjaxRequestTarget target) { //custom code… } });
Tree repeaters
Classorg.apache.wicket.extensions.markup.html.repeater.tree.AbstractTree is the base class of another family of repeaters called tree repeaters and designed to display a data hierarchy as a tree, resembling the behavior and the look & feel of desktop tree components. A classic example of tree component on desktop is the tree used by nearly all file managers to navigate file system: Because of their highly interactive nature, tree repeaters are implemented as AJAX components, meaning that they are updated via AJAX when we expand or collapse their nodes.The basic implementation of a tree repeater shipped with Wicket is component
 NestedTree. In order to use a tree repeater we must provide an implementation of interface ITreeProvider which is in charge of returning the nodes that compose the tree.Wicket comes with a built-in implementation of ITreeProvider called TreeModelProvider that works with the same tree model and nodes used by Swing component javax.swing.JTree. These Swing entities should be familiar to you if you have previously worked with the old tree repeaters (components Tree and TreeTable) that have been deprecated with Wicket 6 and that are strongly dependent on Swing-based model and nodes. TreeModelProvider can be used to migrate your code to the new tree repeaters.In the next example (project CheckBoxAjaxTree) we will build a tree that displays some of the main cities of three European countries: Italy, Germany and France. The cities are sub-nodes of a main node representing the relative county. The nodes of the final tree will be also selectable with a checkbox control. The whole tree will have the classic look & feel of Windows XP. This is how our tree will look like: We will start to explore the code of this example from the home page. The first portion of code we will see is where we build the nodes and the
 TreeModelProvider for the three. As tree node we will use Swing class javax.swing.tree.DefaultMutableTreeNode:public class HomePage extends WebPage { public HomePage(final PageParameters parameters) { super(parameters); DefaultMutableTreeNode root = new DefaultMutableTreeNode("Cities of Europe"); addNodes(addNodes(root, "Italy"), "Rome", "Venice", "Milan", "Florence"); addNodes(addNodes(root, "Germany"),"Stuttgart","Munich", "Berlin","Dusseldorf", "Dresden"); addNodes(addNodes(root, "France"), "Paris","Toulouse", "Strasbourg","Bordeaux", "Lyon"); DefaultTreeModel treeModel = new DefaultTreeModel(root); TreeModelProvider<DefaultMutableTreeNode> modelProvider = new TreeModelProvider<DefaultMutableTreeNode>( treeModel ){ @Override public IModel<DefaultMutableTreeNode> model(DefaultMutableTreeNode object){ return Model.of(object); } }; //To be continued...
DefaultMutableTreeNodes we can build the Swing tree model (DefaultTreeModel) that will be the backing object for a TreeModelProvider. This provider wraps each node in a model invoking its abstract method model. In our example we have used a simple Model as wrapper model.Scrolling down the code we can see how the tree component is instantiated and configured before being added to the home page://Continued from previous snippet… NestedTree<DefaultMutableTreeNode> tree = new NestedTree<DefaultMutableTreeNode>("tree", modelProvider) { @Override protected Component newContentComponent(String id, IModel<DefaultMutableTreeNode>model) { return new CheckedFolder<DefaultMutableTreeNode>(id, this, model); } }; //select Windows theme tree.add(new WindowsTheme()); add(tree); } //implementation of addNodes //… }
newContentComponent which is called internally by base class AbstractTree when a new node must be built. As content component we have used built-in class CheckedFolder which combines a Folder component with a CheckBox form control.The final step before adding the tree to its page is to apply a theme to it. Wicket comes with two behaviors, WindowsTheme and HumanTheme, which correspond to the classic Windows XP theme and to the Human theme from Ubuntu.Our checkable tree is finished but our work is not over yet because the component doesn't offer many functionalities as it is. Unfortunately neither NestedTree nor CheckedFolder provide a means for collecting checked nodes and returning them to client code. It's up to us to implement a way to keep track of checked nodes.Another nice feature we would like to implement for our tree is the following user-friendly behavior that should occur when a user checks/unchecks a node:
- When a node is checked also all its children nodes (if any) must be checked. We must also ensure that all the ancestors of the checked node (root included) are checked, otherwise we would get an inconsistent selection.
- When a node is unchecked also all its children nodes (if any) must be unchecked and we must also ensure that ancestors get unchecked if they have no more checked children.
CheckedFolder that uses a shared Java Set to store checked node and to verify if its node has been checked. This kind of solution requires a custom model for checkbox component in order to reflect its checked status when its container node is rendered. This model must implement typed interface IModel<Boolean> and must be returned by CheckedFolder's method newCheckBoxModel.For the second goal (auto select/unselect children and ancestor nodes) we can use CheckedFolder's callback method onUpdate(AjaxRequestTarget) that is invoked after a checkbox is clicked and its value has been updated. Overriding this method we can handle user click adding/removing nodes to/from the Java Set.Following this implementation plan we can start coding our custom CheckedFolder (named AutocheckedFolder):public class AutocheckedFolder<T> extends CheckedFolder<T> { private ITreeProvider<T> treeProvider; private IModel<Set<T>> checkedNodes; private IModel<Boolean> checkboxModel; public AutocheckedFolder(String id, AbstractTree<T> tree, IModel<T> model, IModel<Set<T>> checkedNodes) { super(id, tree, model); this.treeProvider = tree.getProvider(); this.checkedNodes = checkedNodes; } @Override protected IModel<Boolean> newCheckBoxModel(IModel<T> model) { checkboxModel = new CheckModel(); return checkboxModel; } @Override protected void onUpdate(AjaxRequestTarget target) { super.onUpdate(target); T node = getModelObject(); boolean nodeChecked = checkboxModel.getObject(); addRemoveSubNodes(node, nodeChecked); addRemoveAncestorNodes(node, nodeChecked); } class CheckModel extends AbstractCheckBoxModel{ @Override public boolean isSelected() { return checkedNodes.getObject().contains(getModelObject()); } @Override public void select() { checkedNodes.getObject().add(getModelObject()); } @Override public void unselect() { checkedNodes.getObject().remove(getModelObject()); } } }
AbstractCheckBoxModel which is provided to implement custom models for checkbox controls.Methods addRemoveSubNodes and addRemoveAncestorNodes are called to automatically add/remove children and ancestor nodes to/from the current Set. Their implementation is mainly focused on the navigation of tree nodes and it heavily depends on the internal implementation of the tree, so we won't dwell on their code.Now we are just one step away from completing our tree as we still have to find a way to update the checked status of both children and ancestors nodes on client side. Although we could easily accomplish this task by simply refreshing the whole tree via AJAX, we would like to find a better and more performant solution for this task.When we modify the checked status of a node we don't expand/collapse any node of the three so we can simply update the desired checkboxes rather than updating the entire tree component. This alternative approach could lead to a more responsive interface and to a strong reduction of bandwidth consumption.With the help of JQuery we can code a couple of JavaScript functions that can be used to check/ uncheck all the children and ancestors of a given node. Then, we can append these functions to the current AjaxRequest at the end of method onUpdate:@Override protected void onUpdate(AjaxRequestTarget target) { super.onUpdate(target); T node = getModelObject(); boolean nodeChecked = checkboxModel.getObject(); addRemoveSubNodes(node, nodeChecked); addRemoveAncestorNodes(node, nodeChecked); updateNodeOnClientSide(target, nodeChecked); } protected void updateNodeOnClientSide(AjaxRequestTarget target, boolean nodeChecked) { target.appendJavaScript(";CheckAncestorsAndChildren.checkChildren('" + getMarkupId() + "'," + nodeChecked + ");"); target.appendJavaScript(";CheckAncestorsAndChildren.checkAncestors('" + getMarkupId() + "'," + nodeChecked + ");"); }
@Override
public void renderHead(IHeaderResponse response) {
	PackageResourceReference scriptFile = new PackageResourceReference(this.getClass(),
                                                      "autocheckedFolder.js");
	response.render(JavaScriptHeaderItem.forReference(scriptFile));
}
Working with hidden components
When a component is not visible its markup and the related id attribute are not rendered in the final page, hence it can not be updated via AJAX. To overcome this problem we must use Component's methodsetOutputMarkupPlaceholderTag(true) which has the effect of rendering a hidden <span> tag containing the markup id of the hidden component:final Label label = new Label("labelComponent", "Initial value."); //make label invisible label.setVisible(false); //ensure that label will leave a placeholder for its markup id label.setOutputMarkupPlaceholderTag(true); add(label); //… new AjaxLink("ajaxLink"){ @Override public void onClick(AjaxRequestTarget target) { //turn label to visible label.setVisible(true); target.add(label); } };
setOutputMarkupId(true) as setOutputMarkupPlaceholderTag already does it internally.
18.3 Built-in AJAX behaviors
In addition to specific components, Wicket offers also a set of built in AJAX behaviors that can be used to easily add AJAX functionalities to existing components. As we will see in this paragraph AJAX behaviors can be used also to ajaxify components that weren't initially designed to work with this technology. All the following behaviors are inside packageorg.apache.wicket.ajax.AjaxEventBehavior
AjaxEventBehavior allows to handle a JavaScript event (like click, change, etc...) on server side via AJAX. Its constructor takes in input the name of the event that must be handled. Every time this event is fired for a given component on client side, the callback methodonEvent(AjaxRequestTarget target) is executed. onEvent is abstract, hence we must implement it to tell AjaxEventBehavior what to do when the specified event occurs.In project AjaxEventBehaviorExample we used this behavior to build a “clickable” Label component that counts the number of clicks. Here is the code from the home page of the project:HTML:
<body>
  <div wicket:id="clickCounterLabel"></div>
  User has clicked <span wicket:id="clickCounter"></span> time/s on the label above.
</body>
public class HomePage extends WebPage {
   public HomePage(final PageParameters parameters) {
      super(parameters);      final ClickCounterLabel clickCounterLabel =
         new ClickCounterLabel("clickCounterLabel", "Click on me!");
      final Label clickCounter =
         new Label("clickCounter", new PropertyModel(clickCounterLabel, "clickCounter"));
      clickCounterLabel.setOutputMarkupId(true);
      clickCounterLabel.add(new AjaxEventBehavior("click"){         @Override
         protected void onEvent(AjaxRequestTarget target) {
            clickCounterLabel.clickCounter++;
            target.add(clickCounter);
         }
      });      add(clickCounterLabel);
      add(clickCounter.setOutputMarkupId(true));
    }
}class ClickCounterLabel extends Label{
   public int clickCounter;   public ClickCounterLabel(String id) {
      super(id);
   }   public ClickCounterLabel(String id, IModel<?> model) {
      super(id, model);
   }   public ClickCounterLabel(String id, String label) {
      super(id, label);
   }
}
ClickCounterLabel that exposes a public integer field called clickCounter. Then, in the home page we have attached a AjaxEventBehavior to our custom label to increment clickCounter every time it receives a click event.The number of clicks is displayed with another standard label named clickCounter.AjaxFormSubmitBehavior
This behavior allows to send a form via AJAX when the component it is attached to receives the specified event. The component doesn't need to be inside the form if we use the constructor version that, in addition to the name of the event, takes in input also the target form:Form form = new Form("form"); Button submitButton = new Button("submitButton"); //submit form when button is clicked submitButton.add(new AjaxFormSubmitBehavior(form, "click"){}); add(form); add(submitButton);
AjaxFormComponentUpdatingBehavior
This behavior updates the model of the form component it is attached to when a given event occurs. The standard form submitting process is skipped and the behavior validates only its form component.The behavior doesn't work with radio buttons and checkboxes. For these kinds of components we must useAjaxFormChoiceComponentUpdatingBehavior:Form form = new Form("form"); TextField textField = new TextField("textField", Model.of("")); //update the model of the text field each time event "change" occurs textField.add(new AjaxFormComponentUpdatingBehavior("change"){ @Override protected void onUpdate(AjaxRequestTarget target) { //... } }); add(form.add(textField));
AbstractAjaxTimerBehavior
AbstractAjaxTimerBehavior executes callback method onTimer(AjaxRequestTarget target) at a specified interval. The behavior can be stopped and restarted at a later time with methods stop(AjaxRequestTarget target) and restart(AjaxRequestTarget target):Label dynamicLabel = new Label("dynamicLabel"); //trigger an AJAX request every three seconds dynamicLabel.add(new AbstractAjaxTimerBehavior(Duration.seconds(3)) { @Override protected void onTimer(AjaxRequestTarget target) { //... } }); add(dynamicLabel);
As side effect AJAX components and behaviors make their hosting page stateful. As a consequence they are unfit for those pages that must stay stateless. Project WicketStuff provides a module with a stateless version of the most common AJAX components and behaviors. You can find more informations on this module in Appendix B.
18.4 Using an activity indicator
One of the things we must take care of when we use AJAX is to notify user when an AJAX request is already in progress. This is usually done displaying an animated picture as activity indicator while the AJAX request is running.Wicket comes with a variant of componentsAjaxButton, AjaxLink and AjaxFallbackLink that display a default activity indicator during AJAX request processing. These components are respectively IndicatingAjaxButton, IndicatingAjaxLink and IndicatingAjaxFallbackLink.The default activity indicator used in Wicket can be easily integrated in our components using behavior AjaxIndicatorAppender (available in package org.apache.wicket.extensions.ajax.markup.html) and implementing the interface IAjaxIndicatorAware (in package org.apache.wicket.ajax).IAjaxIndicatorAware declares method getAjaxIndicatorMarkupId() which returns the id of the markup element used to display the activity indicator. This id can be obtained from the AjaxIndicatorAppender behavior that has been added to the current component. The following code snippet summarizes the steps needed to integrate the default activity indicator with an ajaxified component://1-Implement interface IAjaxIndicatorAware public class MyComponent extends Component implements IAjaxIndicatorAware { //2-Instantiate an AjaxIndicatorAppender private AjaxIndicatorAppender indicatorAppender = new AjaxIndicatorAppender(); public MyComponent(String id, IModel<?> model) { super(id, model); //3-Add the AjaxIndicatorAppender to the component add(indicatorAppender); } //4-Return the markup id obtained from AjaxIndicatorAppender public String getAjaxIndicatorMarkupId() { return indicatorAppender.getMarkupId(); } //… }
getIndicatorUrl() of AjaxIndicatorAppender and return the URL to the desired picture.
18.5 AJAX request attributes and call listeners
Starting from version 6.0 Wicket has introduced two entities which allow us to control how an AJAX request is generated on client side and to specify the custom JavaScript code we want to execute during request handling. These entities are classAjaxRequestAttributes and interface IAjaxCallListener, both placed in package org.apache.wicket.ajax.attributes.AjaxRequestAttributes exposes the attributes used to generate the JavaScript call invoked on client side to start an AJAX request. Each attribute will be passed as a JSON parameter to the JavaScript function Wicket.Ajax.ajax which is responsible for sending the concrete AJAX request. Every JSON parameter is identified by a short name. Here is a partial list of the available parameters:| Short name | Description | Default value |
|---|---|---|
| u | The callback URL used to serve the AJAX request that will be sent. | |
| c | The id of the component that wants to start the AJAX call. | |
| e | A list of event (click, change, etc...) that can trigger the AJAX call. | domready |
| m | The request method that must be used (GET or POST). | GET |
| f | The id of the form that must be submitted with the AJAX call. | |
| mp | If the AJAX call involves the submission of a form, this flag indicates whether the data must be encoded using the encoding mode “multipart/form-data”. | false |
| sc | The input name of the submitting component of the form | |
| async | A boolean parameter that indicates if the AJAX call is asynchronous (true) or not. | true |
| wr | Specifies the type of data returned by the AJAX call (XML, HTML, JSON, etc...). | XML |
| bh, pre, bsh, ah, sh, fh, coh | This is a list of the listeners that are executed on client side (they are JavaScript scripts) during the lifecycle of an AJAX request. Each short name is the abbreviation of one of the methods defined in the interface IAjaxCallListener (see below). | An empty list |
A full list of the available request parameters as well as more details on the related JavaScript code can be found at https://cwiki.apache.org/confluence/ display/WICKET/Wicket+Ajax display/WICKET/Wicket+Ajax .Parameters 'u' (callback URL) and 'c' (the id of the component) are generated by the AJAX behavior that will serve the AJAX call and they are not accessible through
AjaxRequestAttributes.Here is the final AJAX function generate for the behavior used in example project AjaxEventBehavior Example:Wicket.Ajax.ajax({"u":"./?0-1.IBehaviorListener.0-clickCounterLabel", "e":"click",
"c":"clickCounterLabel1"});updateAjaxAttributes (AjaxRequestAttributes attributes).One of the attribute we may need to modify is the list of IAjaxCallListeners returned by method getAjaxCallListeners().IAjaxCallListener defines a set of methods which return the JavaScript code (as a CharSequence) that must be executed on client side when the AJAX request handling reaches a given stage:
- getBeforeHandler(Component): returns the JavaScript code that will be executed before any other handlers returned by IAjaxCallListener. The code is executed in a scope where it can use variable attrs, which is an array containing the JSON parameters passed to Wicket.Ajax.ajax.
- getPrecondition(Component): returns the JavaScript code that will be used as precondition for the AJAX call. If the script returns false then neither the Ajax call nor the other handlers will be executed. The code is executed in a scope where it can use variable attrs, which is the same variable seen for getBeforeHandler.
- getBeforeSendHandler(Component): returns the JavaScript code that will be executed just before the AJAX call is performed. The code is executed in a scope where it can use variables attrs, jqXHR and settings:
- attrs is the same variable seen for getBeforeHandler.
- jqXHR is the the jQuery XMLHttpRequest object used to make the AJAX call.
- settings contains the settings used for calling jQuery.ajax().
- getAfterHandler(Component): returns the JavaScript code that will be executed after the AJAX call. The code is executed in a scope where it can use variable attrs, which is the same variable seen before for getBeforeHandler.
- getSuccessHandler(Component): returns the JavaScript code that will be executed if the AJAX call has successfully returned. The code is executed in a scope where it can use variables attrs, jqXHR, data and textStatus:
- attrs and jqXHR are same variables seen for getBeforeSendHandler:
- data is the data returned by the AJAX call. Its type depends on parameter wr (Wicket AJAX response).
- textStatus it's the status returned as text.
- getFailureHandler(Component): returns the JavaScript code that will be executed if the AJAX call has returned with a failure. The code is executed in a scope where it can use variable attrs, which is the same variable seen for getBeforeHandler.
- getCompleteHandler(Component): returns the JavaScript that will be invoked after success or failure handler has been executed. The code is executed in a scope where it can use variables attrs, jqXHR and textStatus which are the same variables seen for getSuccessHandler.
IAjaxCallListener designed to disable a component during AJAX request processing.
18.6 Creating custom AJAX call listener
Displaying an activity indicator is a nice way to notify user that an AJAX request is already running, but sometimes is not enough. In some situations we may need to completely disable a component during AJAX request processing, for example when we want to avoid that impatient users submit a form multiple times. In this paragraph we will see how to accomplish this goal building a custom and reusableIAjaxCallListener. The code used in this example is from project CustomAjaxListenerExample.What we want for our listener
The listener should execute some JavaScript code to disable a given component when the component it is attached to is about to make an AJAX call. Then, when the AJAX request has been completed, the listener should bring back the disabled component to an active state.When a component is disabled it must be clear to user that an AJAX request is running and that he/she must wait for it to complete. To achieve this result we want to disable a given component covering it with a semi-transparent overlay area with an activity indicator in the middle.The final result will look like this:
How to implement the listener
The listener will implement methodsgetBeforeHandler and getAfterHandler: the first will return the code needed to place an overlay <div> on the desired component while the second must remove this overlay when the AJAX call has completed.To move and resize the overlay area we will use another module from JQueryUI library that allows us to position DOM elements on our page relative to another element.So our listener will depend on four static resources: the JQuery library, the position module of JQuery UI, the custom code used to move the overlay <div> and the picture used as activity indicator. Except for the activity indicator, all these resources must be added to page header section in order to be used.Ajax call listeners can contribute to header section by simply implementing interface IComponentAwareHeaderContributor. Wicket provides adapter class AjaxCallListener that implements both IAjaxCallListener and IComponentAwareHeaderContributor. We will use this class as base class for our listener.JavaScript code
Now that we know what to do on the Java side, let's have a look at the custom JavaScript code that must be returned by our listener (file moveHiderAndIndicator.js):DisableComponentListener = {
disableElement: function(elementId, activeIconUrl){
var hiderId = elementId + "-disable-layer";
var indicatorId = elementId + "-indicator-picture"; elementId = "#" + elementId;
//create the overlay <div>
$(elementId).after('<div id="' + hiderId
+ '" style="position:absolute;">'
+ '<img id="' + indicatorId + '" src="' + activeIconUrl + '"/>'
+ '</div>'); hiderId = "#" + hiderId;
//set the style properties of the overlay <div>
$(hiderId).css('opacity', '0.8');
$(hiderId).css('text-align', 'center');
$(hiderId).css('background-color', 'WhiteSmoke');
$(hiderId).css('border', '1px solid DarkGray');
//set the dimention of the overlay <div>
$(hiderId).width($(elementId).outerWidth());
$(hiderId).height($(elementId).outerHeight());
//positioning the overlay <div> on the component that must be disabled.
$(hiderId).position({of: $(elementId),at: 'top left', my: 'top left'}); //positioning the activity indicator in the middle of the overlay <div>
$("#" + indicatorId).position({of: $(hiderId), at: 'center center',
my: 'center center'});
},
//function hideComponenthideComponent: function(elementId){
var hiderId = elementId + "-disable-layer";
$('#' + hiderId).remove();
}
};Java class code
The code of our custom listener is the following:public class DisableComponentListener extends AjaxCallListener { private static PackageResourceReference customScriptReference = new PackageResourceReference(DisableComponentListener.class, "moveHiderAndIndicator.js"); private static PackageResourceReference jqueryUiPositionRef = new PackageResourceReference(DisableComponentListener.class, "jquery-ui-position.min.js"); private static PackageResourceReference indicatorReference = new PackageResourceReference(DisableComponentListener.class, "ajax-loader.gif"); private Component targetComponent; public DisableComponentListener(Component targetComponent){ this.targetComponent = targetComponent; } @Override public CharSequence getBeforeHandler(Component component) { CharSequence indicatorUrl = getIndicatorUrl(component); return ";DisableComponentListener.disableElement('" + targetComponent.getMarkupId() + "'," + "'" + indicatorUrl + "');"; } @Override public CharSequence getCompleteHandler(Component component) { return ";DisableComponentListener.hideComponent('" + targetComponent.getMarkupId() + "');"; } protected CharSequence getIndicatorUrl(Component component) { return component.urlFor(indicatorReference, null); } @Override public void renderHead(Component component, IHeaderResponse response) { ResourceReference jqueryReference = Application.get().getJavaScriptLibrarySettings().getJQueryReference(); response.render(JavaScriptHeaderItem.forReference(jqueryReference)); response.render(JavaScriptHeaderItem.forReference(jqueryUiPositionRef)); response.render(JavaScriptHeaderItem.forReference(customScriptReference) ); } }
getIndicatorUrl) to retrieve the URL of the indicator picture. This was done in order to make the picture customizable by overriding this method.Once we have our listener in place, we can finally use it in our example overwriting method updateAjaxAttributes of the AJAX button that submits the form://… new AjaxButton("ajaxButton"){ @Override protected void updateAjaxAttributes(AjaxRequestAttributes attributes) { super.updateAjaxAttributes(attributes); attributes.getAjaxCallListeners().add(new DisableComponentListener(form)); } } //...
Global listeners
So far we have seen how to use an AJAX call listener to track the AJAX activity of a single component. In addition to these kinds of listeners, Wicket provides also global listeners which are triggered for any AJAX request sent from a page.Global AJAX call events are handled with JavaScript. We can register a callback function for a specific event of the AJAX call lifecycle with functionWicket.Event.subscribe('<eventName>', <callback Function>). The first parameter of this function is the name of the event we want to handle. The possible names are:
- '/ajax/call/before': called before any other event handler.
- '/ajax/call/beforeSend': called just before the AJAX call.
- '/ajax/call/after': called after the AJAX request has been sent.
- '/ajax/call/success': called if the AJAX call has successfully returned.
- '/ajax/call/failure': called if the AJAX call has returned with a failure.
- '/ajax/call/complete': called when the AJAX call has completed.
- '/dom/node/removing': called when a component is about to be removed via AJAX. This happens when component markup is updated via AJAX (i.e. the component itself or one of its containers has been added to
AjaxRequestTarget) - '/dom/node/added': called when a component has been added via AJAX. Just like '/dom/node/removing', this event is triggered when a component is added to
AjaxRequestTarget.
IAjaxCallListener while jqEvent is an event internally fired by Wicket. The last parameter errorThrown indicates if an error has occurred during the AJAX call.To see a basic example of use of a global AJAX call listener, let's go back to our custom datepicker created in chapter 14. When we built it we didn't think about a possible use of the component with AJAX. When a complex component like our datepicker is refreshed via AJAX, the following two side effects can occur:
- After been refreshed, the component loses every JavaScript handler set on it. This is not a problem for our datepicker as it sets a new JQuery datepicker every time is rendered (inside method renderHead).
- The markup previously created with JavaScript is not removed. For our datepicker this means that the icon used to open the calendar won't be removed while a new one will be added each time the component is refreshed.
CustomDatepickerAjax contains a new version of our datepicker which adds to its JavaScript file JQDatePicker.js the code needed to register a callback function that gets rid of the JQuery datepicker before the component is removed from the DOM:Wicket.Event.subscribe('/dom/node/removing',
function(jqEvent, attributes, jqXHR, errorThrown, textStatus) {
var componentId = '#' + attributes['id'];
if($(componentId).datepicker !== undefined)
$(componentId).datepicker('destroy');
}
);