
Deploying to Repository
There are different ways on how you can deploy artifacts in an Archiva repository.
Starting with Archiva 1.2.3, it is possible to block re-deployment of released artifacts to a specific repository. This can be configured through the repository configuration page by ticking the Block Re-deployment of Released Artifacts checkbox.
WARNING The deployed artifact may not appear immediately in the search results. The execution of the index-content repository consumer and other scanning consumers are queued for execution to prevent concurrent updates to the index.
Configuring Maven to deploy to an Archiva repository
- Create a user in Archiva to use for deployment (or use guest if you wish to deploy without a username and password)
- The deployment user needs the Role 'Repository Manager' for each repository that you want to deploy to
- Define the server for deployment inside your 'settings.xml', use the newly created user for authentication
<settings>
  <!-- omitted xml -->
  <servers>
    <server>
      <id>archiva.internal</id>
      <username>{archiva-deployment-user}</username>
      <password>{archiva-deployment-pwd}</password>
    </server>
    <server>
      <id>archiva.snapshots</id>
      <username>{archiva-deployment-user}</username>
      <password>{archiva-deployment-pwd}</password>
    </server>
    <!-- omitted xml -->
  </servers>
  <!-- omitted xml -->
</settings>
Deploying to Archiva using HTTP
Configure the distributionManagement part of your pom.xml (customising the URLs as needed). The id of the repository in distributionManagement must match the id of the server element in settings.xml.
<project>
  <!-- omitted xml -->
  <distributionManagement>
    <repository>
      <id>archiva.internal</id>
      <name>Internal Release Repository</name>
      <url>http://reposerver.mycompany.com:8080/repository/internal/</url>
    </repository>
    <snapshotRepository>
      <id>archiva.snapshots</id>
      <name>Internal Snapshot Repository</name>
      <url>http://reposerver.mycompany.com:8080/repository/snapshots/</url>
    </snapshotRepository>
  </distributionManagement>
  <!-- omitted xml -->
</project>
Deploying to Archiva using WebDAV
In some cases, you may want to use WebDAV to deploy instead of HTTP. If you find this is necessary, follow the same process as for HTTP, with these additional steps:
- Add dav: to the front of the deployment URLs:
<project> <!-- omitted xml --> <distributionManagement> <repository> <id>archiva.internal</id> <name>Internal Release Repository</name> <url>dav:http://reposerver.mycompany.com:8080/repository/internal/</url> </repository> <snapshotRepository> <id>archiva.snapshots</id> <name>Internal Snapshot Repository</name> <url>dav:http://reposerver.mycompany.com:8080/repository/snapshots/</url> </snapshotRepository> </distributionManagement> <!-- omitted xml --> </project> - Add a build extension to your pom.xml (not required in Maven 2.0.9 and above)
<project>
  <!-- omitted xml -->
  <build>
    <extensions>
      <extension>
        <groupId>org.apache.maven.wagon</groupId>
        <artifactId>wagon-webdav-jackrabbit</artifactId>
        <version>2.2</version>
      </extension>
    </extensions>
  </build>
  <!-- omitted xml -->
</project>
Deploying using other protocols
You can also deploy to the Archiva server using traditional means such as SCP, FTP, etc. For more information on these deployment techniques, refer to the Maven documentation.
Once the files are deployed into the location of the Archiva managed repository, they should appear in the Browse page. The artifacts should also be searcheable as long as the index-content repository consumer is enabled.
Deploying Third-Party Artifacts to Archiva using Maven
You can use mvn deploy:deploy-file to deploy single artifacts to Archiva. Once you have the settings file in place as described above, you can deploy the artifact using this type of command:
mvn deploy:deploy-file -Dfile=filename.jar -DpomFile=filename.pom
    -DrepositoryId=archiva.internal
    -Durl=http://repo.mycompany.com:8080/repository/internal/
For more information, consult the documentation for the deploy:deploy-file goal
If you wish to use WebDAV to deploy the file, add dav: to the start of the URL as in the previous instructions.
However, on versions of Maven prior to 2.0.9, you will also need to create a file called pom.xml in the directory from which you intend to execute "mvn deploy:deploy-file":
<project>
  <modelVersion>4.0.0</modelVersion>
  <groupId>com.example</groupId>
  <artifactId>webdav-deploy</artifactId>
  <packaging>pom</packaging>
  <version>1</version>
  <name>Webdav Deployment POM</name>

  <build>
    <extensions>
      <extension>
        <groupId>org.apache.maven.wagon</groupId>
        <artifactId>wagon-webdav-jackrabbit</artifactId>
        <version>2.2</version>
      </extension>
    </extensions>
  </build>
</project>
This pom will not be deployed with the artifact, it simply serves to make the WebDAV protocol available to the build process.
Alternately, you can save this file somewhere else, and use "mvn ... -f /path/to/filename" to force the use of an alternate POM file.
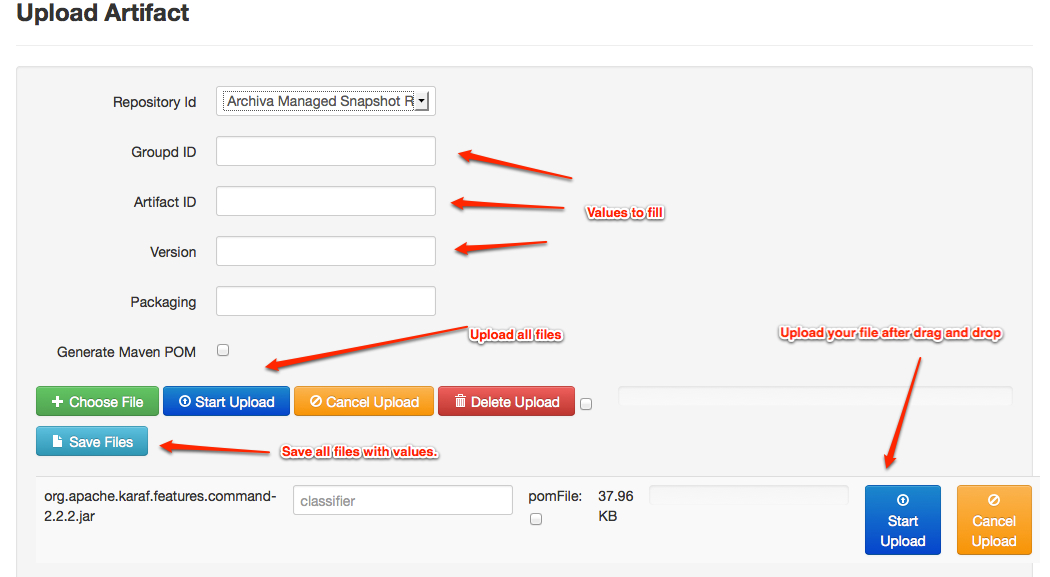
Deploying via the Web UI Form
The easiest way to deploy in the repository is via the Web UI form, which can be accessed in the Upload Artifact section. Just follow these steps:
- In Archiva, click the Upload Artifact option in the left menu. You should see a form similar to the one at the end of this section.
- Fill in the following required fields:
- Group Id - the groupId of the artifact to be deployed.
- Artifact Id - the artifactId of the artifact to be deployed.
- Version - the version of the artifact to be deployed.
- Packaging - the packaging of the artifact to be deployed. (ex. jar, war, ear, etc.)
- Drag and drop files to be deployed.
- Select the repository you want to deploy to. Please note that if you do not have write permission to the repository, you will not be allowed to deploy on it.
- Now, if you want Archiva to generate a pom for the artifact, check the Generate Maven 2 POM field. (Right now, only Maven 2 poms can be generated.) Alternately, supply a POM file to be deployed alongside the artifact.
- Click Saves files and a message will be displayed notifying you if the upload/deployment was successful or not.
These are the files that will be in your repository after deployment:
- artifact
- POM file (if you supplied one or checked Generate Maven 2 POM)
- maven-metadata.xml (this will be created if none exists in the artifact level yet, otherwise it will just be updated)
- maven-metadata.xml.sha1 and maven-metadata.xml.md5 (these will be generated for newly created maven-metadata.xml files, otherwise they will just be updated)