-Axis2 Version 0.95
User Feedback: axis-user@ws.apache.org. Prefix subject with [Axis2]. To subscribe to mailing list see here.
Note (on samples): All the user's guide samples are located in the "samples/userguide/src" directory of the binary distribution.
Axis2 provides an extended support for modules (See Architecture Guide for more details about modules in Axis2). Let's create a custom module and deploy it to the MyService which we created earlier. Following steps shows the actions that need to be performed to deploy a custom module for a given Web Service:
Create the Module Implementation
Create the Handlers
Create the module.xml
Modify the "axis2.xml" (if you need custom phases)
Modify the "services.xml" to engage modules at the deployment time.
Package in a ".mar" (Module Archive)
Deploy the module in Axis2
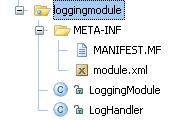
Let's write a simple logging module for our sample. This module contains one handler that just logs the message that is passed through it. Axis2 uses ."mar" (Module Archive) to deploy modules in Axis2. Following diagram shows the file structure inside that needs to be there in the ".mar" archive. Let's create all these and see how it works.
LoggingModule is the implementation class of the Axis2 module. Axis2 modules should implement the "org.apache.axis2.modules.Module" interface with the following methods.
public void init(ConfigurationContext configContext, AxisModule module) throws AxisFault;//Initialize the module
public void shutdown(AxisConfiguration axisSystem) throws AxisFault;//End of module processing
public void engageNotify(AxisDescription axisDescription) throws AxisFault;
These methods can be used to control the module initialization and the termination. With the input parameter AxisConfiguration user is provided with the complete configuration hierarchy. This can be used to fine-tune the module behavior using the module writers. For the simple logging service we can keep these methods blank in our implementation class.
A module in Axis2 can contain, one or more handlers that perform various SOAP header processing at different phases. (See Architecture Guide for more information about phases). For the logging module we will write a handle with the following methods. "public void invoke(MessageContext ctx);" is the method that is called by Axis2 engine when the control is passed to the handler. "public void revoke(MessageContext ctx);" is called when the handlers are revoked by the Axis2 engine.
public class LogHandler extends AbstractHandler implements Handler {
    private Log log = LogFactory.getLog(getClass());
    private QName name;

    public QName getName() {
        return name;
    }

    public void invoke(MessageContext msgContext) throws AxisFault {
        log.info(msgContext.getEnvelope().toString());
    }

    public void revoke(MessageContext msgContext) {
        log.info(msgContext.getEnvelope().toString());
    }

    public void setName(QName name) {
        this.name = name;
    }
}
"module.xml" contains the deployment configurations for a particular module. It contains details such as Implementation class of the module (in this example it is the "LoggingModule" class and various handlers that will run in different phases). "module.xml" for the logging module will be as follows:
<module name="logging" class="userguide.loggingmodule.LoggingModule ">
   <inflow>
        <handler name="InFlowLogHandler" class="userguide.loggingmodule.LogHandler">
        <order phase="loggingPhase" />
        </handler>
   </inflow>

   <outflow>
        <handler name="OutFlowLogHandler" class="userguide.loggingmodule.LogHandler">
        <order phase="loggingPhase"/>
        </handler>
   </outflow>

   <Outfaultflow>
        <handler name="FaultOutFlowLogHandler" class="userguide.loggingmodule.LogHandler">
        <order phase="loggingPhase"/>
        </handler>
   </Outfaultflow>

   <INfaultflow>
        <handler name="FaultInFlowLogHandler" class="userguide.loggingmodule.LogHandler">
        <order phase="loggingPhase"/>
        </handler>
   </INfaultflow>
</module>
As it can be seen there are four phases defined in this "module.xml"
outflow - Represents the handler chain that will run when the message is going out.
Outfaultflow - Represents the handler chain that will run when there is a fault and the fault is going out
INfaultflow - Represents the handler chain that will run when there is a fault and the fault is coming in
Following set of tags describe the name of the handler, handler class and the phase in which this handler is going to run. "InFlowLogHandler" is the name given for the particular instance of this handler. The value of class attribute is the actual implementation class for this handler. Since we are writing logging handler, we can reuse the same handler in all these phases. However this may not be the same for all the modules. "<order phase="loggingPhase" />" describes the phase in which this handler runs.
<handler name="InFlowLogHandler" class="userguide.loggingmodule.LogHandler">
<order phase="loggingPhase" />
</handler>
To learn more on Phase rules, click on here
In this handler the phase "loggingPhase" is defined by the module writer. It is not a pre-defined handler phase, hence the module writer should introduce it to the "axis2.xml" (NOT the services.xml) so that Axis2 engine knows where to place the handler in different "flows" ( InFlow, OutFlow, etc.). Following xml lines show the respective changes made to the "axis2.xml" in order to deploy this logging module in Axis2 engine. This is an extract of the phase section of the "axis2.xml".
<!-- ================================================= -->
<!-- Phases -->
<!-- ================================================= -->

<phaseOrder type="inflow">
        <!--  System pre defined phases       -->
        <phase name="TransportIn"/>
        <phase name="PreDispatch"/>
        <phase name="Dispatch" class="org.apache.axis2.engine.DispatchPhase">
            <handler name="AddressingBasedDispatcher"
                     class="org.apache.axis2.engine.AddressingBasedDispatcher">
                <order phase="Dispatch"/>
            </handler>

            <handler name="RequestURIBasedDispatcher"
                     class="org.apache.axis2.engine.RequestURIBasedDispatcher">
                <order phase="Dispatch"/>
            </handler>

            <handler name="SOAPActionBasedDispatcher"
                     class="org.apache.axis2.engine.SOAPActionBasedDispatcher">
                <order phase="Dispatch"/>
            </handler>

            <handler name="SOAPMessageBodyBasedDispatcher"
                     class="org.apache.axis2.engine.SOAPMessageBodyBasedDispatcher">
                <order phase="Dispatch"/>
            </handler>
            <handler name="InstanceDispatcher"
                     class="org.apache.axis2.engine.InstanceDispatcher">
                <order phase="PostDispatch"/>
            </handler>
        </phase>
        <!--  System pre defined phases       -->
        <!--   After Postdispatch phase module author or or service author can add any phase he want      -->
        <phase name="OperationInPhase"/>
        <phase name="loggingPhase"/>
    </phaseOrder>
    <phaseOrder type="outflow">
        <!--      user can add his own phases to this area  -->
        <phase name="OperationOutPhase"/>
        <phase name="loggingPhase"/>
        <!--system predefined phase-->
        <!--these phase will run irrespective of the service-->
        <phase name="PolicyDetermination"/>
        <phase name="MessageOut"/>
    </phaseOrder/>
    <phaseOrder type="INfaultflow">
        <!--      user can add his own phases to this area  -->
        <phase name="OperationInFaultPhase"/>
        <phase name="loggingPhase"/>
    </phaseOrder>
    <phaseOrder type="Outfaultflow">
        <!--      user can add his own phases to this area  -->
        <phase name="OperationOutFaultPhase"/>
        <phase name="loggingPhase"/>
        <phase name="PolicyDetermination"/>
        <phase name="MessageOut"/>
    </phaseOrder>
Shown in green, the custom phase "loggingPhase" is placed in all the flows, hence that phase will be called in all the message flows in the engine. Since our module is associated with this phase, the LogHandler inside the module now will be executed in this phase.
Up to this point we have created the required classes and configuration descriptions for the logging module and by changing the "axis2.xml" we have created the required phases for the logging module. Next step is to "engage" (use) this module in one of our services. For this, let's use the same Web Service that we have used throughout the user's guide, MyService. However, since we need to modify the "services.xml" of MyService in order to engage this module, we use a separate Web Service, but with the similar operations. The code for this service can be found in the "Axis2Home/samples/userguide/src/userguide/example2" directory. The simple changes that we have done to "services.xml' are shown in green in the following lines of xml.
<service name="MyServiceWithModule">
    <description>
    This is a sample Web Service with a logging module engaged.
    </description>
    <module ref="logging"/>
    <parameter name="ServiceClass" locked="xsd:false">userguide.example2.MyService</parameter>
    <operation name="echo">
    <messageReceiver class="org.apache.axis2.receivers.RawXMLINOutMessageReceiver"/>
    </operation>
    <operation name="ping">
    <messageReceiver class="org.apache.axis2.receivers.RawXMLINOutMessageReceiver"/>
    </operation>
</service>
In this example we have changed the service name (the implementation class is very similar to what we have used earlier although it is in a different package). In addition we have added the line "<module ref="logging"/>" to "services.xml". This informs the Axis2 engine that the module "logging" should be engaged for this service. The handler inside the module will be executed in their respective phases as described by the "module.xml".
Before deploying the module we need to create the ".mar" file for this module. This can be done, using the "jar" command and then renaming the created jar file. Or you can find the "Logging.mar" that is already created for you in the "Axis2Home/samples/userguide" directory.
Deploying a module in Axis2 require the user to create a directory with the name "modules" in the "webapps/axis2/WEB-INF" directory of their servlet container and then copying the ".mar" file to that directory. So let's first create the "modules" directory and drop the "LoggingModule.mar" in to this directory.
Although the required changes to the "services.xml" is very little, we have created a separate service archive (MyServiceWithModule.aar) for users to deploy and see. Deploy this service using the same steps that you used to deploy "MyService" and copy the "LoggingModule.mar" file to the "modules" directory. Then run using the "TestWebServiceWithModuleClient.bat" or "TestWebServiceWithModuleClient.sh" in the "Axis2Home/samples/userguide/src/userguide/clients/bin" directory.
Note: To see the logs, the user needs to modify the "log4j.properties" to log INFO. The property file is located in "webapps\axis2\WEB-INF\classes" of your servlet container. Change the line "log4j.rootCategory= ERROR, LOGFILE" to "log4j.rootCategory=INFO, ERROR, LOGFILE".