-Axis2 Version 0.95
User Feedback: axis-user@ws.apache.org. Prefix subject with [Axis2]. To subscribe to mailing list see here.
Note (on samples): In this page of the user's guide we will look at how to write and deploy Web Services using Axis2. All the user's guide samples are located in the "samples/userguide/src" directory of the binary distribution.
Before starting, please check whether you have deployed the "axis2.war" in your servlet container and it is working properly. (See Installation Guide). User can select any of the following two ways of writing Web services using Axis2.
Start from the WSDL ->Code generate the Skeleton ->Implement the Business Logic.
First let's see how we can write a simple Web Service (MyService) using Axis2's primary interfaces and deploy it. For this purpose we will create a Web Service with two operations as follows.
public void ping(OMElement element){} //IN-ONLY operation, just accepts the OMElement and do some processing.
public OMElement echo(OMElement element){}//IN-OUT operation, accepts an OMElement and
                                          // sends back the same again
Complete code for this example Web Service (MyService) can be found in the "Axis2Home/samples/userguide/src" directory under "userguide/example1" package. As you can see, the two operations are very simple and need no explanations on what they do. Now let's see how we can write the deployment descriptors for the service and deploy it.
Write the Implementation Class
Write a services.xml file to explain the Web Service
create a *.aar archive (Axis Archive) for the Web Service
Deploy the Web Service
Provides an implementation class that provides the business logic for the Web Service, it should have methods that match the operations in the Web Service. Unless you have data binding, the signature of the methods can have only one parameter of type OMElement.
public class MyService{
    public void ping(OMElement element){
     ......
    }
    public OMElement echo(OMElement element){
     ......
    }
}
Axis2 uses "services.xml" to keep configurations for a Web Service. Each Web Service deployed in Axis2 needs a "services.xml" containing the configurations. "services.xml" for MyService will be as follows.
<service >
    <description>
        This is a sample Web Service with two operations, echo and ping.
    </description>
    <parameter name="ServiceClass" locked="false">userguide.example1.MyService</parameter>
    <operation name="echo">
        <messageReceiver class="org.apache.axis2.receivers.RawXMLINOutMessageReceiver"/>
        <actionMapping>urn:echo</actionMapping>
    </operation>
     <operation name="ping">
        <messageReceiver class="org.apache.axis2.receivers.RawXMLINOnlyMessageReceiver"/>
        <actionMapping>urn:ping</actionMapping>
    </operation>
 </service>
The above XML tags can be explained as follows:
First comes the description and the service class.
<parameter name="ServiceClass" locked="false">userguide.example1.MyService</parameter>
We provide the name of the service implementation class a parameter in the services.xml file.
The next two xml tags describe the operations that are available in this service with respective message receivers.
   <operation name="echo">
            <messageReceiver class="org.apache.axis2.receivers.RawXMLINOutMessageReceiver"/>
            <actionMapping>urn:echo</actionMapping>
   </operation>
   <operation name="ping">
       <messageReceiver class="org.apache.axis2.receivers.RawXMLINOnlyMessageReceiver"/>
       <actionMapping>urn:ping</actionMapping>
   </operation>
Every operation must have a corresponding MessageReceiver class. When
Axis2 engine receives a message, after the message is being processed by the
handlers, it will be handed over to a MessageReceiver.
For the "echo" operation we have used a
RawXMLINOutMessageReceiver since it is an IN-OUT operation.
For IN-ONLY operation "ping", we have used
RawXMLINOnlyMessageReceiver as the message receiver.
The actionMapping is required only if you want to enable WS-Addressing. This will be used later in this user guide.
You can write a services.xml file to include a group of services instead of a single service. This makes management and deployment of a set of related services very easy. At runtime you can share information between these services within a single interaction using the ServiceGroupContext. If you hope to use this functionality, the services.xml file should have following format.
<serviceGroup>
  <service name="Service1">
    <!-- details for Service1 -->
  </service>
  <service name="Service2">
    <!-- details for Service2 -->
  </service>
  <module ref="ModuleName" />
  <parameter name="serviceGroupParam1" locked="false">value 1</parameter>
</serviceGroup>
Note : name of the service is a compulsory attribute
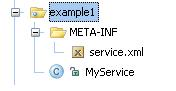
Axis2 uses ".aar" (Axis Archive) file as the deployment package for Web Services. Therefore, for MyService we will use "MyService.aar" with the "services.xml" packaged in the META-INF as shown in the following picture. (Name of the service will be the name of the archive file , if and only if the services.xml contains only one service element).
To create "MyService.aar" user can first create a jar file containing all the files necessary for the service and then rename the "jar" to "aar" so that Axis2 understands it as a service archive. This has already been created in the "Axis2Home/samples/userguide" directory. Now let's use it...
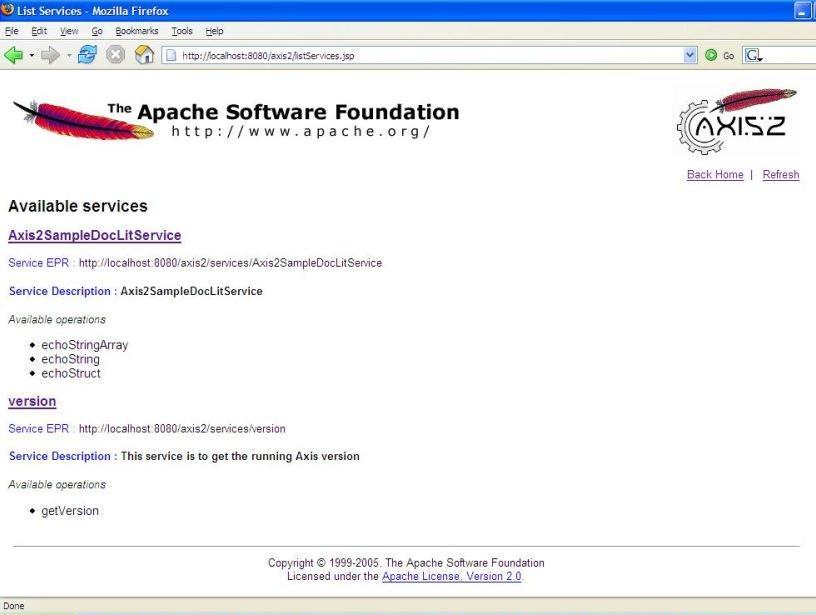
Deploying the service is just a matter of dropping the ".aar" in to "services" directory that can be found in the "\webapps\axis2\WEB-INF" of your servlet container, hence copy the "MyService.aar" into the "services" directory. Once these steps are completed, start the servlet container (if you have not already started) and check the link "Services" on the Home Page of Axis2 Web Application (http://localhost:8080/axis2/index.jsp) and see whether the MyService is deployed properly. If you can see the following output then you have successfully deployed MyService on Axis2.

Note: Axis2 provides an easy way to deploy Web Services using the "Upload Service" tool on Axis2 Web Application's Administration module. (See the Web Administration Guide for more information on this)
This is the second method of writing Web Services using Axis2. Let's see how we can generate the skeleton from a given WSDL and implement the business logic using Axis2. For this we use Axis2SampleDocLit.wsdl that can be found in the wsdl directory under samples.
To generate the skeleton and the required classes you can use the WSDL2Java tool provided in Axis2. This tool is located in the bin directory of the distribution and can be executed using the provided scripts (.bat or .sh). The tool's parameter list is as follows and user can specify these values depending on their requirements.
Usage WSDL2Code -uri <Location of WSDL> : WSDL file location
-o <output Location> : output file location
-a : Generate async style code only. Default is off
-s : Generate sync style code only. Default is off. takes precedence over -a
-p <package name> : set custom package name
-l <language> : valid languages are java and csharp. Default is java
-t : Generate TestCase to test the generated code
-ss : Generate server side code (i.e. skeletons). Default is off
-sd : Generate service descriptor (i.e. services.xml). Default is off. Valid with -ss
-d <databinding> : valid databinding(s) are adb, xmlbeans and jaxme. Default is adb
-g Generates all the classes. valid only with the -ss
-pn <port_name> : name of port in the presence of multiple ports
-sn <service_name> : name of service in the presence of multiple services
-u : unpacks the databinding classes
-r <repository_path> : path of the repository against which code is generated
We will use the tool with the following parameters and generate the skeleton and the other required classes.
Windows users can use the following command in the console:
WSDL2Java -uri ..\samples\wsdl\Axis2SampleDocLit.wsdl -ss -sd -d xmlbeans -o ..\samples -p org.apache.axis2.userguide
Linux users should switch the file separator:
WSDL2Java -uri ../samples/wsdl/Axis2SampleDocLit.wsdl -ss -sd -d xmlbeans -o ../samples -p org.apache.axis2.userguide
This will generate the required classes in the src directory inside samples, and the schema classes in schemaorg_apache_xmlbeans directory which is inside resources directory also inside samples dir. Note that these are not source files and should be available in the class path in order to compile the generated classes.
Locate the skeleton class that can be found under src/userguide directory with the name "Axis2SampleDocLitPortTypeSkeleton.java". This is the skeleton for our Web service and we can now easily implement the business logic. The WSDL we have used has three operations:
echoString - Operation that echoes a String value
echoStringArray - Operation that accept string array as the input and echoes them back
echoStruct - Operation that accept a Struct as the input and echoes them back.
Locate the following code segment in the "Axis2SampleDocLitPortTypeSkeleton.java" and fill the business logic as shown below.
 public org.apache.axis2.userguide.xsd.EchoStringReturnDocument echoString
   (org.apache.axis2.userguide.xsd.EchoStringParamDocument param4 ){
      //Todo fill this with the necessary business logic
      throw new  java.lang.UnsupportedOperationException();
   }
Once filled with the business logic it will be as follows. The code is simple and the explanations are given as comments.
public org.apache.axis2.userguide.xsd.EchoStringReturnDocument echoString
   (org.apache.axis2.userguide.xsd.EchoStringParamDocument param4) throws Exception {
   //Use the factory to create the output document.
   EchoStringReturnDocument retDoc = EchoStringReturnDocument.Factory.newInstance();
   //send the string back.
   retDoc.setEchoStringReturn(param4.getEchoStringParam());
   return retDoc;
 }
Similarly following code fragments shows how you can fill the business logic for our first Web service.
public org.apache.axis2.userguide.xsd.EchoStringArrayReturnDocument echoStringArray
   (org.apache.axis2.userguide.xsd.EchoStringArrayParamDocument param0) throws Exception {
   //Use the factory to create the output document.
   EchoStringArrayReturnDocument retDoc = EchoStringArrayReturnDocument.Factory.newInstance();
   //Get the String array from the input parameters.
   String[] inParams = param0.getEchoStringArrayParam().getStringArray();
   ArrayOfstringLiteral retParams = ArrayOfstringLiteral.Factory.newInstance();
   //Set the input parameters to the output parameters for echoing.
     for (int i = 0; i < inParams.length; i++) {
        retParams.addString(inParams[i]);
     }
   //return the output document.
   retDoc.setEchoStringArrayReturn(retParams);
   return retDoc;
}
public org.apache.axis2.userguide.xsd.EchoStructReturnDocument echoStruct
     (org.apache.axis2.userguide.xsd.EchoStructParamDocument param2) throws Exception {
     //Use the factory to create the output document.
     EchoStructReturnDocument retDoc = EchoStructReturnDocument.Factory.newInstance();

     //Get the SOAPStrcut from the incoming parameters
     SOAPStruct inStruct = param2.getEchoStructParam();

     //Struct for the sending back
     SOAPStruct outStruct = SOAPStruct.Factory.newInstance();

     //Fill the outgoing struct
     outStruct.setVarFloat(inStruct.getVarFloat());
     outStruct.setVarInt(inStruct.getVarInt());
     outStruct.setVarString(inStruct.getVarString());
     //Set the outgoing document.
     retDoc.setEchoStructReturn(outStruct);

     return retDoc;
}
Axis2 uses "services.xml" to hold the configurations for a particular Web service deployed in the Axis2 engine. When we generate the skeleton using the WSDL2Java tool, it will also generate the required services.xml for this Web service as well. This can be found in the same directory as the skeleton. The generated services.xml is as follows.
<!-- This file was auto-generated from WSDL -->
<!-- by the Apache Axis2 version: #axisVersion# #today# -->
<serviceGroup>
    <service name="Axis2SampleDocLitService">
        <messageReceivers>
            <messageReceiver mep="http://www.w3.org/2004/08/wsdl/in-out"
             class="org.apache.axis2.userguide.Axis2SampleDocLitServiceMessageReceiverInOut"/>
        </messageReceivers>
        <parameter locked="false" name="ServiceClass">
         org.apache.axis2.userguide.Axis2SampleDocLitServiceSkeleton</parameter>
        <operation name="echoStringArray" mep="http://www.w3.org/2004/08/wsdl/in-out">
            <actionMapping>echoStringArray</actionMapping>
        </operation>
        <operation name="echoStruct" mep="http://www.w3.org/2004/08/wsdl/in-out">
            <actionMapping>echoStruct</actionMapping>
        </operation>
        <operation name="echoString" mep="http://www.w3.org/2004/08/wsdl/in-out">
            <actionMapping>echoString</actionMapping>
        </operation>
    </service>
</serviceGroup>
First line of the "services.xml" gives the name of the Web Service. This is used in the URL to the service as the service name. Next comes the description and the service class. The next xml tags describe the operations that are available in this service with respective message receivers.
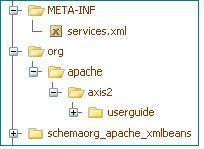
Next step in the process is to package the classes in a .aar (axis2 archive) and deploy it in Axis2. When the WSDL2Java tool generate the skeleton it will also generate the required data binding classes. These schema related classes are located in the schemaorg_apache_xmlbeans directory inside resources directory of the generated code. Copy this to your class path, compile the skeleton and the supporting classes. In order to create the .aar file, let's create the following directory structure with the required files and then simply use jar command to package it.
Go to the top level directory where you can find the class files for the above service (i.e. one level up on the directory structure shown above), then type the following command in a command line.
jar -cf Axis2SampleDocLitPortType.aar .
Deploying the service is just a matter of dropping the ".aar" in to "services" directory that can be found in the "\webapps\axis2\WEB-INF" of your servlet container, hence copy the "echo.aar" into the "services" directory. Once these steps are completed, please start the servlet container (if you have not already started) and check the link "Services" on the Home Page of Axis2 Web Application (http://localhost:8080/axis2/index.jsp) and see whether the Axis2SampleDocLitPortType is deployed properly. If you can see the following output then you have successfully deployed Axis2SampleDocLitPortType on Axis2.
Note: Axis2 provides an easy way to deploy Web Services using the "Upload Service" tool on Axis2 Web Application's Administration module. (See the Web Administration Guide for more information on this)