This sections shows how to work with Cayenne in a web application.
Converting Tutorial to a Web Application
The web part of the web application tutorial is done in JSP, which is the least common denominator of the Java web technologies, and is intentionally simplistic from the UI perspective, to concentrate on Cayenne integration aspect, rather than the interface. A typical Cayenne web application works like this:
- Cayenne configuiration is loaded when an application context is started, using a special servlet filter.
- User requests are intercepted by the filter, and the DataContext is bound to the request thread, so the application can access it easily from anywhere.
- The same DataContext instance is reused within a single user session; different sessions use different DataContexts (and therefore different sets of objects). However see "ObjectContext Scope" section of the Web Applications page. The context can be scoped differently depending on the app specifics. For the tutorial we'll be using a session-scoped context.
For more information on the web application deployment, check Web Applications page.
So let's convert the tutorial that we created to a web application:
- In Eclipse under "tutorial" project folder create a new folder "src/main/webapp/WEB-INF".
- Under "WEB-INF" create a new file "web.xml" (a standard web app descriptor):
web.xml
<?xml version="1.0" encoding="utf-8"?>
 <!DOCTYPE web-app
   PUBLIC "-//Sun Microsystems, Inc.//DTD Web Application 2.3//EN"
   "http://java.sun.com/dtd/web-app_2_3.dtd">
<web-app>
    <display-name>Cayenne Tutorial</display-name>

    <!-- This filter provides each request thread with a session-bound DataContext -->
    <filter>
        <filter-name>CayenneFilter</filter-name>
        <filter-class>org.apache.cayenne.conf.WebApplicationContextFilter</filter-class>
    </filter>
    <filter-mapping>
        <filter-name>CayenneFilter</filter-name>
        <url-pattern>/*</url-pattern>
    </filter-mapping>
    <welcome-file-list>
        <welcome-file>index.jsp</welcome-file>
    </welcome-file-list>
</web-app>
- Create the artist browser page src/main/webapp/index.jsp file with the following contents:
webapp/index.jsp
<%@ page language="java" contentType="text/html" %>
<%@ page import="org.example.cayenne.persistent.*" %>
<%@ page import="org.apache.cayenne.*" %>
<%@ page import="org.apache.cayenne.query.*" %>
<%@ page import="org.apache.cayenne.exp.*" %>
<%@ page import="java.util.*" %>

<%
    SelectQuery query = new SelectQuery(Artist.class);
    query.addOrdering(Artist.NAME_PROPERTY, SortOrder.ASCENDING);

    ObjectContext context = BaseContext.getThreadObjectContext();
    List<Artist> artists = context.performQuery(query);
%>
<html>
    <head>
        <title>Main</title>
    </head>
    <body>
        <h2>Artists:</h2>

        <% if(artists.isEmpty()) {%>
        <p>No artists found</p>
        <% } else {
            for(Artist a : artists) {
        %>
        <p><a href="detail.jsp?id=<%=DataObjectUtils.intPKForObject(a)%>"> <%=a.getName()%> </a></p>
        <%
            }
            } %>
        <hr>
        <p><a href="detail.jsp">Create new artist...</a></p>
    </body>
</html>
- Create the artist editor page src/main/webapp/detail.jsp with the following content:
webapp/detail.jsp
<%@ page language="java" contentType="text/html" %>
<%@ page import="org.example.cayenne.persistent.*" %>
<%@ page import="org.apache.cayenne.*" %>
<%@ page import="java.util.*" %>
<%@ page import="java.text.*" %>

<%
    ObjectContext context = BaseContext.getThreadObjectContext();
    String id = request.getParameter("id");

    // find artist for id
    Artist artist = null;
    if(id != null && id.trim().length() > 0) {
        artist = DataObjectUtils.objectForPK(context, Artist.class, Integer.parseInt(id));
    }

    if("POST".equals(request.getMethod())) {
        // if no id is saved in the hidden field, we are dealing with
        // create new artist request
        if(artist == null) {
            artist = context.newObject(Artist.class);
        }

        // note that in a real application we would so dome validation ...
        // here we just hope the input is correct
        artist.setName(request.getParameter("name"));
        artist.setDateOfBirthString(request.getParameter("dateOfBirth"));

        context.commitChanges();

        response.sendRedirect("index.jsp");
    }

    if(artist == null) {
        // create transient artist for the form response rendering
        artist = new Artist();
    }

    String name = artist.getName() == null ? "" : artist.getName();
    String dob = artist.getDateOfBirth() == null
            ? "" : new SimpleDateFormat("yyyyMMdd").format(artist.getDateOfBirth());
%>
<html>
    <head>
        <title>Artist Details</title>
    </head>
    <body>
        <h2>Artists Details</h2>
        <form name="EditArtist" action="detail.jsp" method="POST">
            <input type="hidden" name="id" value="<%= id != null ? id : "" %>" />
            <table border="0">
                <tr>
                    <td>Name:</td>
                    <td><input type="text" name="name" value="<%= name %>"/></td>
                </tr>
                <tr>
                    <td>Date of Birth (yyyyMMdd):</td>
                    <td><input type="text" name="dateOfBirth" value="<%= dob %>"/></td>
                </tr>
                <tr>
                    <td></td>
                    <td align="right"><input type="submit" value="Save" /></td>
                </tr>
            </table>
        </form>
    </body>
</html>
Running Web Application
To run the web application we'll use "maven-jetty-plugin". To activate it, let's add the following piece of code to the "pom.xml" file, following the "dependencies" section and save the POM:
<build>
	<plugins>
		<plugin>
			<groupId>org.mortbay.jetty</groupId>
			<artifactId>maven-jetty-plugin</artifactId>
			<version>6.1.22</version>
		</plugin>
	</plugins>
</build>
- Go to "Run > Run Configurations..." menu, select "Maven Build", right click and select "New"
- Make sure you fill "Name", "Base directory" and "Goals" fields as shown on the screenshot:
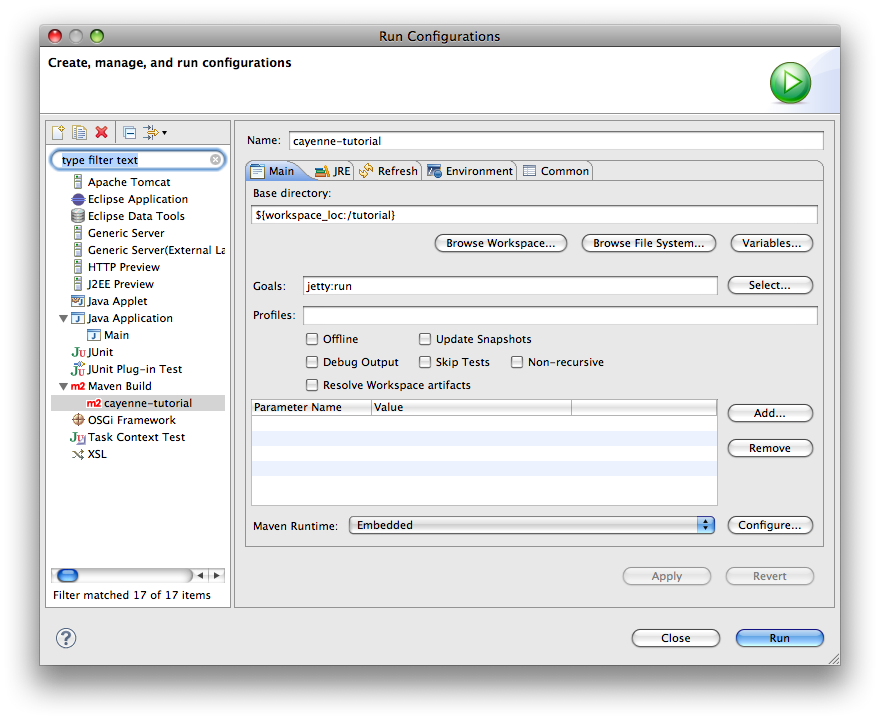
- Click "Apply" and "Run". On the first execution it may take a few minutes for Jetty plugin to download all dependencies, but eventually you'll see the logs like this:
[INFO] Scanning for projects...
[INFO] ------------------------------------------------------------------------
[INFO] Building Unnamed - org.example.cayenne:tutorial:jar:0.0.1-SNAPSHOT
[INFO]
[INFO] Id: org.example.cayenne:tutorial:jar:0.0.1-SNAPSHOT
[INFO] task-segment: [jetty:run]
[INFO] ------------------------------------------------------------------------
...
[INFO] [jetty:run]
[INFO] Configuring Jetty for project: Unnamed - org.example.cayenne:tutorial:jar:0.0.1-SNAPSHOT
[INFO] Webapp source directory = /.../tutorial/Desktop/work/tutorial/src/main/webapp
...
[INFO] Starting jetty 6.1.22 ...
2009-12-22 14:08:06.301::INFO:  jetty-6.1.22
2009-12-22 14:08:06.474::INFO:  No Transaction manager found - if your webapp requires one, please configure one.
INFO: started configuration loading.
INFO: loaded domain: UntitledDomain
INFO: loaded <map name='UntitledDomainMap' location='UntitledDomainMap.map.xml'>.
INFO: loading <node name='UntitledDomainNode' datasource='UntitledDomainNode.driver.xml'
factory='org.apache.cayenne.conf.DriverDataSourceFactory' schema-update-
strategy='org.apache.cayenne.access.dbsync.CreateIfNoSchemaStrategy'>.
INFO: using factory: org.apache.cayenne.conf.DriverDataSourceFactory
INFO: loading driver information from 'UntitledDomainNode.driver.xml'.
INFO: loading driver org.apache.derby.jdbc.EmbeddedDriver
INFO: loading user name and password.
INFO: Created connection pool: jdbc:derby:memory:testdb;create=true
	Driver class: org.apache.derby.jdbc.EmbeddedDriver
	Min. connections in the pool: 1
	Max. connections in the pool: 1
INFO: loaded datasource.
INFO: no adapter set, using automatic adapter.
INFO: loaded map-ref: UntitledDomainMap.
INFO: finished configuration loading in 355 ms.
2009-12-22 14:08:07.081::INFO:  Started SelectChannelConnector@0.0.0.0:8080
[INFO] Started Jetty Server
- So the Jetty container just started and loaded Cayenne.
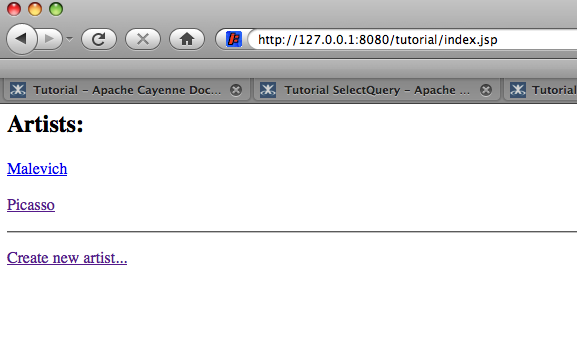
- Now go to http://localhost:8080/tutorial/ URL. You should see "No artists found message" in the web browser and the following output in the Eclipse console:
INFO: --- will run 1 query.
INFO: Opening connection: jdbc:derby:memory:testdb;create=true
	Login: null
	Password: *******
INFO: +++ Connecting: SUCCESS.
INFO: --- transaction started.
INFO: Detected and installed adapter: org.apache.cayenne.dba.derby.DerbyAdapter
INFO: No schema detected, will create mapped tables
INFO: CREATE TABLE GALLERY (ID INTEGER NOT NULL GENERATED BY DEFAULT AS IDENTITY,
NAME VARCHAR (200), PRIMARY KEY (ID))
INFO: CREATE TABLE ARTIST (DATE_OF_BIRTH DATE, ID INTEGER NOT NULL GENERATED
BY DEFAULT AS IDENTITY, NAME VARCHAR (200), PRIMARY KEY (ID))
INFO: CREATE TABLE PAINTING (ARTIST_ID INTEGER, GALLERY_ID INTEGER,
ID INTEGER NOT NULL GENERATED BY DEFAULT AS IDENTITY, NAME VARCHAR (200), PRIMARY KEY (ID))
INFO: ALTER TABLE PAINTING ADD FOREIGN KEY (ARTIST_ID) REFERENCES ARTIST (ID)
INFO: ALTER TABLE PAINTING ADD FOREIGN KEY (GALLERY_ID) REFERENCES GALLERY (ID)
INFO: CREATE TABLE AUTO_PK_SUPPORT (  TABLE_NAME CHAR(100) NOT NULL,  NEXT_ID BIGINT NOT NULL,  PRIMARY KEY(TABLE_NAME))
INFO: DELETE FROM AUTO_PK_SUPPORT WHERE TABLE_NAME IN ('ARTIST', 'GALLERY', 'PAINTING')
INFO: INSERT INTO AUTO_PK_SUPPORT (TABLE_NAME, NEXT_ID) VALUES ('ARTIST', 200)
INFO: INSERT INTO AUTO_PK_SUPPORT (TABLE_NAME, NEXT_ID) VALUES ('GALLERY', 200)
INFO: INSERT INTO AUTO_PK_SUPPORT (TABLE_NAME, NEXT_ID) VALUES ('PAINTING', 200)
INFO: SELECT t0.DATE_OF_BIRTH, t0.ID, t0.NAME FROM ARTIST t0 ORDER BY t0.NAME - prepared in 35 ms.
INFO: === returned 0 rows. - took 53 ms.
INFO: +++ transaction committed.
- You can click on "Create new artist" link to create artists. Existing artists can be edited by clicking on their name:
You are done with the tutorial!