This page explains how you can contribute to Apache Isis. You’ll probably also want set up your development environment and learn how to build Isis.
Thanks for considering to help out, your contributions are appreciated!
Recommended Workflow (github)
Isis' source code is hosted in an Apache git repo (https, http), with a clone on github (https, or ssh: git@github.com:apache/isis.git.
As you might imagine, only committers are permitted to push changes to the central git repo. As a contributor, we recommend that you fork the apache/isis repo in github, and then use your fork as a way of publishing your patches for the Isis committers to apply.
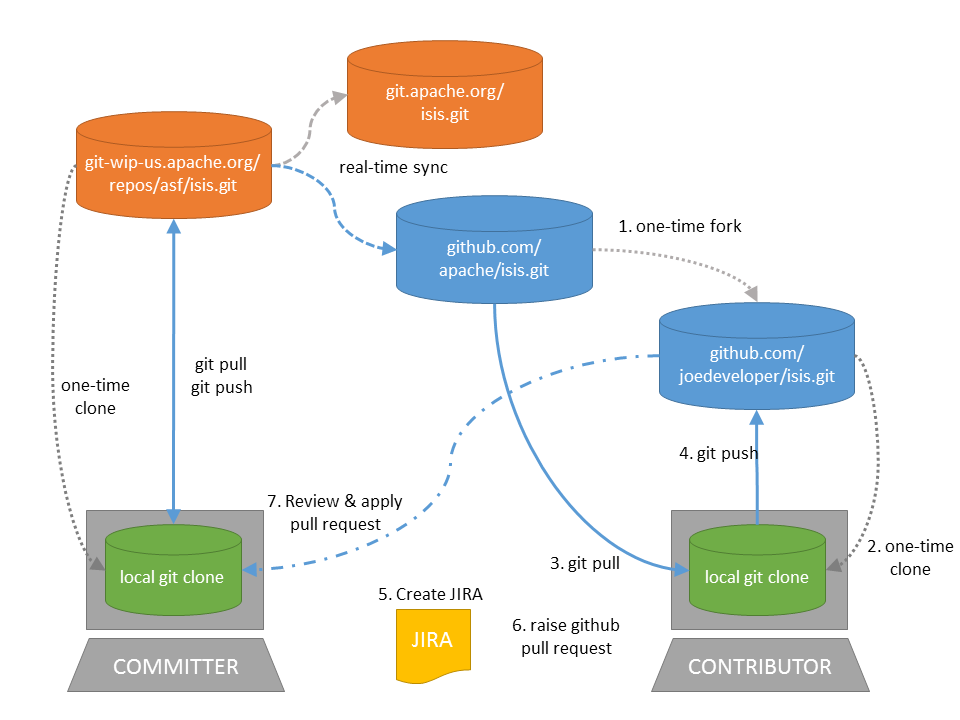
The diagram below illustrates the process:
That is:
-
as a one-time activity, you fork the github.com/apache/isis repo into your own fork on github.com
-
as a one-time activity, you clone your fork to your local computer
-
you set the github.com/apache/isis as your upstream branch; this will allow you to keep your local clone up-to-date with new commits
-
note the asymmetry here: the
upstreamrepo (the Apache github repo) is not the same as theoriginrepo (your fork).
-
-
you work on your changes locally; when done, you push them to your github fork
-
to contribute back a change, raise a JIRA ticket, and ensure your commit message is in the form:
ISIS-nnnn: …so that changes can be tracked (more discussion on this point below). In any case, before you decide to start hacking with Isis, it’s always worth creating a ticket in JIRA and then have a discussion about it on the mailing lists. -
Use github to raise a pull request for your feature
-
An Isis committer will review your change, and apply it if suitable.
Alternative Workflow (JIRA patches)
As an alternative, you may decide to clone directly from github.com/apache/isis rather than create your own fork:
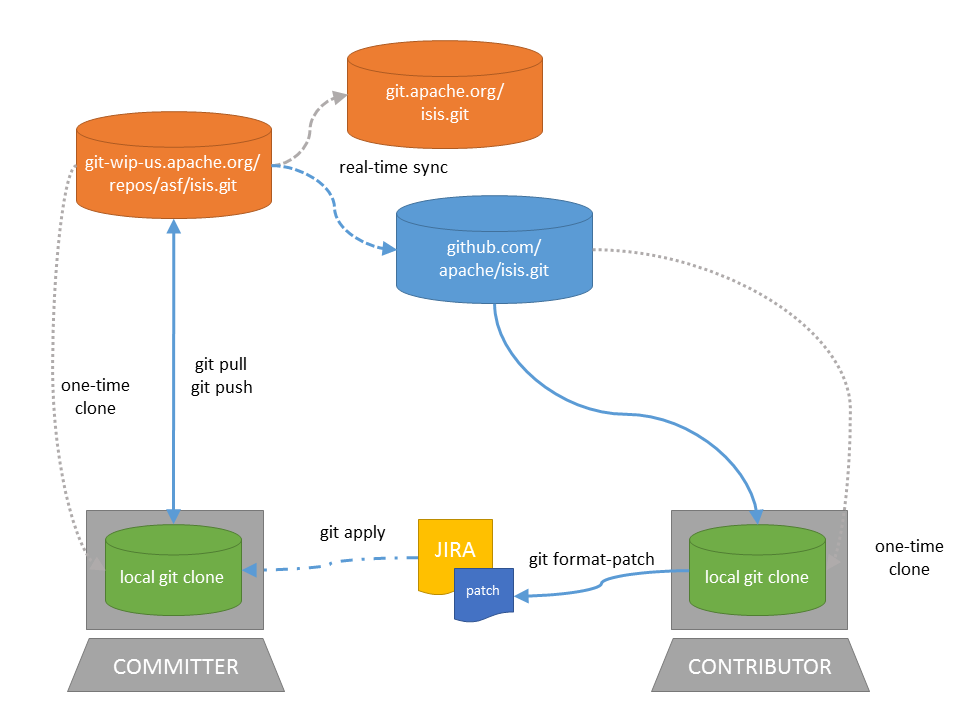
In this case your upstream repo is the same as your origin repo, which might seem more straightforward. On the other hand, if you go this route then you’ll need create patches locally and attach them to the JIRA ticket.
For the Isis committers it really doesn’t matter which route you take, so go with whatever’s most comfortable.
Setting up your fork/clone
If you choose to create your own fork then you’ll need an account on github.com. You then fork simply by pressing the "Fork" button:

An account isn’t needed if you just clone straight from the github.com/apache/isis.
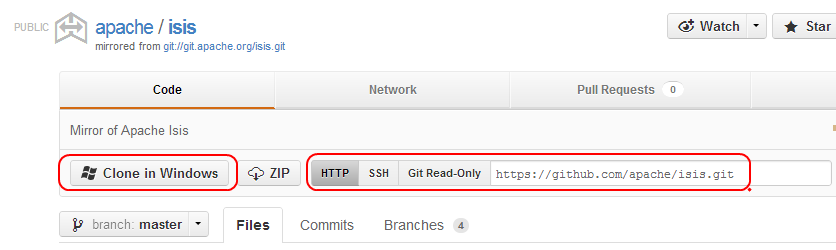
Whether you’ve forked or not, you then need to clone the repo onto your computer. Github makes this very easy to do:
-
for Windows users, we suggest you use github’s 'Clone in Windows' feature
-
for Mac/Linux users, create a clone from the command line:
Again, the info is easily found in the github page:
If you’ve created your own fork, then you need to add the upstream remote to the github.com/apache/isis. This remote is traditionally called upstream. You should then arrange for your master branch to track the upstream/master remote branch:
If you didn’t create your own fork, you can omit the above step. Either way around, you can now fetch new commits using simply:
git fetchCommit messages
Although with git your commits are always performed on your local repo, those commit messages become public when the patch is applied by an Isis committer. You should take time to write a meaningful commit message that helps explain what the patch refers to; if you don’t then there’s a chance that your patch may be rejected and not applied. No-one likes hard work to go to waste!
We therefore recommend that your commit messages are as follows [1]:
ISIS-999: Make the example in CONTRIBUTING imperative and concrete

Without this patch applied the example commit message in the CONTRIBUTING
document is not a concrete example.  This is a problem because the
contributor is left to imagine what the commit message should look like
based on a description rather than an example.  This patch fixes the
problem by making the example concrete and imperative.

The first line is a real life imperative statement with a ticket number
from our issue tracker.  The body describes the behavior without the patch,
why this is a problem, and how the patch fixes the problem when applied.
Once your git repo is setup, the next thing you’ll most likely want to do is to setup your development environment. See here for more details.
Creating the patch file
If you are working without a github fork of Isis, then you can create the patches from your own local git repository.
As per this stackoverflow question, create the patch using git format-patch:
git format-patch -10 HEAD --stdout > 0001-last-10-commits.patchHere -10 is the last 10 commits you have done. You need to change that integer according to the commits you need to apply into the patch.
Sample Contribution Workflow
Assuming you’re development environment is all setup, let’s walk through how you might make contribute a patch. In this example, suppose that you’ve decided to work on JIRA ticket #123, an enhancement to support Blob/Clob datatypes.
Update your master branch
The first thing to do is to make sure your local clone is up-to-date. We do this by retrieving new commits from upstream repo and then merging them as a fast-forward into your local branch.
Irrespective of whether you are using a github fork, the upstream for your local master branch will be tracking the appropriate remote’s master branch. So n either case, the same commands work:
Alternatively, you can combine the git fetch and git merge and just use git pull:
<pre>
git checkout master
git pull –ff-only
</pre>
If the merge or pull fails, it means that you must have made commits and there have been changes meanwhile on the remote master’s branch. You can use `gitk --all to confirm. If this fails, see our git cookbook page for a procedure to retrospectively sort out this situation.
Create a topic branch
We recommend you name topic branches by the JIRA ticket, ie <tt>ISIS-nnn-description</tt>. So let’s create a new branch based off master and call it "ISIS-123-blobs"
You can confirm the branch is there and is your new HEAD using either gitk --all. Alternatively, use the command line:
$ git checkout -b ISIS-123-blobsThe command line prompt should also indicate you are on a branch, isolated from any changes that might happen on the master branch.
Make File Changes and Commit
Next, make changes to your files using the usual commands (see also our git cookbook page):
-
git add -
git mv -
git rm -
git commit -
git status
and so on.
Continue this way until happy with the change. Remember to run all your tests on the topic branch (including a full mvn clean install).
Rebasing with master
Before you can share your change, you should rebase (in other words replay) your changes on top of the master branch.
The first thing to do is to pull down any changes made in upstream remote’s master since you started your topic branch:
These are the same commands that you would have run before you created your topic branch. If you use gitk --all, there’s a good chance that new commits have come in.
Next, we reintegrate our topic branch by rebasing onto master:
<pre>
git checkout ISIS-123-blobs
git rebase master
</pre>
This takes all of the commits in your branch, and applies them on top of the new master branch. When your change is eventually integrated back in, it will result in a nice clear linear history on the public repo.
If the rebase fails because of a conflict, then you’ll be dumped into REBASE mode. Edit the file that has the conflict, and make the appropriate edits. Once done:
Once the rebase has completed, re-run your tests to confirm that everything is still good.
Raising a pull request
If you have your own fork, you can now simply push the changes you’ve made locally to your fork:
This will create a corresponding branch in the remote github repo. If you use gitk --all, you’ll also see a remotes/origin/ISIS-123-blobs branch.
Then, use github to raise a pull request. Pull requests sent to the Apache GitHub repositories will forward a pull request e-mail to the dev mailing list. You’ll probably want to sign up to the dev mailing list first before issuing your first pull request (though that isn’t mandatory).
The process to raise the pull request, broadly speaking:
-
Open a web browser to your github fork of isis
-
Select your topic branch (pushed in the previous step) so that the pull request references the topic branch.
-
Click the
Pull Requestbutton. -
Check that the Isis mailing list email came through.
If your pull request is accepted
To double check that your pull request is accepted, update your master branch from the upstream remote:
You can then use gitk --all (or git log if you prefer the command line) to check your contribution has been added.
You can now delete your topic branch and remove the branch in your github:
Finally, you might want to push the latest changes in master back up to your github fork. If so, use:
If your pull request is rejected
If your pull request is rejected, then you’ll need to update your branch from the main repository and then address the rejection reason.
You’ll probably also want to remove the remote branch on github:
git push origin –delete ISIS-123-blobs… and continue as before until you are ready to resubmit your change.
[1] inspiration for the recommended commit format comes from the puppet project’s contributing page.