
SOAP is widely viewed as the backbone to a new generation of cross-platform cross-language distributed computing applications, termed Web Services.
After a little while, it became clear that a ground-up rearchitecture was the way to go. Several of the v2 committers proposed very similar designs, all based around configurable "chains" of message "handlers" which would implement small bits of functionality in a very flexible and composable manner. Axis is the result of months of continued discussion and coding effort in this direction. Some of the key Axis features include the following:
Before running the examples in this guide, you'll need to make sure that axis.jar is in your classpath. You should find it in the build/lib directory of the distribution.
1   import org.apache.axis.client.Call;
2   import org.apache.axis.client.Service;
3
4   public class TestClient
5   {
6      public static void main(String [] args) {
7          try {
8              String endpoint =
9                       "http://nagoya.apache.org:5049/axis/servlet/AxisServlet";
10
11             Service  service = new Service();
12             Call     call    = (Call) service.createCall();
13
14             call.setTargetEndpointAddress( new java.net.URL(endpoint) );
15             call.setOperationName( "echoString" );
16             call.setProperty( Call.NAMESPACE, "http://soapinterop.org/" );
17
18             String ret = (String) call.invoke( new Object[] { "Hello!" } );
19
20             System.out.println("Sent 'Hello!', got '" + ret + "'");
21         } catch (Exception e) {
22             System.err.println(e.toString());
23         }
24     }
25  }
Assuming you have a network connection active, this program can be run as follows:
% java samples.userguide.example1.TestClient
Sent 'Hello!', got 'Hello!'
%
So what's happening here? On lines 11 and 12 we create new Service and Call objects. These are the standard JAX-RPC objects that are used to store metadata about the service to invoke. On line 14, we set up our endpoint URL - this is the destination for our SOAP message. On line 15 we define the operation (method) name of the Web Service. Line 16 defines the namespace to use on the Body of the SOAP message. And on line 18 we actually invoke the desired service, passing in an array of parameters - in this case just one String.
You can see what happens to the arguments by looking at the SOAP request that goes out on the wire (look at the colored sections, and notice they match the values in the call above):
<?xml version="1.0" encoding="UTF-8"?>
<SOAP-ENV:Envelope xmlns:xsd="http://www.w3.org/2001/XMLSchema"
                   xmlns:SOAP-ENV="http://schemas.xmlsoap.org/soap/envelope/"
                   xmlns:xsi="http://www.w3.org/2001/XMLSchema-instance">
  <SOAP-ENV:Body>
    <ns1:echoString xmlns:ns1="http://soapinterop.org/">
      <arg0 xsi:type="xsd:string">Hello!</arg0>
    </ns1:echoString>
  </SOAP-ENV:Body>
</SOAP-ENV:Envelope>
Note: to actually watch the XML flowing back and forth between a SOAP client and server, you can use the included tcpmon tool. See the appendix for an overview.
  call.addParameter("testParam",
                    org.apache.axis.encoding.XMLType.XSD_STRING,
                    Call.PARAM_MODE_IN);
<?xml version="1.0" encoding="UTF-8"?>
<SOAP-ENV:Envelope xmlns:xsd="http://www.w3.org/2001/XMLSchema"
                   xmlns:SOAP-ENV="http://schemas.xmlsoap.org/soap/envelope/"
                   xmlns:xsi="http://www.w3.org/2001/XMLSchema-instance">
  <SOAP-ENV:Body>
    <ns1:echoString xmlns:ns1="http://soapinterop.org/">
      <testParam xsi:type="xsd:string">Hello!</testParam>
    </ns1:echoString>
  </SOAP-ENV:Body>
</SOAP-ENV:Envelope>
Here's what a typical response might look like to the echoString method:
call.setReturnType( org.apache.axis.encoding.XMLType.XSD_STRING );
OK - so now you know the basics of accessing SOAP services as a client. But how do you publish your own services?
public class Calculator {
  public int add(int i1, int i2)
  {
    return i1 + i2;
  }

  public int subtract(int i1, int i2)
  {
    return i1 - i2;
  }
}
(You'll find this very class in samples/userguide/example2/Calculator.java.)
How do we go about making this class available via SOAP? There are a couple of answers to that question, but we'll start with the easiest way Axis provides to do this, which takes almost no effort at all!
% copy Calculator.java <your-webapp-root>/axis/Calculator.jwsNow for step 2... hm, wait a minute. You're done! You should now be able to access the service at the following URL (assuming your Axis web application is on port 8080):
http://localhost:8080/axis/Calculator.jws
Axis automatically locates the file, compiles the class, and converts SOAP calls correctly into Java invocations of your service class. Try it out - there's a calculator client in samples/userguide/example2/CalcClient.java, which you can use like this:
% javac CalcClient.java
% java CalcClient -p8080 add 2 5
Got result : 7
% java CalcClient -p8080 subtract 10 9
Got result : 1
%
(note that you may need to replace the "-p8080" with whatever port your J2EE server is running on)
<deployment xmlns="http://xml.apache.org/axis/wsdd/"
            xmlns:java="http://xml.apache.org/axis/wsdd/providers/java">
 <service name="MyService" provider="java:RPC">
  <parameter name="className" value="samples.userguide.example3.MyService"/>
  <parameter name="methodName" value="*"/>
 </service>
</deployment>
We need to tell the RPCDispatcher that it should instantiate and call the correct class (e.g. samples.userguide.example3.MyService), and we do so by including a <parameter> tag, giving the service one parameter to configure the class name, and another to tell the engine that any public method on that class may be called via SOAP (that's what the "*" means; we could also have restricted the SOAP-accessible methods by using a space or comma separated list of available method names).
% java org.apache.axis.client.AdminClient deploy.wsdd
<Admin>Done processing</Admin>
This command has now made our service accessible via SOAP. Check it out by running the Client class - it should look like this:
% java samples.userguide.example3.Client "test me!"
You typed : test me!
%
If you want to prove to yourself that the deployment really worked, try undeploying the service and calling it again. There's an "undeploy.wsdd" file in the example3/ directory which you can use just as you did the deploy.wsdd file above. Run the AdminClient on that file, then try the service Client again and see what happens.
You can also use the AdminClient to get a listing of all the deployed components in the server:
% java org.apache.axis.client.AdminClient list
<big XML document returned here>
In there you'll see services, handlers, transports, etc. Note that this listing is an exact copy of the server's "server-config.wsdd" file, which we'll talk about in more detail a little later.
<deployment xmlns="http://xml.apache.org/axis/wsdd/"
            xmlns:java="http://xml.apache.org/axis/wsdd/providers/java">

 <!-- define the logging handler configuration -->
 <handler name="track" type="java:samples.userguide.example4.LogHandler">
  <parameter name="filename" value="MyService.log"/>
 </handler>

 <!-- define the service, using the log handler we just defined -->
 <service name="LogTestService" provider="java:RPC">
  <requestFlow>
   <handler type="track"/>
  </requestFlow>

  <parameter name="className" value="samples.userguide.example4.Service"/>
  <parameter name="methodName" value="*"/>
 </service>
</deployment>
The first section defines a Handler called "track" that is implemented by the class samples.userguide.example4.LogHandler. We give this Handler an option to let it know which file to write its messages into.
Then we define a service, LogTestService, which is an RPC service just like we saw above in our first example. The difference is the <requestFlow> element inside the <service> - this indicates a set of Handlers that should be invoked when the service is invoked, before the provider. By inserting a reference to "track", we ensure that the message will be logged each time this service is invoked.
<service name="AdminService" provider="java:MSG">
 <parameter name="className" value="org.apache.axis.util.Admin"/>
 <parameter name="methodName" value="*"/>
 <parameter name="enableRemoteAdmin" value="true"/>
</service>
WARNING: enabling remote administration may give unauthorized parties access to your machine. If you do this, please make sure to add security to your configuration!
<beanMapping qname="ns:local" xmlns:ns="someNamespace"
             languageSpecificType="java:my.java.thingy"/>
The <beanMapping> tag maps a Java class (presumably a bean) to an XML QName. You'll note that it has two important attributes, qname and languageSpecificType. So in this case, we'd be mapping the "my.java.thingy" class to the XML QName [someNamespace]:[local].
Let's take a look at how this works in practice. Go look at the samples/userguide/example5/BeanService.java file. (we won't reproduce it here, it's pretty straightforward) The key thing to notice is that the argument to the service method is an Order object. Since Order is not a basic type which Axis understands by default, trying to run this service without a type mapping will result in a fault (if you want to try this for yourself, you can use the bad-deploy.wsdd file in the example5 directory). But if we put a beanMapping into our deployment, all will be well. Here's how to run this example (from the example5 directory):
% java org.apache.axis.client.AdminClient -llocal:///AdminService deploy.wsdd
<Admin>Done processing</Admin>

% java Client -llocal:// -n "Glen"
Hi, Glen!

You seem to have ordered the following:

1 of item : mp3jukebox
4 of item : 1600mahBattery

If this had been a real order processing system, we'd probably have charged you about now.
%
TBD - this section will be expanded in a future version! For now, take a look at the ArraySerializer, the BeanSerializer (both in org.apache.axis.encoding), and the DataSer example (in samples/encoding) to see how custom serializers work.
<typeMapping qname="ns:local" xmlns:ns="someNamespace"
             languageSpecificType="java:my.java.thingy"
             serializer="my.java.Serializer"
             deserializer="my.java.DeserializerFactory"/>
This looks a lot like the <beanMapping> tag we saw earlier, but there are two extra attributes. One, serializer, is the Java class name of the Serializer class which should be used to write the specified Java class (i.e. my.java.thingy) into XML. The other, deserializer, is the class name of a Deserializer factory that generates Deserializers which can be used to unmarshall XML into the correct Java class.
(the <beanMapping> tag is really just shorthand for a <typeMapping> tag with serializer="org.apache.axis.encoding.BeanSerializer" and deserializer="org.apache.axis.encoding.BeanSerializer$BeanDeserFactory", but clearly it can save a lot of typing!)
Axis supports WSDL in three ways:
If you access the service URL in a browser, you'll see a message indicating that the endpoint is an Axis service, and that you should usually access it using SOAP. However, if you tack on "?wsdl" to the end of the URL, Axis will automatically generate a service description for the deployed service, and return it as XML in your browser (try it!). The resulting description may be saved or used as input to proxy-generation, described next. You can give the WSDL-generation URL to your online partners, and they'll be able to use it to access your service with toolkits like .NET, SOAP::Lite, or any other software which supports using WSDL.
You can also generate WSDL files from existing Java classes (see #Java2WSDL: Building WSDL from Java ).
% java org.apache.axis.wsdl.WSDL2Java (url-to-wsdl-file)
You can try an example, assuming you've deployed the service in example 3 above and have your Axis server up and running. Type the following at the command line:
% java org.apache.axis.wsdl.WSDL2Java http://localhost:8080/axis/services/MyService?wsdlYou can add the "--verbose" option right before the URL if you want some more feedback on what the tool is up to. This will generate stub code, which we'll describe.
WSDL2Java generates a few classes; here's a rundown of what they are and how to use them:
public class Tester {
  public static void main(String [] args) throws Exception
  {
    // Make a service (PortType factory)
    MyService service = new MyService();


    // Now use the service to get a PortType that we can call.
    MyServicePortType port = service.getMyServicePort();

    // Make the actual call
    String ret = port.serviceMethod("test string");
    System.out.println("Return val was " + ret);
  }
}
To make skeleton classes, you just specify the "--skeleton" option to WSDL2Java. For instance, if we wanted to replicate the service in the last example, we'd type:
% java org.apache.axis.wsdl.WSDL2Java --skeleton http://localhost:8080/axis/services/MyService?wsdlThere are a couple of classes produced by the skeleton generator, so let's take a look at them:
Usage: java org.apache.axis.wsdl.Wsdl2java [options] WSDL-URI
Options:
-h, --help
print this message and exit
-v, --verbose
print informational messages
-s, --skeleton
emit skeleton class for web service
-m, --messageContext
emit a MessageContext parameter to skeleton methods
-N, --NStoPkg <argument>=<value>
mapping of namespace to package
-p, --package <argument>
override all namespace to package mappings, use this package name instead
-o, --output <argument>
output directory for emitted files
-d, --deployScope <argument>
add scope to deploy.wsdd: "Application", "Request", "Session"
-t, --testCase
emit junit testcase class for web service
-n, --noImports
only generate code for the immediate WSDL document
--NStoPkg urn:AddressFetcher2=samples.addrIf there are a number of namespaces in the WSDL document, listing a mapping for them all could become tedious. To help keep the command line terse, Wsdl2java will also look for mappings in a file called NStoPkg.properties residing in the default package (ie., no package). The entries in this file are of the same form as the arguments to the --NStoPkg command line option. For example, instead of providing the command line option as above, we could provide the same information in NStoPkg.properties:
urn\:AddressFetcher2=samples.addr(Note that the colon must be escaped in the properties file.)
If an entry for a given mapping exists both on the command line and in the properties file, the command line entry takes precedence.
package samples.userguide.example6;
/**
* Interface describing a web service
to set and get Widget prices.
**/
public interface WidgetPrice
{
public void setWidgetPrice(String
widgetName, String price);
public String getWidgetPrice(String
widgetName);
}
Note: If you compile your class with debug information, Java2WSDL will use the debug information to obtain the method parameter names.
Here is an example invocation that produces the wsdl file (wp.wsdl) from the interface described in the previous section:
java org.apache.axis.wsdlgen.Java2WSDL -o wp.wsdl -l"http://localhost:8080/axis/services/WidgetPrice" -n "urn:Example6" -p"samples.userguide.example6" "urn:Example6" samples.userguide.example6.WidgetPrice
Where:
The Java2WSDL tool has many additional options which are detailed in the next section.
Java2WSDL emitter
Usage: java org.apache.axis.wsdl.Java2WSDL
[options] class-of-portType
Options:
-h, --help
print this message and exit
-o, --output <argument>
output Wsdl filename
-l, --location <argument>
service location url
-s, --service <argument>
service name (obtained from --location if not specified)
-n, --namespace <argument>
target namespace
-p, --PkgtoNS <argument>=<value>
package=namespace, name value pairs
-m, --methods <argument>
space or comma separated list of methods to export
-a, --all
look for allowed methods in inherited class
-w, --outputWsdlMode <argument>
output WSDL mode: All, Interface, Implementation
-L, --locationImport <argument>
location of interface wsdl
-N, --namespaceImpl <argument>
target namespace for implementation wsdl
-O, --outputImpl <argument>
output Implementation Wsdl filename, setting this causes --outputWsdlMode
to be ignored
-f, --factory <argument>
name of the Java2WSDLFactory class for extending WSDL generation functions
-i, --implClass <argument>
optional class that contains implementation of methods in
class-of-portType. The debug information in the class is used
to obtain the method parameter names, which are used to set
the WSDL part names.
Details:
portType name=
<class-of-portType name>
binding
name= <--service value>SoapBinding
service
name= <--service value>Service
port
name= <--service value>
address location= <--location
value>
-h , --help
Prints the help message.
-o, --output <wsdl file>
Indicates the name of the output wsdl file. If not specified,
a suitable default wsdl file is written into the current directory.
-l, --location <location>
Indicates the url of the location of the service. The name after
the last slash or backslash is the name of the service port (unless overriden
by the -s option). The service port address location attributed is
assigned the specified value.
-s, -service <name>
Indicates the name of the service. If not specified, the service
name is derived from the --location value. The names of the wsdl
binding, service, and port elements are derived from the service name as
indicated in the Details section
above.
-n, --namespace <target namespace>
Indicates the name of the target namespace of the wsdl.
-p, --PkgToNS <package> <namespace>
Indicates the mapping of a package to a namespace. If a package
is encountered that does not have a namespace, the Java2WSDL emitter will
generate a suitable namespace name. This option may be specified
multiple times.
-m, --methods <arguments>
If this option is specified, only the indicated methods in your interface
class will be exported into the wsdl file. The methods list must
be comma separated. If not specified, all methods declared in the
interface class will be exported into the wsdl file.
-a, --all
If this option is specified, the Java2WSDL parser will look into extended
classes to determine the list of methods to export into the wsdl file.
-w, --outputWSDLMode <mode>
Indicates the kind of wsdl to generate. Accepted values are:
-N, --namespaceImpl <namespace>
Namespace of the implementation wsdl.
-O, --outputImpl <wsdl file>
Use this option to indicate the name of the output implementation wsdl
file. If specified, Java2WSDL will produce interface and implementation
wsdl files. If this option is used, the -w option is ignored.
-f, --factory <class>
Use this expert option to extend and customize the WSDL2Java tool.
-i, --implClass <impl-class>
The Java2WSLD tool uses method parameter names to construct the WSDL
message part names. The message names are obtained from the debug
information of the <class-of-portType> class file. If that
class file was compiled without debug information or if <class-of-portType>
is an interface, the method parameter names are not available. In
these cases, you can use the --implClass option to provide an alternative
class from which to obtain method parameter names. The <impl-class>
could be the actual implementation class, a stub class or a skeleton class.
java org.apache.axis.wsdl.Wsdl2java -o . -d session -s -Nurn:Example6 samples.userguide.example6 ws.wsdl
This will generate the following files:
% java org.apache.axis.utils.tcpmon [listenPort targetHost targetPort]Without any of the optional arguments, you will get a gui which looks like this:
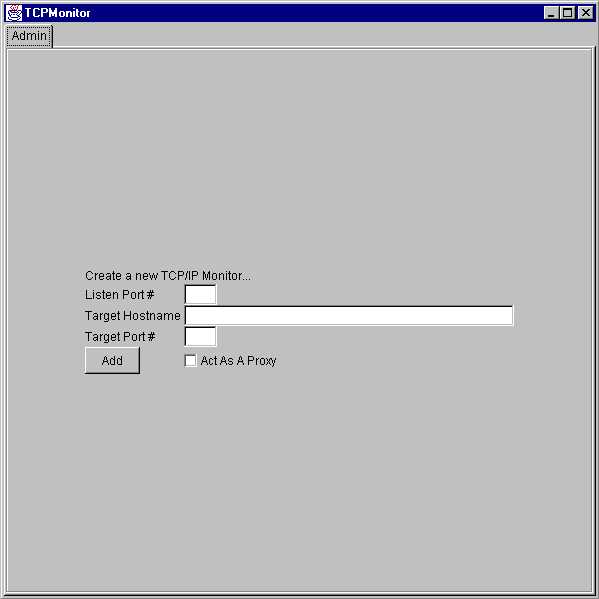
To use the program, you should select a local port which tcpmon will monitor for incoming connections, a target host where it will forward such connections, and the port number on the target machine which should be "tunneled" to. Then click "add". You should then notice another tab appearing in the window for your new tunneled connection. Looking at that panel, you'll see something like this:
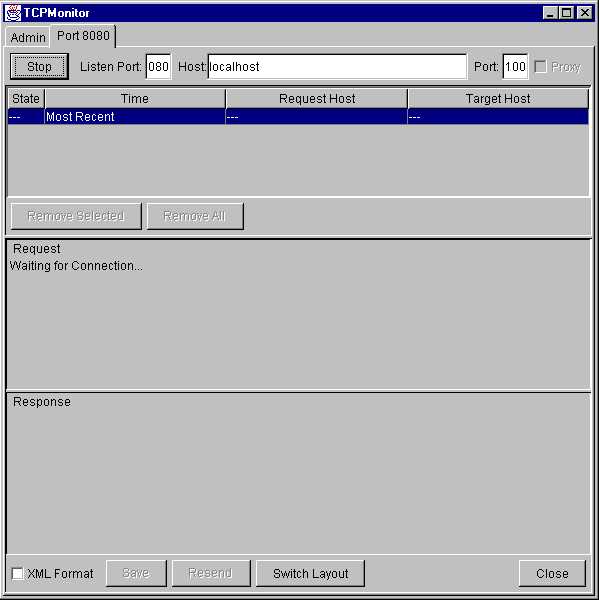
Now each time a SOAP connection is made to the local port, you will see the request appear in the "Request" panel, and the response from the server in the "Response" panel. Tcpmon keeps a log of all request/response pairs, and allows you to view any particular pair by selecting an entry in the top panel. You may also remove selected entries, or all of them, or choose to save to a file for later viewing.
The "resend" button will resend the request you are currently viewing, and record a new response. This is particularly handy in that you can edit the XML in the request window before resending - so you can use this as a great tool for testing the effects of different XML on SOAP servers.