
Alpha 2 Version
Introduction
Installing Axis
Axis Architecture - a Brief Primer
Consuming Web Services with Axis
Publishing Web Services with Axis
XML <-> Java Data Mapping in Axis
Using WSDL with Axis
Deployment Reference
Glossary
Welcome to Axis, the third generation of Apache SOAP! This is the alpha 2 version, our first publically announced milestone. Please note that Axis is a work in progress, and although the basic functionality is there, there are still a lot of unfinished areas and rough edges. That said, we're very psyched about the package so far and would love to get your take on how we can make it better.
SOAP is an XML-based communitcation protocol and encoding format for inter-application communication. Originally conceived by Microsoft and Userland software, it has evolved through several generations and the current spec, SOAP 1.1, is fast growing in popularity and usage. The W3C's XML Protocol working group is in the process of turning SOAP into a true open standard, and as of this writing has released a working draft of SOAP 1.2, which cleans up some of the more confusing areas of the 1.1 spec.
SOAP is widely viewed as the backbone to a new generation of cross-platform cross-language distributed computing applications, termed Web Services.
Apache SOAP began at IBM as "SOAP4J" and then became Apache SOAP version 2. The committers on the v2 project began some conversations in late 2000 about making the engine much more flexible, configurable, and able to handle both SOAP and the upcoming XML Protocol specification from the W3C.
After a little while, it became clear that a ground-up rearchitecture was the way to go. Several of the v2 committers proposed very similar designs, all based around configurable "chains" of message "handlers" which would implement small bits of functionality in a very flexible and composable manner. Axis is the result of months of continued discussion and coding effort in this direction. Some of the key Axis features include the following:
We hope you enjoy using Axis. Please note that this is an open-source effort - if you feel the code could use some new features or fixes, please get involved and lend a hand! The Axis developer community welcomes your participation.
Please send feedback about the package to "axis-user@xml.apache.org". Also, Axis is regsitered in bugzilla, the Apache bug tracking and feature-request database.
This release includes the following features:
All of these items are on the list for the final release.
See the Axis Installation Guide for instructions on installing Axis as a web application on your J2EE server.
Before running the examples in this guide, you'll need to make sure that axis.jar is in your classpath. You should find it in the build/lib directory of the distribution.
(Skip this section if you want to dive right in - in many cases using the basic features of Axis requires zero knowledge of these topics.)
TBD - explanation of Axis architecture, Handlers, Chains, Services... How transports and global chains work, our deployment architecture, etc...
Let's take a look at an example Web Service client that will call the echoString method on the public Axis server at Apache.
1   import org.apache.axis.client.ServiceClient;
2   public class TestClient {
3     public static void main(String [] args) {
4       String endpoint = "http://nagoya.apache.org:5049/axis/servlet/AxisServlet";
5
6       ServiceClient client = new ServiceClient(endpoint);
7       String ret = (String)client.invoke("http://soapinterop.org/",
8                                          "echoString",
9                                          new Object [] { "Hello!" });
10
11      System.out.println("Sent 'Hello!', got '" + ret + "'");
12    }
13  }
(You'll find this file in samples/userguide/example1/TestClient.java)
Assuming you have a network connection active, this program can be run as follows:
% java samples.userguide.example1.TestClient
Sent 'Hello!', got 'Hello!'
%
So what's happening here? On line 4, we set up our endpoint URL - this is the destination for our SOAP message. On line 6, we initialize a new ServiceClient instance with our URL. The ServiceClient class is the center of the Axis client API - we'll cover the very basics here, but take a look at the JavaDoc for this class to see what it can do.
We're all set to go, so on line 7 we invoke the remote service. The invoke() API takes several arguments - first, the XML namespace of the desired service. Second, the method name which should be invoked. Finally, we pass an Object array containing the arguments to the method.
You can see what happens to the arguments by looking at the SOAP request that goes out on the wire (look at the colored sections, and notice they match the values in the call above):
<?xml version="1.0" encoding="UTF-8"?>
<SOAP-ENV:Envelope xmlns:xsd="http://www.w3.org/2001/XMLSchema"
                   xmlns:SOAP-ENV="http://schemas.xmlsoap.org/soap/envelope/"
                   xmlns:xsi="http://www.w3.org/2001/XMLSchema-instance">
  <SOAP-ENV:Body>
    <ns1:echoString xmlns:ns1="http://soapinterop.org/">
      <arg0 xsi:type="xsd:string">Hello!</arg0>
    </ns1:echoString>
  </SOAP-ENV:Body>
</SOAP-ENV:Envelope>
The String argument is automatically serialized into XML, and the server responds with an identical String, which we deserialize and print.
Note: to actually watch the XML flowing back and forth between a SOAP client and server, you can use the included tcpmon tool. See the appendix for an overview.
In the above example, the parameters are in the order in which we sent them, but since we only passed the objects themselves, Axis automatically named the XML-encoded arguments in the SOAP message "arg0", "arg1", etc. If you want to change this, it's easy! Instead of passing the actual Object value of your argument in the arguments array, simply wrap the argument in an RPCParam class like so:
  String ret = (String)client.invoke("http://soapinterop.org",
                                     "echoString",
                                     new Object [] { new RPCParam("testParam", "Hello!") };
<?xml version="1.0" encoding="UTF-8"?>
<SOAP-ENV:Envelope xmlns:xsd="http://www.w3.org/2001/XMLSchema"
                   xmlns:SOAP-ENV="http://schemas.xmlsoap.org/soap/envelope/"
                   xmlns:xsi="http://www.w3.org/2001/XMLSchema-instance">
  <SOAP-ENV:Body>
    <ns1:echoString xmlns:ns1="http://soapinterop.org/">
      <testParam xsi:type="xsd:string">Hello!</testParam>
    </ns1:echoString>
  </SOAP-ENV:Body>
</SOAP-ENV:Envelope>
Note that the param is now named "testParam" as expected.
In the above examples, we've been casting the return type of invoke(), which is Object, to the appropriate "real" type - for instance, we know that the echoString method returns a String, so we expect to get one back from client.invoke(). Let's take a moment and investigate how this happens, which sheds light on a potential problem (to which, of course, we have a solution - so don't fret :)).
Here's what a typical response might look like to the echoString method:
<?xml version="1.0" encoding="UTF-8"?>
<SOAP-ENV:Envelope xmlns:xsd="http://www.w3.org/2001/XMLSchema"
                   xmlns:SOAP-ENV="http://schemas.xmlsoap.org/soap/envelope/"
                   xmlns:xsi="http://www.w3.org/2001/XMLSchema-instance">
  <SOAP-ENV:Body>
    <ns1:echoStringResponse xmlns:ns1="http://soapinterop.org/">
      <result xsi:type="xsd:string">Hello!</result>
    </ns1:echoStringResponse>
  </SOAP-ENV:Body>
</SOAP-ENV:Envelope>
Take a look at the section which we've highlighted in red - that attribute is a schema type declaration, which Axis uses to figure out that the contents of that element are, in this case, deserializable into a Java String object. Many toolkits put this kind of explicit typing information in the XML to make the message "self-describing". On the other hand, some toolkits return responses that look like this:
<?xml version="1.0" encoding="UTF-8"?>
<SOAP-ENV:Envelope xmlns:xsd="http://www.w3.org/2001/XMLSchema"
                   xmlns:SOAP-ENV="http://schemas.xmlsoap.org/soap/envelope/"
                   xmlns:xsi="http://www.w3.org/2001/XMLSchema-instance">
  <SOAP-ENV:Body>
    <ns1:echoStringResponse xmlns:ns1="http://soapinterop.org/">
      <result>Hello, I'm a string!</result>
    </ns1:echoStringResponse>
  </SOAP-ENV:Body>
</SOAP-ENV:Envelope>
There's no type in the message, so how do we know what Java object we should deserialize the <result> element into? The answer is metadata - data about data. In this case, we need a description of the service that tells us what to expect as the return type. Here's how to do it on the client side in Axis:
  ServiceDescription sd = new ServiceDescription("name", true);
  sd.setOutputType(new QName(Constants.URI_2001_SCHEMA_XSD, "string"));
  client.setServiceDescription(sd);
The ServiceDescription constructor takes a name (can be anything) and a boolean as arguments; the boolean indicates whether the service is RPC or not. In this case it is, so we use "true". Then we call "setOutputType()", which tells the ServiceDescription that if the return element is not typed, act as if the return value has an xsi:type attribute set to the QName which we supply. (You can see an example of this in action in the interop echo-test client - samples/echo/TestClient.java.)
OK - so now you know the basics of accessing SOAP services as a client. But how do you publish your own services?
Let's say we have a simple class like the following:
public class Calculator {
  public int add(int i1, int i2)
  {
    return i1 + i2;
  }

  public int subtract(int i1, int i2)
  {
    return i1 - i2;
  }
}
(You'll find this very class in samples/userguide/example2/Calculator.java.)
How do we go about making this class available via SOAP? There are a couple of answers to that question, but we'll start with the easiest way Axis provides to do this, which takes almost no effort at all!
OK, here's step 1 : copy the above .java file into your webapp directory, and rename it "Calculator.jws". So you might do something like this:
% copy Calculator.java <your-webapp-root>/axis/Calculator.jws
Now for step 2... hm, wait a minute. You're done! You should now be able to access the service at the following URL (assuming your Axis web application is on port 8080):
http://localhost:8080/axis/Calculator.jws
Axis automatically locates the file, compiles the class, and converts SOAP calls correctly into Java invocations of your service class. Try it out - there's a calculator client in samples/userguide/example2/CalcClient.java, which you can use like this:
% javac CalcClient.java
% java CalcClient -p8080 add 2 5
Got result : 7
% java CalcClient -p8080 subtract 10 9
Got result : 1
%
(note that you may need to replace the "-p8080" with whatever port your J2EE server is running on)
JWS files are great quick ways to get your classes out there as Web Services, but they're not always the best choice. For one thing, you need the source code - there might be times when you want to expose a pre-existing class on your system without source. Also, the amount of configuration you can do as to how the service gets accessed is pretty limited - you can't specify custom type mappings, or control which Handlers get invoked when people are using your service.
<admin:deploy xmlns:admin="AdminService">
 <service name="MyService" pivot="RPCDispatcher">
  <option name="className" value="samples.userguide.example3.MyService"/>
  <option name="methodName" value="*"/>
 </service>
</admin:deploy>
Pretty simple, really - the outermost element tells the engine that this is a deployment (other options are "undeploy" and "list" - see the deployment reference). Then the service element actually deploys the service for us. If you remember from the architecture overview, a service is a targeted chain, which means it may have any/all of: a request Handler, a pivot Handler, and a response Handler. In this case, our pivot handler is the RPCDispatcher, which is the Provider which handles Java remote procedure call backends.
We need to tell the RPCDispatcher that it should instantiate and call the correct class (samples.userguide.example3.MyService), and we do so by including an <option> tag, giving the service one option to configure the class name, and another to tell the engine that any public method on that class may be called via SOAP (that's what the "*" means; we could also have restricted the SOAP-accessible methods by using a space or comma separated list of available method names).
Once we have this file, we need to send it to an Axis server in order to actually deploy the described service. We do this with the AdminClient, or the "org.apache.axis.client.AdminClient" class. An invocation of the AdminClient looks like this:
% java org.apache.axis.client.AdminClient deploy.xml
<admin>done processing</admin>
This command has now made our service accessible via SOAP. Check it out by running the Client class - it should look like this:
% java samples.userguide.example3.Client "test me!"
You typed : test me!
%
If you want to prove to yourself that the deployment really worked, try undeploying the service and calling it again. There's an "undeploy.xml" file in the example3/ directory which you can use just as you did the deploy.xml file above. Run the AdminClient on that file, then try the service Client again and see what happens.
You can also use the AdminClient to get a listing of all the deployed components in the server:
% java org.apache.axis.client.AdminClient list
<big XML document returned here>
In there you'll see services, handlers, transports...
Now let's start to explore some of the more powerful features of the Axis engine. Let's say you want to track how many times your service has been called. We've included a sample handler in the samples/log directory to do just this. To use a handler class like this, you first need to deploy the Handler itself, and then use the name that you give it in deploying a service. Here's a sample deploy.xml file:
<admin:deploy xmlns:admin="AdminService">
 <!-- define the logging handler configuration -->
 <handler name="track" class="samples.userguide.example4.LogHandler">
  <option name="filename" value="MyService.log"/>
 </handler>

 <!-- define the service, using the log handler we just defined -->
 <service name="LogTestService" request="track" pivot="RPCDispatcher">
  <option name="className" value="samples.userguide.example4.Service"/>
  <option name="methodName" value="*"/>
 </service>
</admin:deploy>
The first section defines a Handler called "track" that is implemented by the class samples.log.LogHandler. We give this Handler an option to let it know which file to write its messages into.
Then we define a service, MyService, which is an RPC server just like we saw
above in our first example. The difference is the "request" attribute - this
indicates a Handler (or set of Handlers) that should be invoked when the service
is invoked, before the pivot handler. By setting this to "track", we ensure
that the message will be logged each time this service is invoked.
Note that by default, the Axis server is configured to only accept administration requests from the machine on which it resides - if you wish to enable remote administration, you must set the "enableRemoteAdmin" property of the AdminService to true. To do this, find the "server-config.xml" file in your webapp's WEB-INF directory. In it, you'll see a deployment for the AdminService. Add an option as follows:
<service name="AdminService" pivot="RPCDispatcher">
 <option name="className" value="org.apache.axis.util.Admin"/>
 <option name="methodName" value="*"/>
 <option name="enableRemoteAdmin" value="true"/>
</service>
WARNING: enabling remote administration may give unauthorized parties access
to your machine. If you do this, please make sure to add security to your configuration!
Axis includes the ability to serialize/deserialize, without writing any code, arbitrary Java classes which follow the standard JavaBean pattern of get/set accessors. All you need to do is tell Axis which Java classes map to which XML Schema types. Configuring a bean mapping looks like this:
<beanMappings>
 <ns:local xmlns:ns="someNamespace" classname="my.java.thingy"/>
</beanMappings>
Inside the <beanMappings> element is an arbitrary number of other elements, each of which maps a Java class (presumably a bean) to an XML QName. The QName of the element itself is the XML QName, and the value of the classname attribute is the Java class name. So in this case, we'd be mapping the "my.java.thingy" class to the XML QName [someNamespace]:[local].
Let's take a look at how this works in practice. Go look at the docs/examples/example4/BeanService.java file. (we won't reproduce it here, it's pretty straightforward) The key thing to notice is that the argument to the service method is an Order object. Since Order is not a basic type which Axis understands by default, trying to run this service without a type mapping will result in a fault (if you want to try this for yourself, you can use the bad-deploy.xml file in the example4 directory). But if we put a beanMapping into our deployment, all will be well. Here's how to run this example (from the example4 directory):
% java org.apache.axis.client.AdminClient -llocal:// deploy.xml
<?xml version="1.0" encoding="UTF-8"?><Admin>Done processing</Admin>

% java Client -llocal:// -n "Glen"
Hi, Glen!

You seem to have ordered the following:

1 of item : mp3jukebox
4 of item : 1600mahBattery

If this had been a real order processing system, we'd probably have charged you about now.
%
Just as JWS deployment is sometimes not flexible enough to meet all needs, the default bean serialization model isn't robust enough to handle every case either. At times there will be non-bean Java classes (especially in the case of pre-existing assets) which you need to map to/from XML, and there also may be some custom XML schema types which you want to map into Java in particular ways. Axis gives you the ability to write custom serializers/deserializers, and some tools to help make your life easier when you do so.
TBD - this section will be expanded in a future version! For now, take a look at the ArraySerializer, the BeanSerializer (both in org.apache.axis.encoding), and the DataSer example (in samples/encoding) to see how custom serializers work.
The Web Service Description Language is a specification authored by IBM and Microsoft, and supported by many other organizations. WSDL serves to describe Web Services in a structured way. A WSDL description of a service tells us, in a machine-understandable way, the interface to the service, the data types it uses, and where the service is located. Please see the spec (follow the link in the first sentence) for details about WSDL's format and options.
Axis supports WSDL in two ways: first, when you deploy a service in Axis, users may then access your service's URL with a standard web browser and by appending "?WSDL" to the end of the URL, they will obtain an automatically-generated WSDL document which describes your service. Second, we provide a "Wsdl2java" tool which will build Java proxies and skeletons for services with WSDL descriptions. Both of these techniques are explained in more detail below.
When you make a service available using Axis, there is typically a unique URL associated with that service. For JWS files, that URL is simply the path to the JWS file itself. For non-JWS services, this is usually the URL "http://<host>/axis/services/<service-name>".
If you access the service URL in a browser, you'll see a message indicating that the endpoint is an Axis service, and that you should usually access it using SOAP. However, if you tack on "?wsdl" to the end of the URL, Axis will automatically generate a service description for the deployed service, and return it as XML in your browser (try it!). The resulting description may be saved or used as input to proxy-generation, described next. You can give the WSDL-generation URL to your online partners, and they'll be able to use it to access your service with toolkits like .NET, SOAP::Lite, or any other software which supports using WSDL.
You'll find the Axis WSDL -> Java tool in "org.apache.axis.wsdl.Wsdl2java". The basic invocation form looks like this:
% java org.apache.axis.wsdl.Wsdl2java (url-to-wsdl-file)
A stub is a Java class which has the same interface as a remote Web Service. It stands in as a proxy (another term for the same idea) for the remote service, letting you call it exactly as if it were a local object. In other words, you don't need to deal with the endpoint URL, namespace, or parameter arrays which are involved in dynamic invocation via the ServiceClient. The stub hides all that work for you.
You can try an example, assuming you've deployed the service in example 3 above and have your Axis server up and running. Type the following at the command line:
% java org.apache.axis.wsdl.Wsdl2java http://localhost:8080/axis/services/MyService?wsdl
You can add the "--verbose" option right before the URL if you want some more feedback on what the tool is up to. This will generate stub code, which we'll describe.
Wsdl2java generates a few classes; here's a rundown of what they are and how to use them:
So a typical usage of the stub classes would be as follows:
public class Tester {
  public static void main(String [] args) throws Exception
  {
    // Make a service (PortType factory)
    MyService service = new MyService();


    // Now use the service to get a PortType that we can call.
    MyServicePortType port = service.getMyServicePort();

    // Make the actual call
    String ret = port.serviceMethod("test string");
    System.out.println("Return val was " + ret);
  }
}
Just as a stub is the client side of a Web Service represented in Java, a skeleton is a Java framework for the server side. You'd want to make a skeleton if you had a WSDL description of a service which you'd like to implement. For instance, you might want to join a digital marketplace which requires you to make your inventory available via a particular Web Service interface.
To make skeleton classes, you just specify the "--skeleton" option to Wsdl2java. For instance, if we wanted to replicate the service in the last example, we'd type:
% java org.apache.axis.wsdl.Wsdl2java --skeleton http://localhost:8080/axis/services/MyService?wsdl
There are a couple of classes produced by the skeleton generator, so let's take a look at them:
WSDL files can contain (or reference) XML Schema describing the data types used by particular operations. As we've seen, Axis needs to do some work to map schema types to Java types, and this remains true whether we code the Java by hand or generate it with a tool. When you use Wsdl2java to generate either stubs or skeletons for operations which contain complex types, you will notice that Java classes corresponding to the XML data types are also generated. For the stub, the code inside the stub handles setting up the type mapping in Axis - and for the skeleton, the type mappings are included in the generated "deploy.xml" file.
You'll notice that for each data class that Wsdl2java generates, there is a corresponding "Holder" class - for instance a class called "MyDataType" would also get a companion class "MyDataTypeHolder". These classes exist so that we have a reasonably clean mapping for WSDL's in/out and out parameters in Java. See the examples for more details.
<option name="name" value="value"/>)
include:
% java org.apache.axis.client.AdminClient -llocal:// list
The included "tcpmon" utility can be found in the org.apache.axis.utils package. To run it from the command line:
% java org.apache.axis.utils.tcpmon
This will pop up a gui which looks like this:
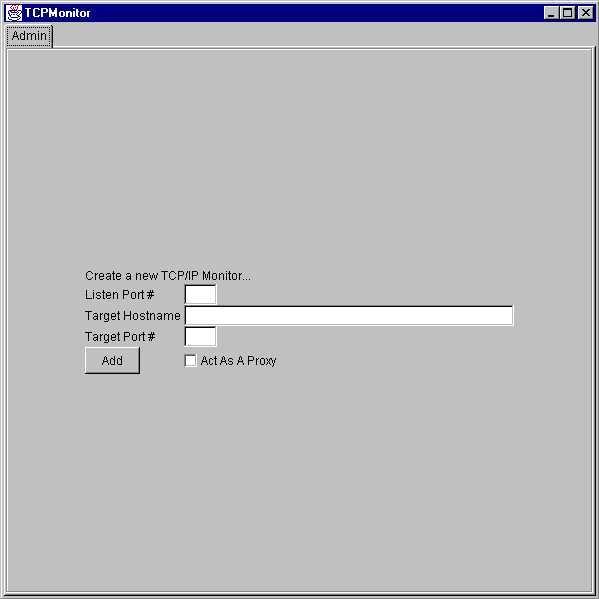
To use the program, you should select a local port which tcpmon will monitor for incoming connections, a target host where it will forward such connections, and the port number on the target machine which should be "tunneled" to. Then click "add". You should then notice another tab appearing in the window for your new tunneled connection. Looking at that panel, you'll see something like this:
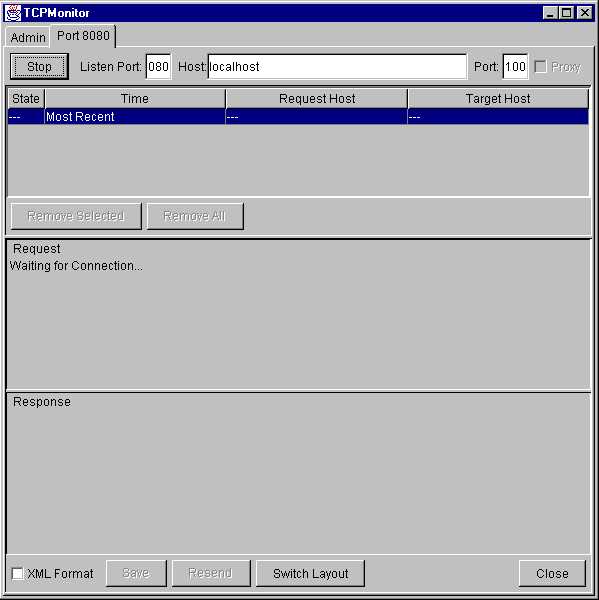
Now each time a SOAP connection is made to the local port, you will see the request appear in the "Request" panel, and the response from the server in the "Response" panel. Tcpmon keeps a log of all request/response pairs, and allows you to view any particular pair by selecting an entry in the top panel. You may also remove selected entries, or all of them, or choose to save to a file for later viewing.
The "resend" button will resend the request you are currently viewing, and record a new response. This is particularly handy in that you can edit the XML in the request window before resending - so you can use this as a great tool for testing the effects of different XML on SOAP servers.