Copyright © 2002 David M Johnson
Updated: November 2, 2002
Roller is a Weblogger. Roller makes it easy for you to maintain a weblog, even if you are have little or no knowledge of HTML. All you have to do is go to a web site that is running the Roller software, sign up for an account and bam you have a weblog. You can start posting right away. You will need to know a little about HTML if you want to kick it up a notch by customizing the layout of your Weblog and adding new pages to your Weblog website. More on that later.
Please note that Roller is currently beta quality code – not necessarily ready for prime time – there are probably a number of design flaws and an even larger number of bugs. As always with software of all sorts, and especially pre-release software such as this, use at your own risk. If you find a flaw, a bug, or something that you do not like please contribute back to the Roller project be reporting that bug to the Roller development team's JIRA issue tracking system.
To sign-up for a Roller account, go the the main Roller
page and click on the link that reads “register as a new user.” Enter your
login name, your real name, your desired password, your e-mail address, and
pick one of the predefined Weblog themes provided by Roller. There is a
basic theme, which is a very good starting point for those who wish to build
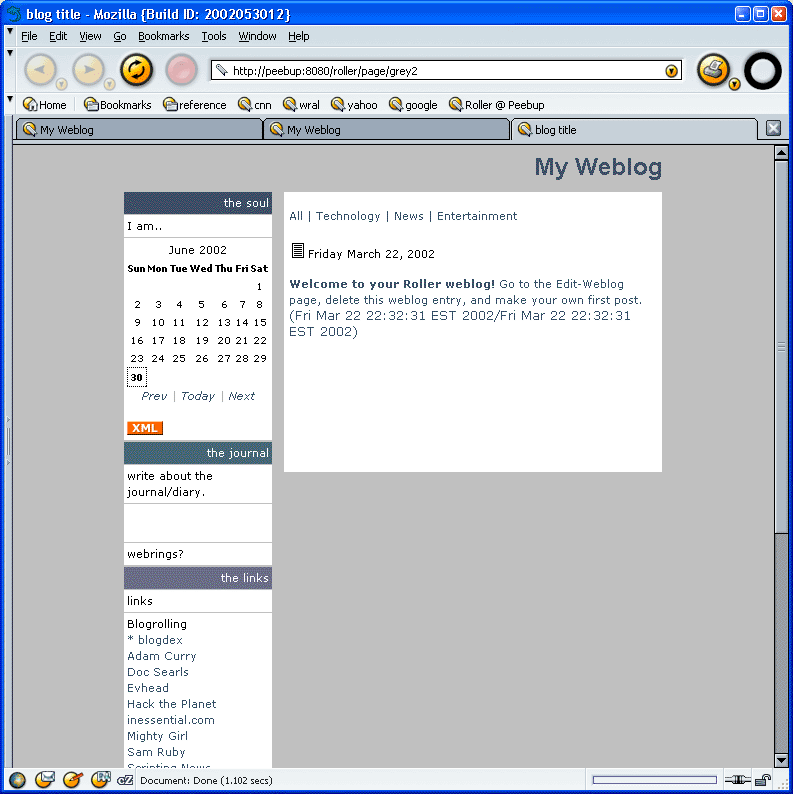
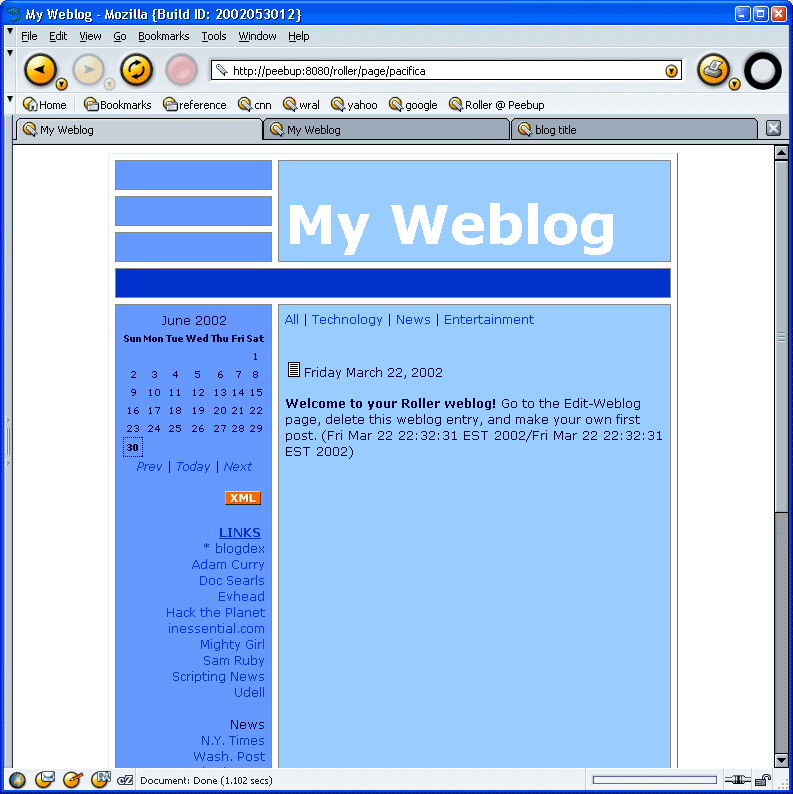
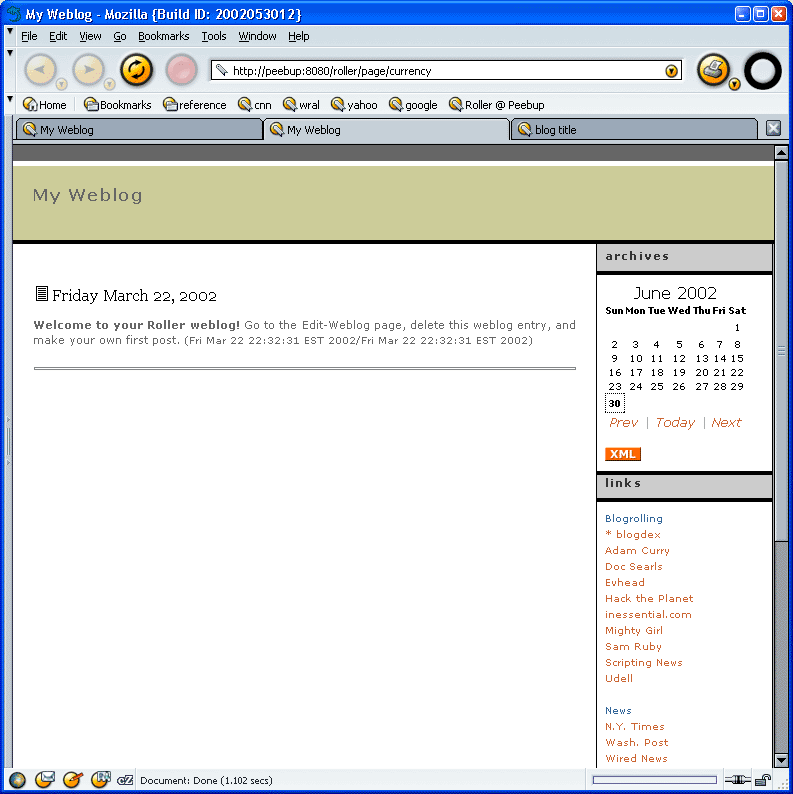
their own themes. And, there are three themes adapted from themes on blogskins.com: these are shown below.
There is also a new XHTML/CSS based theme called x2 that was contributed
by Matt Raible.
|
|
|
|
|
basic |
After your account is created you will be returned to the main Roller page. You will see that your name has been added to the list of Roller users displayed on the main page. If you click on your name in this list, you will be taken to your Weblog page.
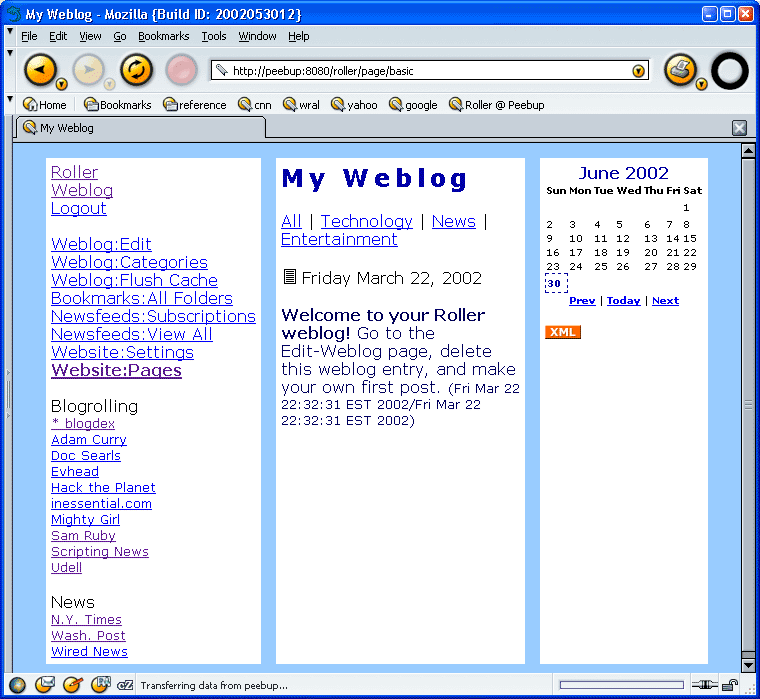
Your initial website will include just one webpage that is visible to your readers and that is named "Weblog". This page will include a navigation bar, a weblog category chooser, a weblog calendar, some links and a weblog area where your posts will appear. The screenshot below shows what your page will look like if you chose the Roller basic theme:
Figure 1: your initial Weblog page, assuming you chose the basic theme
From your Weblog page or from the main Roller page, click the Login link. Enter your username and password, click submit, and you will be taken to your Weblob page again. But this time, you will see some new Links on the page: Weblog:Edit, Weblog:Categories, Weblog:Flush-Cache, Bookmarks, Newsfeeds, and Website. These links lead you to pages for editing your Weblog, categories, bookmarks (AKA links), newsfeeds, and the actual pages that make up your website. First, lets talk about how to edit your Weblog.
Editing your Weblog means adding new Weblog entries to be enjoyed by your readers and editing older Weblog entries to correct mistakes, clarify points, or to censor those drunken ramblings you entered last night.
To add a new Weblog entry you simply go to the Edit-Weblog page, enter
an optional title, enter the Weblog entry, choose a Weblog category. and
hit the Submit button. As soon as you do that, your Weblog entry is posted
to your Weblog for the world to see.
Generally, you will not need to use the Flush Cache link on the Weblog:Edit
page, unless you are using SQL to muck about in the Roller database and you
want to force the cache to reset itself. Normally, as you edit weblog entries,
bookmarks, and other things Roller should automatically reset it's cache
as needed.
Figure 2: the Edit-Weblog page
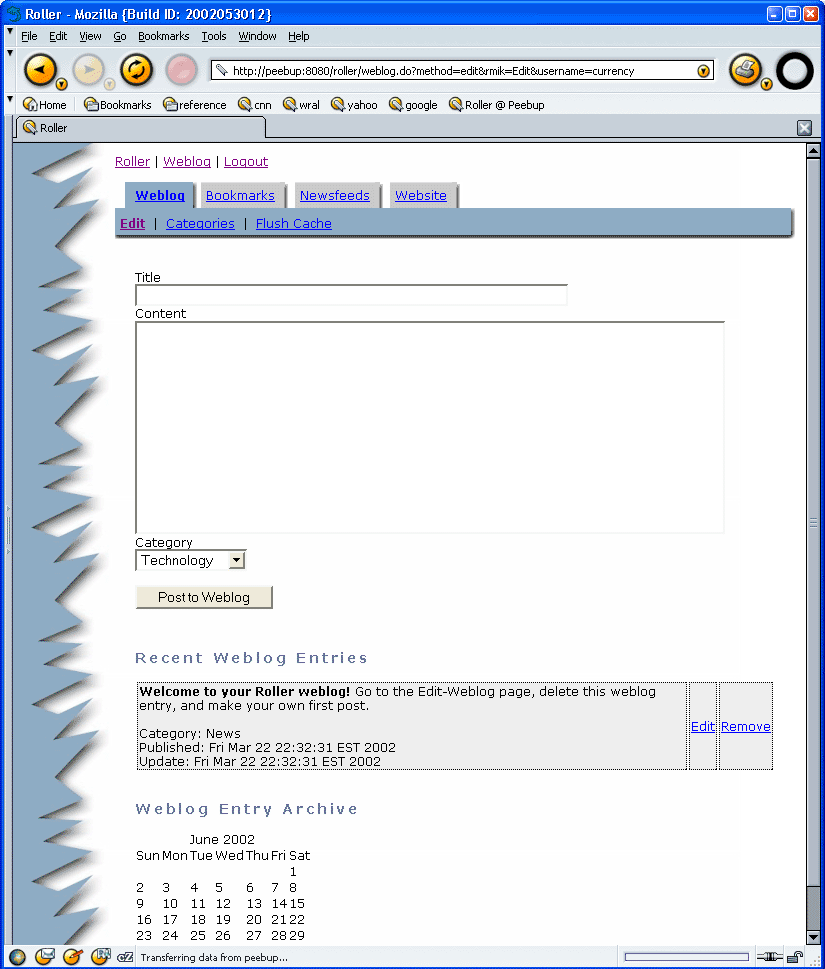
The buttons "Post to Weblog" and "Save as Draft" control whether or not your weblog entry is visible on your weblog's main page. If you click "Post to Weblog", then your entry is visible to your readers. If you click "Save as Draft", then your entry is private.
The text field marked "Pub Time" controls the publish time your your entry. Changing the publish time may change the order of weblog entries displayed on your weblog. When you enter a new publish time, you must use the format dd.MM.yyyy HH:mm:ss
You can edit or remove an old Weblog entry by clicking on the Edit or Remove links in the Recent Weblog Entries part of the page. If the Weblog entry that you want to edit is not so recent and is not shown in the Recent Weblog Entries list, then you can use the Weblog Entry Archive calendar to find that old entry.
Need a SpellCheck screenshot hereIf you would like to Spellcheck your entry, click the "Spell Check" button. This will take you to another page which displays "suspect" words in drop-downs. The Spellchecking software doesn't understand HTML, so any tags used will likely be marked as suspect. To correct any errors, select the proper spelling from the appropriate drop-down. If you'd rather not use the drop-downs, you can edit the text directly in the textbox provided.
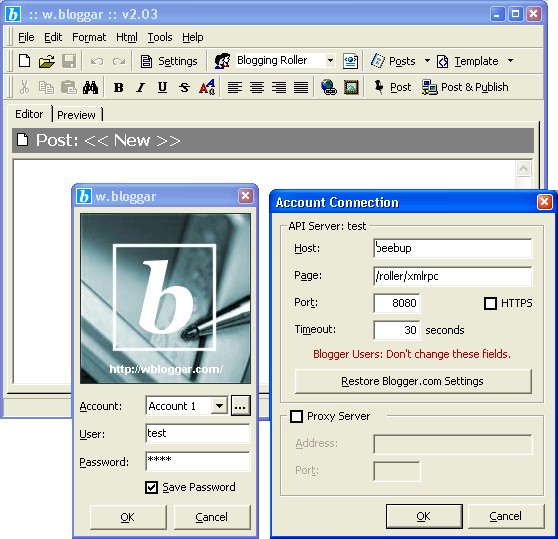
You can use any Blogger API client to post and edit Roller weblog entries. Before you can do this, you must go to the Roller Website:Settings menu and check the box that reads Enable Blogger API for your weblog. You should also pick a category for posts made through the Blogger API. Be aware that one shortcoming of Blogger API based blogging clients titles. The Blogger API does not support weblog entry titles.
Once you have enabled Blogger API support for your weblog, you can use
any Blogger API client to post and edit your Roller weblog. For example,
you could use the w:bloggarclient. Below
is a screenshot of the w:bloggar client. As you can see, you need to configure
w:bloggar by entering your host name, port number, and the path /roller/xmlrpc
into the w:bloggar Account Connection dialog-box. You also need to enter
your Roller username and password in to the w:bloggar login dialog.
You probably already have a web bookmark collection stored in your web browser, so why do you need to enter bookmarks into Roller. Well, most Weblog authors like to include links to their favorite websites and to their favorite Weblogs right on their Weblog page. Roller's bookmark feature makes it easy for you to do this too.
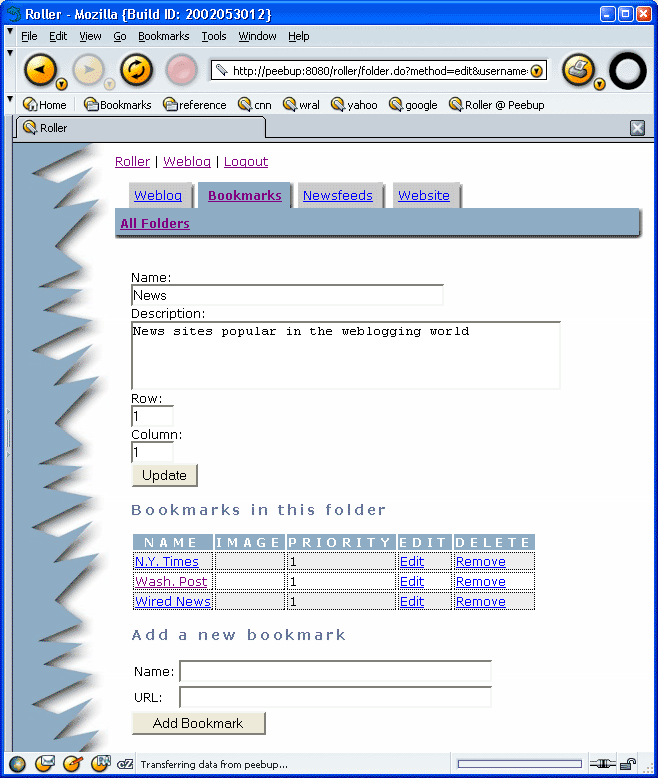
Bookmarks are organized in to named folders. You can define any number of folders and each of these folders can hold any number of bookmarks. There is only one level of folders, so you cannot have a folder that contains other folders.
Your initial website contains two bookmark folders: one named “Blogrolling” that contains Weblogging related links and one named “News” that contains links to well known news sources. If you look at Figure 1 again, you can see that these two folder are displayed on the left side of the Weblog page. You can use Roller's bookmark management features to rename these folders if you wish, or you can delete them add add folders of your own choosing.
Figure 3: the Edit-Bookmark Folders page
Once you have defined one or more bookmark folders, you can start adding bookmarks to those folders. From the Edit-Bookmark Folders page, click the Edit link for the Folder you wish to edit. You will be taken to the Edit-Bookmark Folder page for that folder. From there you can edit the name of the folder and you can add and remove bookmarks in that folder.
Figure 4: the Edit-Bookmark Folder page
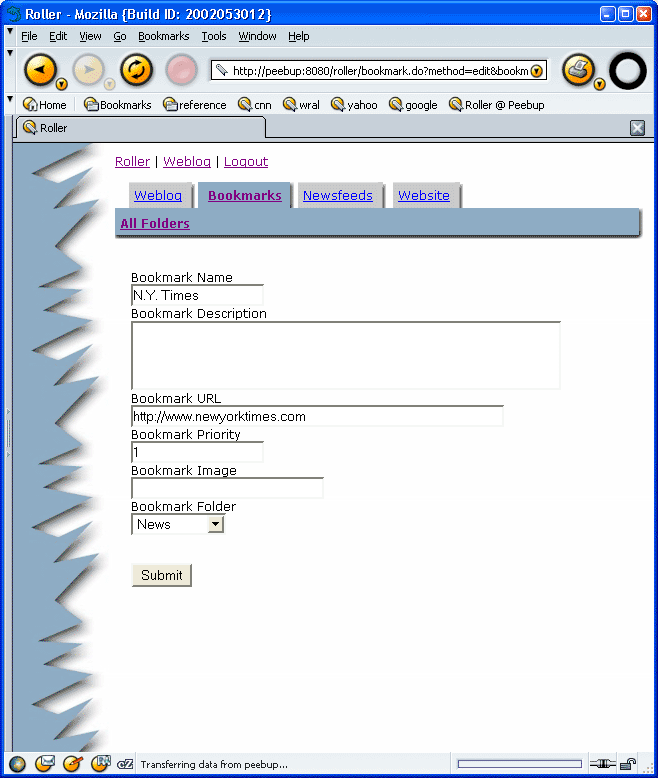
After you use the Edit-Bookmark Folder to add a bookmark, you can edit the Bookmark itself. To edit a bookmark, click on the Edit link in the Edit-Bookmark Folder page. That will take you to the Edit-Bookmark page and from there you can change the name, description and display priority of the bookmark you have chosen to edit. You can also move the bookmark to another folder by changing the Bookmark Folder combo-box.
Figure 5: the Edit-Bookmark page
A newsfeed is a list of news stories and a short desciption of each story that is automically retrieved from some remote website. Newsfeeds are delivered in a format known as Really Simple Syndication or Rich Site Summary or just RSS.
Roller allows you to include newsfeeds on your Weblog page or on a separate page that you create as part of your Weblog's website. Your initial website will include three newsfeeds, but none of these newsfeeds are displayed on your Weblog page. You can use one of the macros that we will discuss later to display your newsfeeds.
Before you include a newsfeed on your website, you should probaby make sure that doing so is OK with the provider of the newsfeed. Some providers might frown upon this and by frown I mean that they might sick a pack of rabid lawyers on your ass. Anyhow, use your own judgement here – I am not a lawyer and I am not responsible for any of your current or future legal troubles.
To add a newsfeed you need a URL to the providers RSS feed. This URL usually ends with the letters “.xml”. Enter the name that you would like to use for the newsfeed, enter the URL and hit enter to add the newsfeed.
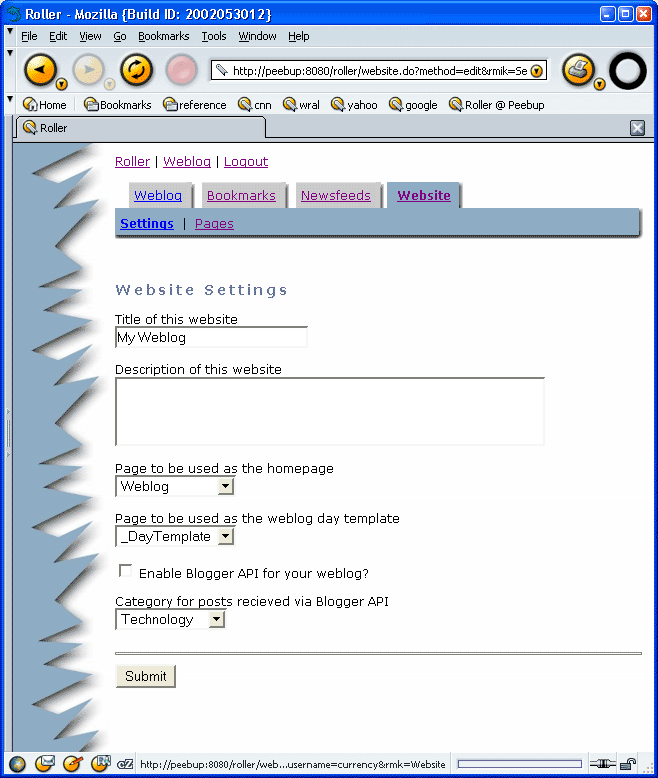
Website title - The title of your website may include HTML, but the HTML will be stripped out in your RSS feed. You can access your title in a page template with the expression $macros.website.title
Website description - The description of your website may include HTML, but the HTML will be stripped out in your RSS feed. You can access your description in a page template with the expression $macros.website.description
Homepage page - Choose a page template to be used as your websites main page.
Day template page - Choose a page template to be used to display weblog entries via the $macros.showWeblogEntries() macro.
Weblog editor page - Choose either the plain old text editor (editor-text.jsp), the Ekit editor applet (editor-ekit.jsp), or the IE only Mitchell editor (editor-dhtml.jsp).
Enable Blogger API - Set to true to enable weblogging via the Blogger API.
Category for Blogger API posts - Choose the category for incoming posts made via the blogger API.
Your Weblog page is defined by a page template. A template is a file with some special "macros" that indicate where Roller is supposed to put your Weblog, Weblog Calendar, and other dynamically created content. A templage can be an HTML file, an HTML fragment, a CSS page, or just about anything else you can enter into Roller as text.
You initial Roller website has three page template, only one of which is visible to users. The pages are named Weblog, _DayTemplate and _css.
The Weblog page is the visible page, it is the HTML template that defines your Weblog. It is a mix of HTML and Roller macros that render the dynamic parts of the page like the Weblog Calendar and the actual Weblog entries.
The _DayTemplate page is the HTML template that defines the entries for each day are formatted in your Weblog page. This is essentially an HTML fragment with some Roller macros for rendering the day's Weblog entries, title, date, and other items.
The _css page is a CSS style-sheet information that is included (using a macro) on your Weblog page.
You can define as many pages as you would like. You must specify which page is to be your Default Page, that is, the page that your readers first see when they visit your website. You must also specify which page is your Weblog day template.
Note that any page whose name begins with the underbar “_” character will not be visible to your readers. That is why the _DayTemplate and _css pages start with underbars, they are used internally and are not meant for public consumption.
Figure 6: the Edit-Website page
If you click on one of the Current Pages in the Edit-Website page, you will be directed to the Edit-Page page so that you can edit that page. You can put anything on a page, but typically you will put HTML with some Roller macros mixed in. Next you will read about the various Roller macros that are available for your use.
The screenshot below shows the Weblog page being edited in the Edit-Page page.
Figure 7: the Edit-Page page

Besides editing your pages directly, you can Preview the other templates and modifications to your weblog page. NOTE: this feature is only good for editing the default page, which must be your weblog page if you want to preview other templates. On the "Change your Weblog Template" page you may select another theme to preview, or edit the template directly.
Macros tell Roller where to place the dynamic parts of your web pages.
Macros use Velocity expressions and
custom JSP tag libraries. For more information on Velocity,
visit the Velocity web site and read the Velocity
User's Guide. Note that
we use the term macro loosely, but it does have a specific meaning in Velocity.
What we call a macro is really a Velocity expression. To learn more about JSP
and tag libraries, visit Sun's JSP site.
Your Day Template page determines how each day of Weblog
entries is formatted on the page by the $macros.showWeblogEntries()
macro. Inside your day template you have access to a $macros object that has some additional
methods. So see the methods available to you via the $macros object in the
day template, please refer to the Javadocs for:
org.roller.presentation.velocity.Macros
org.roller.presentation.weblog.tags.WeblogEntryMacros
Additionally, inside a day template you also have access
to a collection called $entries which is made up of WeblogEntryDataEx objects.
For information on the methods and fields of these objects please refer to:
Here is the weblog page template for the basic theme, shown in figure 1 (macros are shown in blue):
<html>
<head>
<!DOCTYPE html PUBLIC "-//W3C//DTD HTML 4.01 Transitional//EN">
<title>$macros.showWebsiteTitle()</title>
<style type="text/css">$macros.includePage("_css")
</style>
</head>
<body background="/roller/images/bg-greylines.gif">
<table cellpadding="5" cellspacing="15" border="0" align="center" width="95%">
   <tr>
   <td width="20%" valign="top" bgcolor="#ffffff">
      $macros.showNavBar(true)<br>
      $macros.showEditorNavBar(true)<br>
      $macros.showBookmarks("Blogrolling",true)<br>
      $macros.showBookmarks("News",true)
   </td>
   <td width="60%" valign="top" bgcolor="#ffffff">
      <h2>$macros.showWebsiteTitle()</h2>
      $macros.showWeblogCategoryChooser()<br>
      $macros.showWeblogEntries()
   </td>
   <td valign="top" bgcolor="#ffffff" width="20%">
      $macros.showWeblogCalendar()<br>
      $macros.showRSSBadge()
   </td>
   </tr>
</table>
</body>
</html>
Here is the Day Template for the Weblog shown in figure 1:
<table width="95%">
<tr>
   <td>
   $macros.showPermalink()
   $macros.showEntryDate()
   </td>
</tr>
</table>
#foreach( $entry in $entries )
<p>
   <b>$entry.title</b> $entry.text
   <font size="2">($entry.updateTime/$entry.pubTime)</font>
</p>
#end