Jakarta JMeter

About

Download

Documentation

Tutorials (PDF format)

Community


10. Building a WebService Test Plan

In this section, you will learn how to create a Test Plan to test a WebService. You will create five users that send requests to One page. Also, you will tell the users to run their tests twice. So, the total number of requests is (5 users) x (1 requests) x (repeat 2 times) = 10 HTTP requests. To construct the Test Plan, you will use the following elements: Thread Group , WebService(SOAP) Request (Beta Code) , and Graph Results .

General notes on the webservices sampler. The current implementation uses Apache SOAP driver, which requires activation.jar and mail.jar from SUN. Due to license restrictions, JMeter does not include the jar files in the binary distribution.

If the sampler appears to be getting an error from the webservice, double check the SOAP message and make sure the format is correct. In particular, make sure the xmlns attributes are exactly the same as the WSDL. If the xml namespace is different, the webservice will likely return an error. Xmethods contains a list of public webservice for those who want to test their test plan.


10.1 Adding Users

The first step you want to do with every JMeter Test Plan is to add a Thread Group element. The Thread Group tells JMeter the number of users you want to simulate, how often the users should send requests, and the how many requests they should send.

Go ahead and add the ThreadGroup element by first selecting the Test Plan, clicking your right mouse button to get the Add menu, and then select Add --> ThreadGroup.

You should now see the Thread Group element under Test Plan. If you do not see the element, then "expand" the Test Plan tree by clicking on the Test Plan element.

Next, you need to modify the default properties. Select the Thread Group element in the tree, if you have not already selected it. You should now see the Thread Group Control Panel in the right section of the JMeter window (see Figure 10.1 below)


Figure 10.1. Thread Group with Default Values

Start by providing a more descriptive name for our Thread Group. In the name field, enter Jakarta Users.

Next, increase the number of users (called threads) to 10.

In the next field, the Ramp-Up Period, leave the the default value of 0 seconds. This property tells JMeter how long to delay between starting each user. For example, if you enter a Ramp-Up Period of 5 seconds, JMeter will finish starting all of your users by the end of the 5 seconds. So, if we have 5 users and a 5 second Ramp-Up Period, then the delay between starting users would be 1 second (5 users / 5 seconds = 1 user per second). If you set the value to 0, then JMeter will immediately start all of your users.

Finally, clear the checkbox labeled "Forever", and enter a value of 2 in the Loop Count field. This property tells JMeter how many times to repeat your test. If you enter a loop count value of 0, then JMeter will run your test only once. To have JMeter repeatedly run your Test Plan, select the Forever checkbox.

In most applications, you have to manually accept changes you make in a Control Panel. However, in JMeter, the Control Panel automatically accepts your changes as you make them. If you change the name of an element, the tree will be updated with the new text after you leave the Control Panel (for example, when selecting another tree element).

See Figure 10.2 for the completed Jakarta Users Thread Group.


Figure 10.2. Jakarta Users Thread Group


10.2 Adding WebService Requests

In our Test Plan, we will use a .NET webservice. Since you're using the webservice sampler, we won't go into the details of writing a webservice. If you don't know how to write a webservice, google for webservice and familiarize yourself with writing webservices for Java and .NET. It should be noted there is a significant difference between how .NET and Java implement webservices. The topic is too broad to cover in the user manual. Please refer to other sources to get a better idea of the differences.

JMeter sends requests in the order that they appear in the tree.

Start by adding the sampler WebService(SOAP) Request (Beta Code) to the Jakarta Users element (Add --> Sampler --> WebService(SOAP) Request (Beta Code) ). 
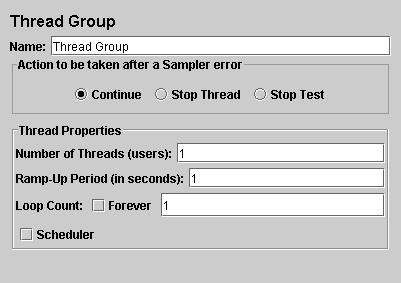
Then, select the webservice Request element in the tree and edit the following properties (see Figure 10.5):

  1. Change the Name field to "WebService(SOAP) Request (Beta Code)".
  2. Enter the WSDL URL and click "Load WSDL".


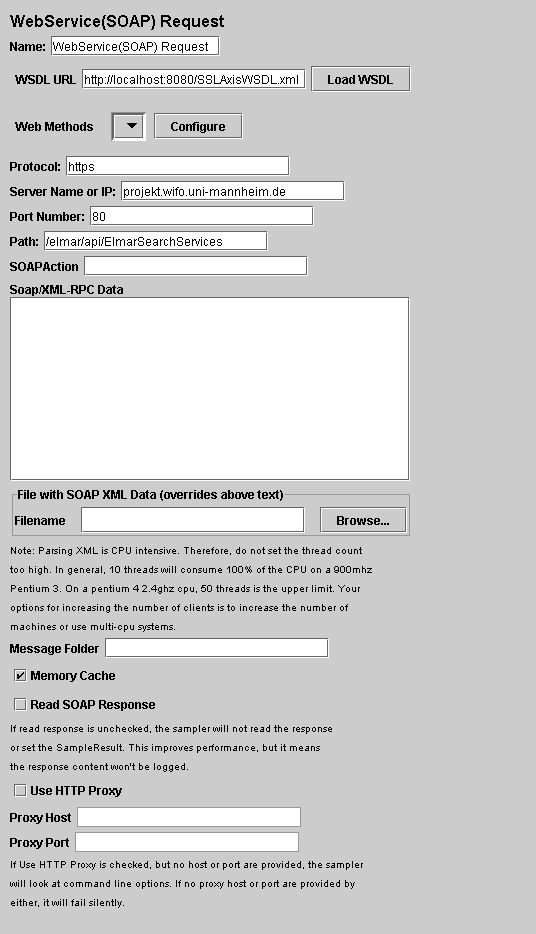
Figure 10.3. Webservice Request

If the WSDL file was loaded correctly, the "Web Methods" drop down should be populated. If the drop down remains blank, it means there was a problem getting the WSDL. You can test the WSDL using a browser that reads XML. For example, if you're testing an IIS webservice the URL will look like this: http://localhost/myWebService/Service.asmx?WSDL. At this point, SOAPAction, URL and SOAP Data should be blank.

Next, select the web method and click "Configure". The sampler should populate the "URL" and "SOAPAction" text fields. Assuming the WSDL is valid, the correct soap action should be entered.

The last step is to paste the SOAP message in the "SOAP/XML-RPC Data" text area. You can optionally save the soap message to a file and browse to the location. For convienance, there is a third option of using a message folder. The sampler will randomly select files from a given folder and use the text for the soap message.

If you do not want JMeter to read the response from the SOAP Webservice, uncheck "Read Soap Responses." If the test plan is intended to stress test a webservice, the box should be unchecked. If the test plan is a functional test, the box should be checked. When "Read Soap Responses" is unchecked, no result will be displayed in view result tree or view results in table.

An important note on the sampler. It will automatically use the proxy host and port passed to JMeter from command line, if those fields in the sampler are left blank. If a sampler has values in the proxy host and port text field, it will use the ones provided by the user. If no host or port are provided and JMeter wasn't started with command line options, the sampler will fail silently. This behavior may not be what users expect.

Note: If you're using Cassini webserver, it does not work correctly and is not a reliable webserver. Cassini is meant to be a simple example and isn't a full blown webserver like IIS. Cassini does not close connections correctly, which causes JMeter to hang or not get the response contents.

Currently, only .NET uses SOAPAction, so it is normal to have a blank SOAPAction for all other webservices. The list includes JWSDP, Weblogic, Axis, The Mind Electric Glue, and gSoap.


10.3 Adding a Listener to View Store the Test Results

The final element you need to add to your Test Plan is a Listener . This element is responsible for storing all of the results of your HTTP requests in a file and presenting a visual model of the data.

Select the Jakarta Users element and add a Graph Results listener (Add --> Listener --> Graph Results). Next, you need to specify a directory and filename of the output file. You can either type it into the filename field, or select the Browse button and browse to a directory and then enter a filename.


Figure 10.7. Graph Results Listener


Copyright © 1999-2009, Apache Software Foundation