|
About
Download
Documentation
Tutorials (PDF format)
Community
|
|
3. Building a Test Plan
|
A test plan describes a series of steps JMeter will execute when run. A complete
test plan will consiste of one or more Thread Groups, logic conrollers, sample generating
controllers, listeners, timers, assertions, and configuration elements.
|
3.1 Adding and Removing Elements
|
Adding
elements to a test plan
can be done by right-clicking on an element in the
tree, and choosing a new element from the "add" list. Alternatively, elements can
be loaded from file and added by choosing the "open" option.
To remove an element, make sure the element is selected, right-click on the element,
and choose the "remove" option.
|
|
|
3.2 Loading and Saving Elements
|
To load an element from file, right click on the existing tree element to which
you want to add the loaded element, and select the "open" option. Choose the file where
your elements are saved. JMeter will load the elements into the tree.
To save tree elements, right click on an element and choose the "save" option.
JMeter will save the element selected, plus all child elements beneath it. In this way,
you can save test tree fragments, individual elements, or the entire test plan.
| The workbench is not automatically saved with the test plan, but it can be saved separately as above.
|
|
|
|
3.3 Configuring Tree Elements
|
Any element in the test tree will present controls in JMeter's right-hand frame. These
controls allow you to configure the behavior of that particular test element. What can be
configured for an element depends on what type of element it is.
| The Test Tree itself can be manipulated by dragging and dropping components around the test tree.
|
|
|
|
3.4 Saving the Test Plan
|
Although it is not required, we recommend that you save the Test Plan to a
file before running it. To save the Test Plan, select Save Test Plan from the
File menu (with the latest release, it is no longer necessary to select the
Test Plan element first).
| JMeter allows you to save the entire Test Plan tree or
only a portion of it. To save only the elements located in a particular "branch"
of the Test Plan tree, select the Test Plan element in the tree from which to start
the "branch", and then click your right mouse button to access the Save As menu item.
Alternatively, select the appropriate Test Plan element and then select Save As from
the Edit menu.
|
|
|
|
3.5 Running a Test Plan
|
To run your test plan, choose "start" from the "run" menu item. To stop your test
plan, choose "stop" from the same menu.
When JMeter is running, it shows a small green box at the right hand end of the section just under the menu bar.
You can also check the "run" menu.
If "start" is disabled, and "stop" is enabled,
then JMeter is running your test plan (or, at least, it thinks it is).
There are two types of stop command:
-
Stop (Control + '.') - stops the threads immediately
-
Shutdown (Control + ',')- requests the threads to stop at the end of any current work
|
|
|
3.6 Scoping Rules
|
The JMeter test tree contains elements that are both hierarchical and ordered. Some elements in the test trees are strictly hierarchical (Listeners, Config Elements, Post-Procesors, Pre-Processors, Assertions, Timers), and some are primarily ordered (controllers, samplers). When you create your test plan, you will create an ordered list of sample request (via Samplers) that represent a set of steps to be executed. These requests are often organized within controllers that are also ordered. Given the following test tree:
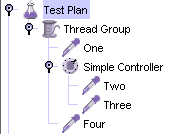
Example test tree
|
The order of requests will be, One, Two, Three, Four.
Some controllers affect the order of their subelements, and you can read about these specific controllers in
the component reference
.
Other elements are hierarchical. An Assertion, for instance, is hierarchical in the test tree.
If its parent is a request, then it is applied to that request. If its
parent is a Controller, then it affects all requests that are descendants of
that Controller. In the following test tree:

Hierarchy example
|
Assertion #1 is applied only to Request One, while Assertion #2 is applied to Requests Two and Three.
Another example, this time using Timers:

complex example
|
In this example, the requests are named to reflect the order in which they will be executed. Timer #1 will apply to Requests Two, Three, and Four (notice how order is irrelevant for hierarchical elements). Assertion #1 will apply only to Request Three. Timer #2 will affect all the requests.
Hopefully these examples make it clear how configuration (hierarchical) elements are applied. If you imagine each Request being passed up the tree branches, to its parent, then to its parent's parent, etc, and each time collecting all the configuration elements of that parent, then you will see how it works.
The Configuration elements Header Manager, Cookie Manager and Authorization manager are
treated differently from the Configuration Default elements.
The settings from the Configuration Default elements are merged into a set of values that the Sampler has access to.
However, the settings from the Managers are not merged.
If more than one Manager is in the scope of a Sampler,
only one Manager is used, but there is currently no way to specify
which
is used.
|
|
|
3.7 Error reporting
|
JMeter reports warnings and errors to the jmeter.log file, as well as some information on the test run itself.
Just occaisionally there may be some errors that JMeter is unable to trap and log; these will appear on the command console.
If a test is not behaving as you expect, please check the log file in case any errors have been reported (e.g. perhaps a syntax error in a function call).
Sampling errors (e.g. HTTP 404 - file not found) are not normally reported in the log file.
Instead these are stored as attributes of the sample result.
The status of a sample result can be seen in the various different Listeners.
|
|
|
|
|