
Setting up Tashi on a cluster
Overview
The process of setting up Tashi on a cluster is a little more involved than setting it up on a single node. I'll try to explain the general process in this document as well as list the specific steps that were necessary to deploy it in my environment.
As a first step, I would recommend that you get the basic environment working first on a single node, as documented here. Once you've got a working node manager environment, it is much easier to deploy. The basic components in a Tashi deployment are:
- Cluster manager
- Scheduler
- Image server
- Set of node managers
- DHCP and DNS server integration (optional)
- MySQL server (optional)
- Frontend node (optional)
A Word About Startup
One of the first steps you'll want to take is to setup a system to automatically deploy Tashi and its dependencies to a set of nodes. This process is beyond the scope of this document, but we use a custom-built PXE booting system to make sure that the nodes, when restarted, are brought up with a new version of Tashi and are ready to go. Another part of this process is getting the node manager running on every machine in the cluster. The nmd program, which is included in the source code, is good for this purpose, but whatever system you use to keep processes alive will work fine.
Config Files
Tashi uses Python's ConfigParser to manage config files. There are many defaults settings in etc/TashiDefaults.cfg If you want to override settings, they can be put in one of several config files. The following folders are searched in this order: ./etc/, /usr/share/tashi/, /etc/tashi/, and ~/.tashi/. A later file may override settings in an earlier file. In each of these folders, the following files are searched, again, in order: TashiDefaults.cfg, Tashi.cfg, ClusterManagerDefaults.cfg, ClusterManager.cfg. For programs other than the cluster manager, the base names of the additional files are NodeManager, Client, and Agent, depending on which program is running. This allows for each program to have its own config files as well as each user and each system. Most of the edits that are necessary can easily be placed into etc/Tashi.cfg.
Setting Up the Cluster Manager, the Scheduler, and the Image Server
The cluster manager is responsible for keeping track of all running VMs and all hosts among other things. The scheduler is in regular contact with the cluster manager to place new VM requests and to notify other systems when a VM has exited. Images can be served out of anything that mounts into a regular file path. In our case, it was expedient and functional to combine all three pieces of this functionality onto one server. Configuring these three pieces together will be one of the most important tasks in setting up Tashi correctly. Some of the most obvious setting that will need to be changed are listed below. In our environment, the node running as the cluster manager is called "merkabah":
[Client]
clusterManagerHost = merkabah

[NodeManagerService]
clusterManagerHost = merkabah

[Vfs]
prefix = /mnt/merkabah/tashi/
The top two options refer to the hostname of the machine running the cluster manager and the last one refers to the mount point out of which all the nodes can see the disk images. In our case, the images will be in /mnt/merkabah/tashi/images/. Just for completeness, I list our entire config file below:
[ClusterManager]
data = tashi.clustermanager.data.LdapOverride

[ClusterManagerService]
allowDecayed = 60.0
allowMismatchedVersions = True

[LdapOverride]
ldapCommand = ldapsearch -x -w AbCdef1G -h 1.2.3.4 -b ou=ABC,dc=abcd,dc=abcd,dc=abc -D cn=abcd,cn=Abcde,dc=abcd,dc=abcd,dc=abc msSFU30LoginShell=* -z 0

[Client]
clusterManagerHost = merkabah

[NodeManagerService]
clusterManagerHost = merkabah
statsInterval = 15.0

[Vfs]
prefix = /mnt/merkabah/tashi/

[Qemu]
useMigrateArgument = True
monitorTimeout = 3600.0
migrateTimeout = 3600.0
statsInterval = 15.0

[handlers]
keys = consoleHandler,publisherHandler,fileHandler

[logger_root]
handlers = consoleHandler,publisherHandler,fileHandler

[Primitive]
densePack = True
DHCP and DNS
Tashi has the ability to integrate with DHCP and DNS in order to insert new entries into both for the management of VMs. The DhcpDns hook in the primitive scheduler performs these operations. In order to isolate the DHCP and DNS keys from regular users, it is advisable to place the information in a separate config file that is only available on the server. We used Agent.cfg, which is contained below:
[DhcpDns]
dnsKeyFile = /root/cluster-admin/scripts/Kmerkabah.+157+36480.private
dnsServer = 172.16.0.5 53
dnsDomain = bigdata.research.intel-research.net
dnsExpire = 60
dhcpServer = 172.16.0.5
dhcpKeyName = merkabah
dhcpSecretKey = ABcdEf12GhIJKLmnOpQrsT==
ipRange999 = 172.16.192.1-172.16.255.254
ipRange1001 = 172.16.1.10-172.16.1.19
reverseDns = True
Most of the options are pretty self-explanatory, but the ipRanges are perhaps not. In our environment, the IPs are actually selected by the Tashi scheduler so that information can be given to the DHCP server. This is done so that a guest can get its host name from the DHCP server at boot time instead of getting a randomly assigned IP and no hostname. Additionally, the number after ipRange (999 in "ipRange999") specifies which network id that the IP range is for.
As a point of reference, the Open Cirrus cluster at ILP uses bind 9.4.2 and ISC's dhcpd 3.0.6. An example command that can be used to generate a DHCP and DNS key and the relevant parts of the config files are below.
Key generation:
root@merkabah:# dnssec-keygen -a HMAC-MD5 -b 128 -n HOST merkabah
/etc/bind/named.conf.local:
key merkabah { algorithm hmac-md5; secret "ABcdEf12GhIJKLmnOpQrsT=="; };

zone "bigdata.research.intel-research.net" {
	type master;
	file "/etc/bind/db.bigdata.research.intel-research.net";
	allow-update { key merkabah; };
};

zone "16.172.in-addr.arpa" {
	type master;
	file "/etc/bind/db.172.16";
	allow-update { key merkabah; };
};
/etc/dhcp3/dhcpd.conf:
use-host-decl-names on;
key merkabah {
    algorithm hmac-md5;
    secret ABcdEf12GhIJKLmnOpQrsT==;
};
omapi-key merkabah;
omapi-port 7911;
Host Networking
Depending on the networking setup that is present in your environment, you may or may not have to support multiple VLANs. If there is only one LAN on which VMs will be placed, the networking will be relatively simple. Start by creating a bridge device that will connect the physical network card with the VMs. In this case, the /etc/network/interfaces file looks like the following:
auto lo
iface lo inet loopback

auto eth0
iface eth0 inet manual
	pre-up brctl addbr vmbr
	pre-up brctl addif vmbr eth0
	pre-up ifconfig eth0 0.0.0.0 up
	post-down ifconfig eth0 down
	post-down brctl delif vmbr eth0
	post-down brctl delbr vmbr

auto vmbr
iface vmbr inet dhcp
If you are using the Qemu backend, the file /etc/qemu-ifup.1 will need to exist on each host running a node manager. The "1" corresponds to network id 1, which is the default unless others are configured at the cluster manager. This file tells Qemu what to do with each virtual TAP device. Again, here's what the file looks like in the environment described above:
#! /bin/bash

/sbin/ifconfig $1 0.0.0.0 up
/usr/sbin/brctl addif vmbr $1
exit 0
This is all that's necessary to have VMs bridge onto the regular network if you only have one untagged VLAN. If, however, your network is a little more complicated, it may look like ours:
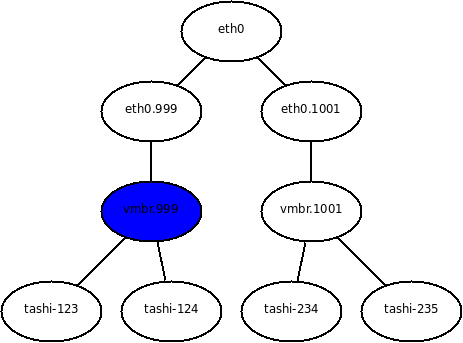
In this environment, vconfig is used to create eth0.999 and eth0.1001 from eth0. Then brctl is used to connect the two untagged network devices to bridge devices that are used to hang VMs on. The /etc/network/interfaces files used is as follows:
auto lo
iface lo inet loopback

auto eth0
iface eth0 inet manual
        pre-up vconfig add eth0 999
        pre-up vconfig add eth0 1001
        pre-up ifconfig eth0 0.0.0.0 up promisc
        post-down ifconfig eth0 down
        post-down vconfig rem eth0.1001
        post-down vconfig rem eth0.999

auto eth0.999
iface eth0.999 inet manual
        pre-up brctl addbr vmbr.999
        pre-up brctl addif vmbr.999 eth0.999
        pre-up ifconfig eth0.999 0.0.0.0 up promisc
        post-down ifconfig eth0.999 down
        post-down brctl delif vmbr.999 eth0.999
        post-down brctl delbr vmbr.999

auto eth0.1001
iface eth0.1001 inet manual
        pre-up brctl addbr vmbr.1001
        pre-up brctl addif vmbr.1001 eth0.1001
        pre-up ifconfig eth0.1001 0.0.0.0 up promisc
        post-down ifconfig eth0.1001 down
        post-down brctl delif vmbr.1001 eth0.1001
        post-down brctl delbr vmbr.1001

auto vmbr.1001
iface vmbr.1001 inet manual
        pre-up ifconfig vmbr.1001 0.0.0.0 up
        post-down ifconfig vmbr.1001 down

auto vmbr.999
iface vmbr.999 inet dhcp
In addition to this, there are two script files, /etc/qemu-ifup.999 and /etc/qemu-ifup.1001 which are the same as the above script except that vmbr.999 and vmbr.1001 are used. In our environment, the host runs DHCP on only vmbr.999 (shown in blue above), which allows the host to appear in the same VLAN as most VMs. This is necessary in order to achieve good guest to host network performance simultaneously from many VMs without having to go back out into the network and through a router.
Deploying a Frontend Node
It may be advisable to setup a node that has Tashi and its dependencies install so that not every user has to maintain an installation. In addition to checking out the code and running "make", you can perform a few simple steps to make using it easier:
- Symlink the code into site-packages ("ln -s `pwd`/src/tashi /usr/lib/python2.5/site-packages")
- Symlink the configuration into /etc ("ln -s `pwd`/etc /etc/tashi")
- Symlink the client executable into /usr/local/bin ("ln -s `pwd`/bin/tashi-client.py /usr/local/bin/tashi")