
This section explains how to load and use NPanday.
After you start the NPanday Build System and it is running, it no longer appears as an option on the Tools menu (and reappears again when Visual Studio is stopped and started). Therefore, if you had previously started the NPanday Build System and it is still running, you do not need to start it again in this step.
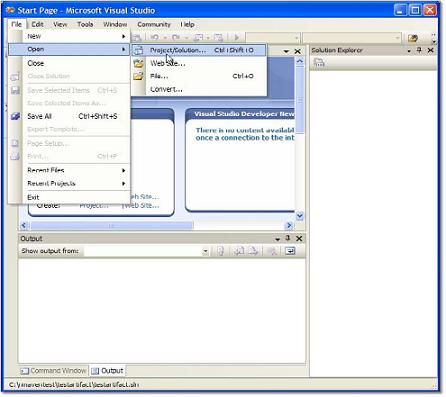
Or select File>Open>Project/Solution to open the Project/Solution. An Open Project window appears, which allows you to browse to find the specific Project/Solution you want to open.
For example, if you created the archetype C# or VB projects in the previous section of this document, from the Open Project window browse to the NPanday.Test directory (created previously) and locate the Project/Solution file (NPanday.Test.sln). Click to select the Project/Solution file, then click on Open to load the Project/Solution.
The *.sln file is located under the directory you created in the previous section of this document. In this sample procedure, you created a directory called npandaytest and the subsequent steps created the Project/Solution files under that directory. To find the *.sln file, you would browse to C:\npandaytest\NPanday.Test and find the file called NPanday.Test.sln.
Upon opening your Project/Solution, you may see a window with the selection Load project normally. Select that option and continue. This window may appear twice, so select Load project normally both times. After you open the Project/Solution, the associated files and directories appear in the Solution Explorer window of Visual Studio.
The goal will begin running, and status information appears in the Visual Studio Output pane. NPanday installs the artifacts in a .NET local repository, located in C:\Documents and Settings\[user_home]\.m2\uac.
For the NPanday.Test solution the artifact is placed here, C:\Documents and Settings\[user_home]\.m2\uac\gac_msil\NPanday.Test\1.0-SNAPSHOT__NPanday\NPanday.Test.dll
The contents in C:\Documents and Settings\[user_home]\.m2\uac\gac_msil SHOULD NOT be manually modified or the project build will fail due to artifacts that are not properly indexed and are not synchronized with the repository. In case the contents have been modified, delete the C:\Documents and Settings\[user_home]\.m2\uac directory then re-install the project.
If the build fails on nunit-console see the Pre-requisites section for information on installing NUnit 2.2+ and adding it to your PATH.
If you notice build errors in the Output pane, it may be because your PATH is not set correctly to find the compiler. The Pre-requisites section explains how to set the PATH correctly.