Lokahi Setup
Before You Start
- If you're using Lokahi to manage a large server farm with multiple versions of Apache, Tomcat, or other web server, we encourage you to determine your naming convention before you begin.
- Make a list of the following in your server farm. (You'll need this information in the sections below.)
- Apache version numbers, $APACHE_HOME, and log directories
- Tomcat Version numbers, $TOMCAT_HOME, container directories, and log directories
- Environment names (e.g. development, test, production)
- Server Farms (e.g. Atlanta intranet, Bangalore DMZ)
- JDKs used (version, vendor), and $JAVA_HOME directories
- hostnames
- cluster names (if your hardware is clustered)
Setting Up Lokahi
After building and installing the software, Lokahi requires some initial objects to be added to the database before you can start configuring and managing web servers and applications.
The following items must be performed through the GUI.
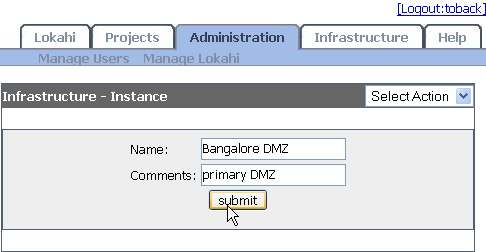
1. Add Instances
The first instance was pre-populated into the database when you built the software (see the build.properties file)
To add more instances, go to Administration tab >> Manage Lokahi >> Manage Instances >> Select Action (menu) >> Add Instance
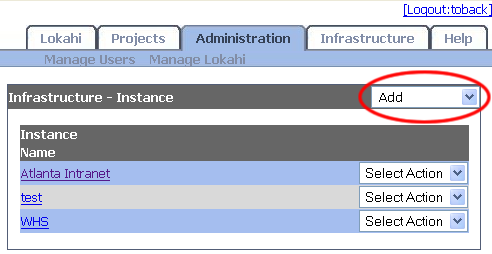
Name your instance, and enter a comment. Both fields are required.
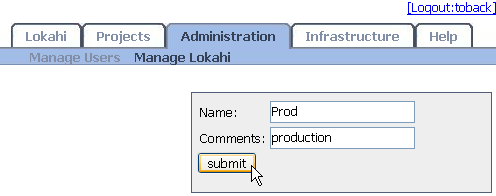
2. Add Environments
Add environments contained within your instance. Go to Administration tab >> Manage Lokahi >> Manage Environments >> Select Action (menu) >> Add Environment
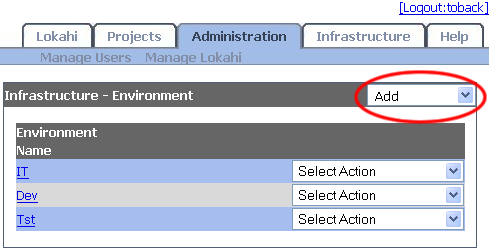
Name your instance, and enter a comment. Both fields are required.
By now you have at least one instance, and at least one environment to which you can add servers.
3. Add Servers
3.1 Add Apache head-matter file
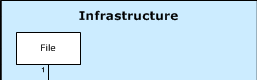
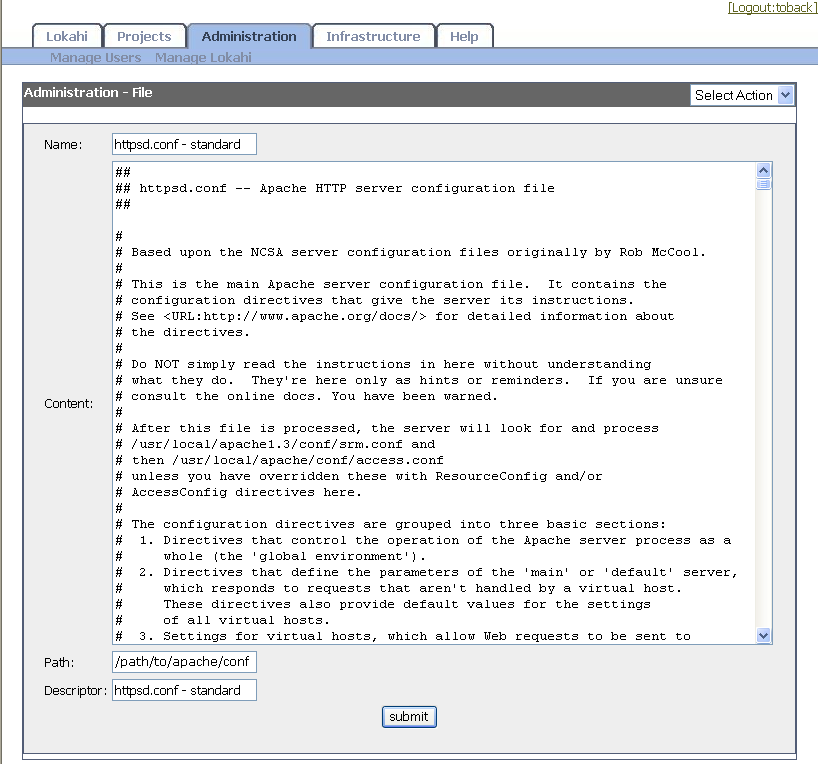
Click: Administration >> Manage Lokahi >> Manage Files >> Select Action (menu) >> Add
The ApacheWorkers and ApachePools will be based on the head matter files you're creating here. Give the file a name that denotes its use in your infrastructure, perhaps specifying whether it is your standard configuration, or how its module list deviates from your usual standard.
For example, if you have an instance of Apache in your server farm that does not include mod_speling, create a separate file using that head-matter.
In the Content field, paste in the head matter of your httpsd.conf file, excluding VirtualHosts, Listens, and catchalls. Enter a name for the file you're adding in the Name and Descriptor fields. In the Path field, add the path to where the apache conf directory is located on your servers.
3.2 Create Apache server template
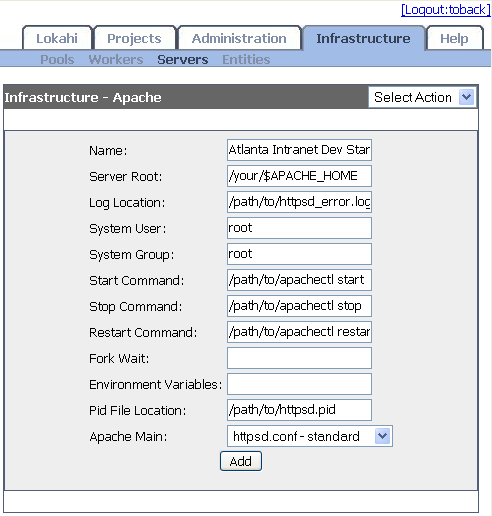
Click: Infrastructure >> Servers >> View Apaches >> Select Action (menu) >> Add
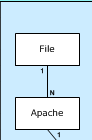
An Apache server template is a combination of an httpsd.conf File, and the directories associated with how you've installed Apache on your machine. To create an Apache server in Lokahi, you'll choose one of the httpsd.conf Files you created in the last section, and add to it all the information about how Apache is configured on your machine.
Name: whatever makes sense to you.
ServerRoot: path to $APACHE_HOME
Log Location: /your/path/to/httpsd_error.log
System User:
System Group:
Start Command: /your/path/to/apachectl start
Stop Command: /your/path/to/apachectl stop
Restart Command: /your/path/to/apachectl restart
Fork Wait: number of seconds for monitoring to wait before starting to monitor the process
Environment Variables: enter them if you use them, otherwise leave blank
Pid File Location: /path/to/httpsd.pid
Apache Main: choose one of the files you created in previous sections.
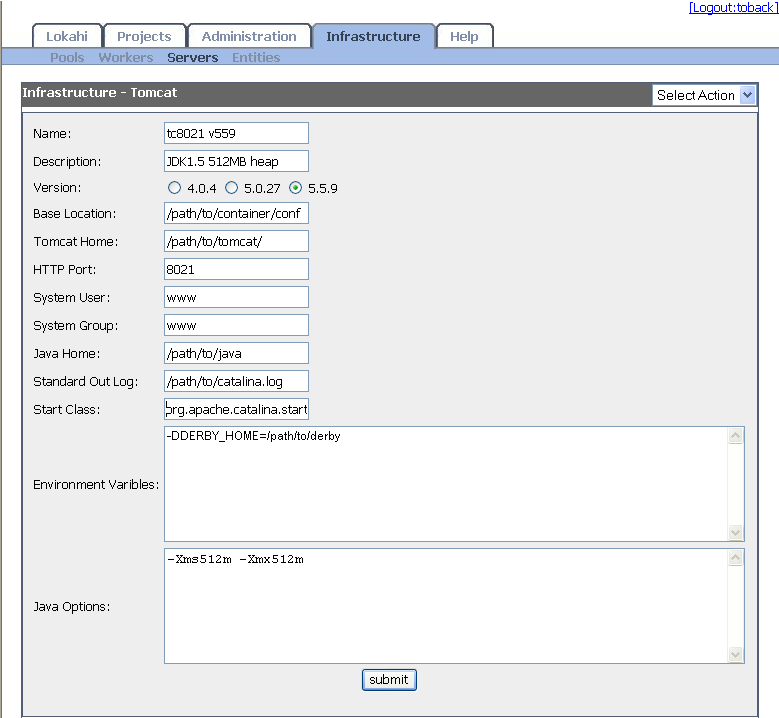
3.3 Add Tomcat Server template

Infrastructure >> Servers >> View Tomcat >> Select Action (menu) >> Add
Name: whatever works for you.
Description: A good place to note JDK version, heap size, or other short note.
Version: Choose one.
Base Location: /path/to/container/conf/
Tomcat Home: /path/to/$TOMCAT_HOME/
HTTP Port: 1 < # > 63000
System User:
System Group:
Java Home:
Standard Out Log: /path/to/catalina.log
Start Class: org.apache.catalina.startup.Boostrap
Environment Variables:
Java Options:
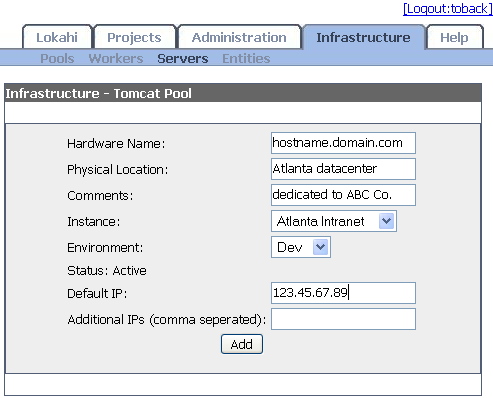
3.4 Add Hardwares

Click: Infrastructure >> Servers >> View Hardware >> Select Action (menu) >> Add
Hardware Name: enter the server's hostname on your network
Physical Location: enter anything you need to keep track of your machine
Comments: space for a short note
Instance: choose which instance the machine is part of
Environment: choose which environment the machine is part of
Status: defaults to "Active" when adding a new machine, but can be updated to "Inactive" if you need to take the server out of the pool.
Default IP: the default IP for this hostname returned by an nslookup
Additional IPs: any other IPs added to the machine. Comma-separated. The Default and Additional IPs are used to populate the list of addresses that Apache can listen on.
TIP: If you're adding an IP to an existing Hardware, make sure the IP has been physically added to the machine before adding it to the Hardware record in Lokahi. (You'll crash Apache if you tell it to listen on an IP that doesn't exist on the machine.)
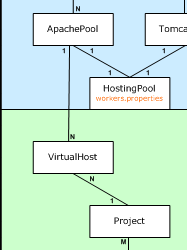
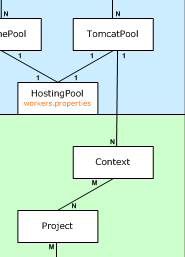
4 Create Pools out of Servers
4.1 Create Apache Pool
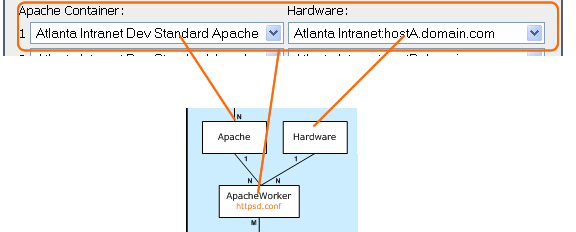
Click: Infrastructure >> Pools >> Select One >> Add Apache Pool
First click the "Add another Apache Worker" link to display a row for each machine in your pool.
x number of machines in your pool
Pool Name: name it. In the illustration below, we used the name of our hardware pool and the word "Apache" but you can put in anything you want
Environment: choose an environment
Apache Container: choose which Apache server configuration will be on this pool
Hardware: choose the hostnames that make up this pool.
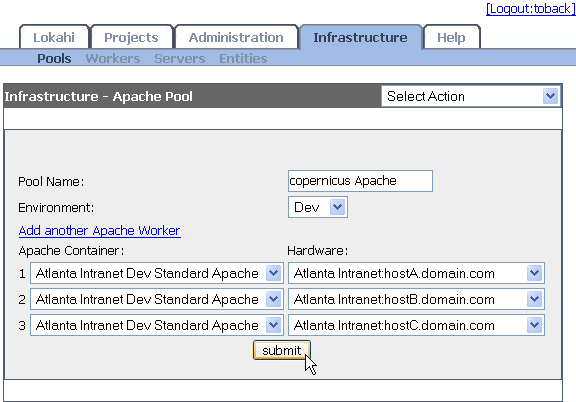
Each row is one ApacheWorker.
4.2 create tomcat pool
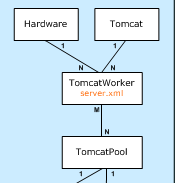
Click: Infrastructure >> Pools >> Select One >> Add Tomcat Pool
First click the "Add another Tomcat Worker" link to display a row for each machine in your pool.
x number of machines in your pool
Name: name your TomcatPool
Environment: choose an environment
Tomcat Container: choose which Tomcat server configuration will be use to create this JVM pool.
Hardware: choose the hostnames that make up this pool.
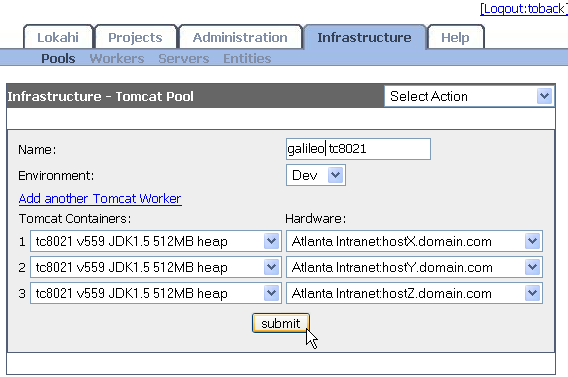
Each row is one Tomcat Worker.

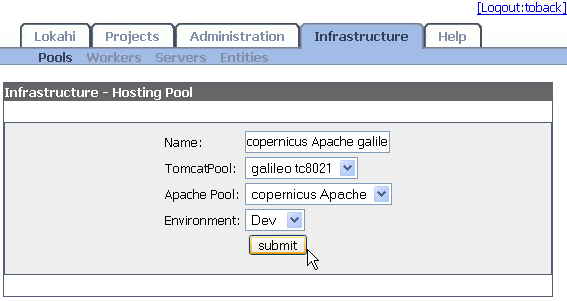
4.3 Create Hosting Pool
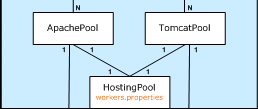
Click: Infrastructure >> Pools >> Select One >> Add Hosting Pool
Name: add the name for your HostingPool. (This example just concatenates the name of the TomcatPool after the name of the ApachePool, but you can name your HostingPools however you want.)
TomcatPool: choose the TomcatPool that you want to associate with this HostingPool
ApachePool: choose the ApachePool that you want to associate with this HostingPool
Environment: choose the Environment that this HostingPool is in.
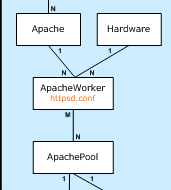
Hopefully by now you're beginning to understand how Servers relate to Workers, which relate to Pools, which relate to Pools of Pools. And you've probably also gotten ideas on how to set up a useful naming convention for your server farm.
Now it's time to set up an application.
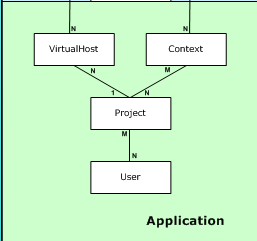
5. Set Up a Web Application
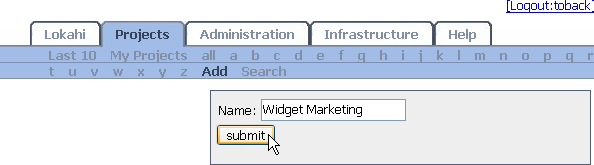
5.1 Create Project
Click: Projects >> Add and enter the name of your project.
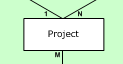
You can name your project anything you want. Projects can contain multiple applications, so you can keep the VirtualHost and Contexts for a development, test, and production application all together in one project, if that's how you choose to organize it.
5.2 Add Virtual Host
Click: Projects >> Search >> [enter
- Select a HostingPool from the menu.
- In the ServerName field, enter a domain name.
- In the Entry field, add Apache directives for the web application, one per line.
- Click submit. Lokahi will generate the VirtualHost entry, insert it into the database, build the apache httpsd.conf file (and the jvm.conf and server.xml files if you added a context), and deploy it to the hardware you added.
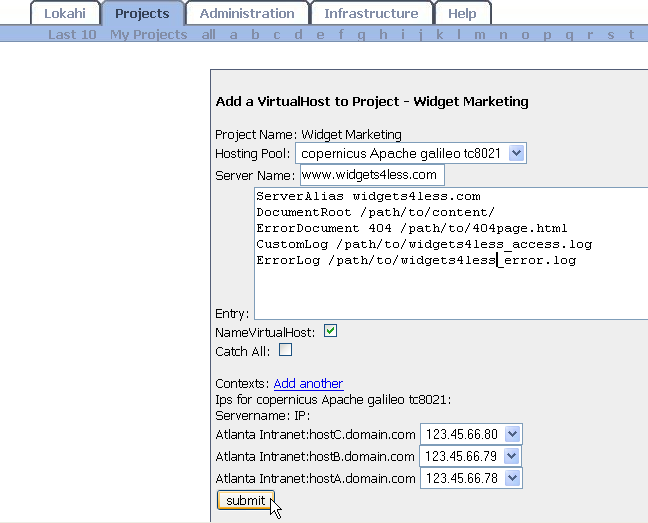
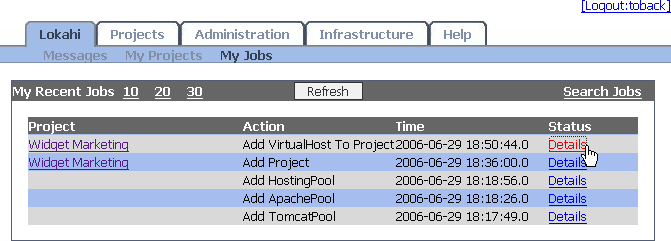
Make sure to click the Details link to view the progress of your job. If there are any syntax errors in your VirtualHost, the configtest will fail and the syntax error will be displayed on screen.
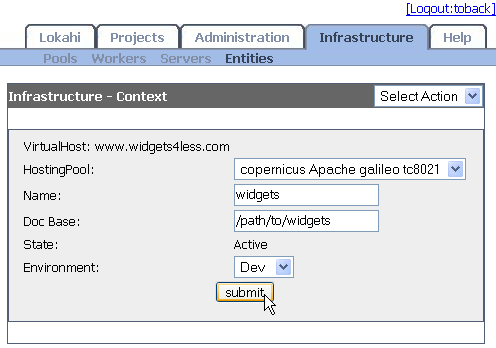
5.3 Add Context
- Click: Projects >> Search to locate the project to which you want to add a context
You can add a context to a VirtualHost by choosing "Add a Context" from the VirtualHosts's menu. - Click Select Action (menu) >> Add a Context from the VirtualHost's menu.
- Enter the context name and the DocBase path.
HostingPool: Choose a HostingPool that contains:
a. the TomcatPool in which you want to run your context
b. the ApachePool containing your VirtualHost.
Lokahi supports remote workers with mod_jk. If you want to run your Apache and Tomcat on different servers, it's as simple as combining any ApachePool and any TomcatPool into a new HostingPool. Lokahi generates the appropriate entries in the ApachePool's workers.properties files when a HostingPool is created. Notice that the machines in the "copernicus Apache" ApachePool are not the same as those in the "galileo tc8021" TomcatPool.
Name: Name your context
Doc Base: specify its DocBase path -- the name and DocBase will be populated into the Tomcat container's server.xml file.

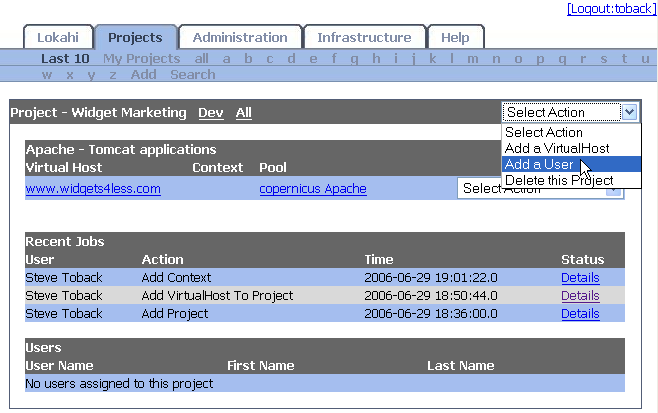
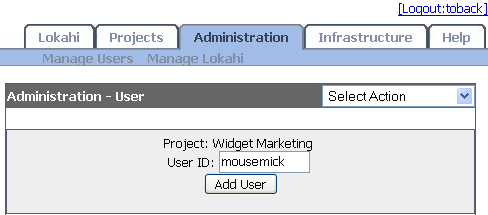
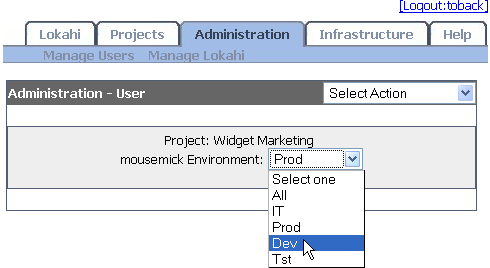
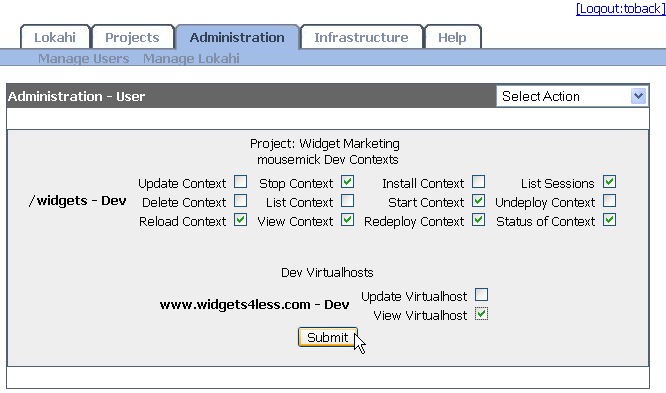
5.4 Add User
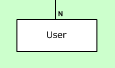
First add a user to the system.
Click: Administration >> Manage Users >> Add User

Then add the user to the project.
Click:
- Enter the user ID.
- Choose the environment(s) in which to grant the user permissions.
- Check off the options you want to grant to the user. The boxes checked below give the user read-only access to their VirtualHost and Context configurations.