Title: Reverse Engineer Database
Reverse Engineer Database
Start Reverse Engineering. To reverse engineer a database you need to select either a DataDomain or one of its children on the project tree. Then select "Tools > Reengineer Database Schema" from the menu. "Connect to Database" dialog will be presented.
 | Reverse-engineering behavior is sensitive to the current project tree selection. If you selected a DataDomain or a DataNode, a new DataMap will be created and all reengineered tables will be put in this DataMap. If you had an existing DataMap (or one of its entities) selected when you started reverse engineering, new tables will be merged into the existing DataMap. |
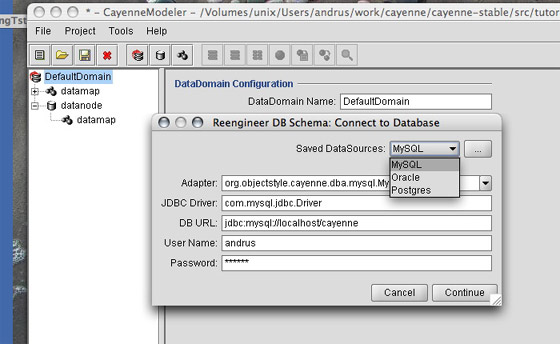
Configure Database Connection. "Connect to Database" dialog allows to specify alternative connection parameters. If a DataNode was selected when reverse engineering started, its connection information is shown by default. You can use suggested default connection, select one of the stored local DataSources from "Saved DataSources" dropdown (those can be edited on the spot by clicking "..." button), or type your own info. When desired connection is selected, click "Continue". Cayenne will attempt to connect to the database and if connection is successful, "Select Options" dialog is presented.

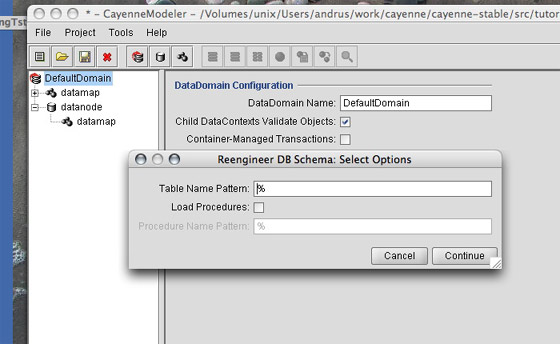
Configure Options. "Select Options" dialog allows to specify what needs to be reverse engineered. If a database supports schemas, one of the listed schemas should be selected. Table and stored procedure patterns allow to control which tables/procedures are included in reverse engineering. Patterns should be in the format used by SQL LIKE clause (e.g. "ABC", "ABC%" or" %" or "A%T", etc.).
After desired options are selected, click "Continue". Progress dialog will open. It will close automatically when reverse-engineering is done. After that all database tables and stored procedures that matched selected criteria will be added to the DataMap. Default ObjEntity mapping will be created as well.


